PLANERGY’s AP Automation automates invoice processing, verification, and authorization using optical character recognition (OCR), AI, and machine learning.
The Accounts Payable section allows you to create a centralized and streamlined accounts payable process ensuring faster reconciliation than manual systems for reporting, analyzing, and reconciling across all entities to have real-time consolidated spend visibility.
It also enables you to capture early payment discounts and avoid late payment penalties, thus boosting efficiency and accuracy in your accounts payable workflows.
The AP automation feature combines with the existing accounts payable workflow in PLANERGY. The standard 2-way or 3-way matching process works the same way as before with all the checks in place to ensure only correct invoices are paid.
The sections in the Accounts Payable module are:
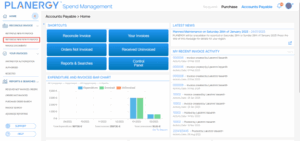
Home
The main dashboard for the Accounts Payable Module.
For more information about the home page and how to customize it you can read the article about the Accounts Payable Home Page.
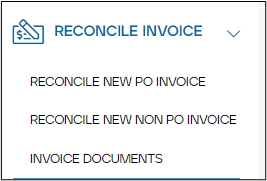
Reconcile Invoices
In this section, you have the options available to you for reconciling invoices.
There are three subsections under Reconcile Invoices:
- Reconcile New PO Invoice – This section allows you to manually reconcile the invoices that have purchase orders associated with them.
- Reconcile New Non-PO Invoice – This section allows you to manually reconcile invoices that have no purchase orders associated with them.
- Invoice Documents – This section allows you to scan or upload the invoice documents to be stored in your account so that they are ready to be matched, authorized, and processed for payment.
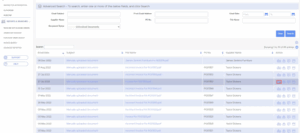
How to Reconcile Invoices in Invoice Documents
To reconcile the invoices in the Invoice Document section, follow the steps below.
- On the Accounts Payable > Invoice Documents page, press the Reconcile icon in the row of the invoice you wish to reconcile.
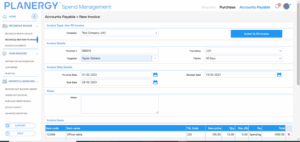
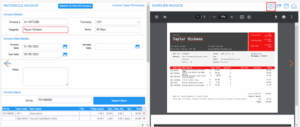
The RECONCILE INVOICE page is displayed.
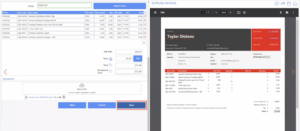
The RECONCILE INVOICE page provides you with a side-by-side view of the invoice document and the purchase order.
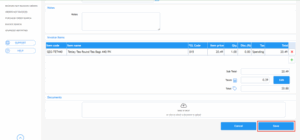
- Review the items to be processed on the invoice.
- Press Save.
The invoice is reconciled and ready to be authorized for payment.
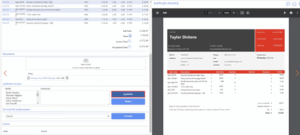
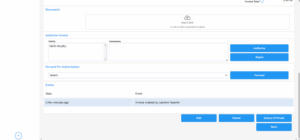
If you have the user permission to authorize/reject the reconciled invoice for payment, press Authorize/Reject; else, you can send it to be authorized by pressing Forward.
The invoice is reconciled and saved.
Note: You can change the document view to review the reconciliation of the invoice document/invoice with the purchase order. For more information, refer to the following sections:
- Change View of Documents
- Invoice Matched Using AP Automation
- Add a Comment While Reconciling
How to Reconcile a New Non PO Invoice Manually
To manually reconcile invoices that have no purchase orders associated, follow the steps below.
- On the left navigation panel, press RECONCILE INVOICE > RECONCILE NEW NON PO INVOICE.
The Accounts Payable > New Invoice page is displayed.
- Select the company from the Company dropdown list.
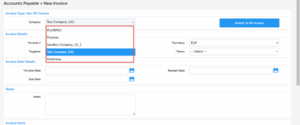
- In the Invoice Details, Invoice Date Details, and Notes, all the fields with an asterisk (*) are mandatory. Enter the fields with the required data. For more information on the fields, refer to the How to Reconcile New PO Invoice Manually.

- Enter the details required in the Invoice Items table such as Item code, Item name, GL Code (general ledger code), Item price, Qty (quantity), Disc (%) (percentage of discount), and Tax.
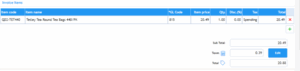
- Press Save.
The Invoice successfully saved notification is displayed.
Note:
- On the Accounts Payable > View Invoice page, you can authorize/reject the invoice if you have the user permission to do so; else, you can send it to be authorized by pressing Forward.
- To edit the invoice, press the Edit button and make the necessary changes.
- To delete the invoice, press Delete and confirm the deletion.
- If the Non PO invoice budget setting is enabled on your account, the system will allocate the invoice amount as an expense to the selected Department, Cost Code, and GL Code upon invoice approval. Please reach out to our support team to enable the invoice budget setting on your account.
Add a Comment While Reconciling
To add any information or comment while reconciling the invoices in the invoice documents, follow the steps below.
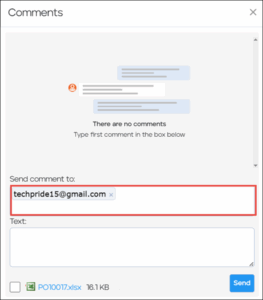
- On the RECONCILE INVOICE page, press the Comment icon.
The Comments dialog is displayed.
- Press Click to send a comment up to 300 characters long.
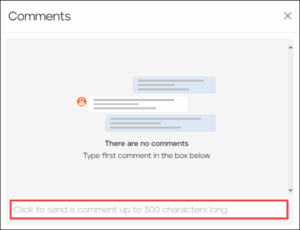
The Send comment to and Text fields are displayed.
- Enter the email address that you wish to send the comment to in the Send comment to field.
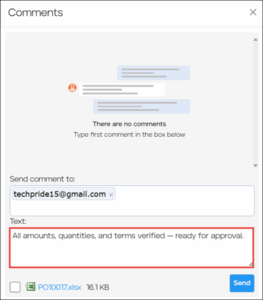
- Enter the required information or comment in the Text field.
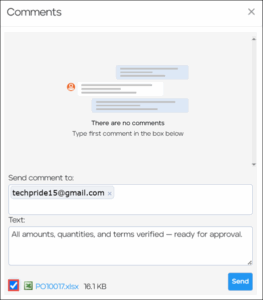
- Check the box beside the attached invoice document (if needed) to link it to your comment.
- Click Send.
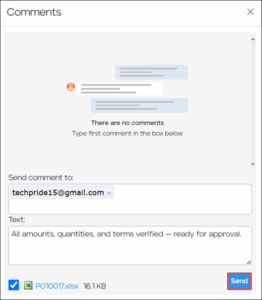
The comment is added and displayed under the Comments section.
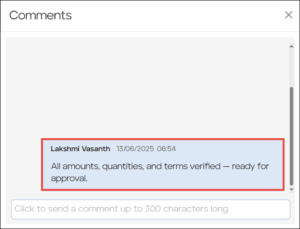
You can add multiple comments as needed similarly.
Note: The most recent comment appears in the Latest Comment column of the Invoice Documents table located on the Accounts Payable > Invoice Documents page, enabling streamlined tracking and review.

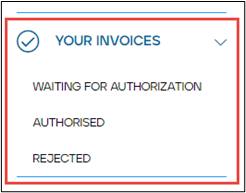
Your Invoices
You can access all the invoices that have the status as waiting for authorization/authorized/rejected from you and the invoices that you have forwarded to be authorized and have the status as waiting for authorization/authorized/rejected.
Reports & Searches
The Reports & Searches section allows you to easily access all purchase orders that are outstanding, invoices, or reports in the system using the search functionality by combining as many search fields as required to narrow down the results.
This section is classified into the following subsections.
-
- Received Not Invoiced Orders – These are outstanding purchase orders that are not fully invoiced but are marked as delivered.
- Orders Not Invoices – These are purchase orders that are not invoiced. The order may or may not be delivered.
- Purchase Order Search – These are all the purchase orders in the system that includes requisitions and canceled orders.
- Invoice Search – These are all the invoices in the system that you have permission to view.
- Advance Reporting – This section allows you to view the various graphs, create custom reports, schedule reports, etc.
