Starting out as a new user of a new software can be daunting.
This guide aims to explain common key actions you will likely need to carry out when using PLANERGY.
Depending on your role or user permissions not all the sections will be relevant to you. But it should serve as a good starting point when starting to use PLANERGY.
The following sections are covered:
- Accessing PLANERGY for the First Time
- How To Configure Your User Setup
- How to Create a Purchase Order
- How to Approve Orders Waiting for Your Approval
- How to Request a New Vendor
- How to Reconcile Delivery
- How to Process an Invoice
Accessing PLANERGY for the First Time
New users are notified by email with a welcome email. To access PLANERGY you can follow these steps.
- Open the welcome email.

- Click Click Here To Set Password.

The Setup Password page opens.

- Fill in your email address, your password, and a confirmation of your password. Then press Confirm and Log In.

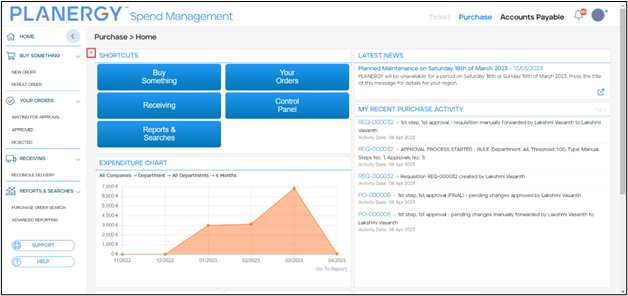
The Purchase > Home page opens.
Resetting Your PLANERGY Password
If for some reason the welcome email does not work as expected or you later forget your password, you can manually reset your password from the Log In page.
Note
- Press Forgot Your Password?.

The Reset Your Password page opens.

- Enter your email in the Email field and press Reset Password.

A confirmation will appear on screen and an email will have been sent to your email address.

- When you receive the email, open it and press Click Here To Reset Your Password.

The Reset Password page opens.

- Enter your email address, your password, and a confirmation of your password. Then press Confirm and Log In.

The Purchase > Home page opens.
How To Configure Your User Setup
There are a number of configurable options in your PLANERGY user profile.
When starting out using PLANERGY you should start by configuring these settings.
Customize Your Home Page Dashboard
You can customize your Purchase > Home page dashboard based on your own needs. You can:
- Add a Panel
- Resize a Panel
- Reposition a Panel
- Remove a Panel
- Restore the Dashboard to the Default Settings
You can add a maximum of 8 panels at a time to the Purchase Home page. For a more detailed explanation of the various available panels please review Home Page Dashboard Panels.
Note
Add a Panel
To add a new panel to the dashboard, follow the steps below.
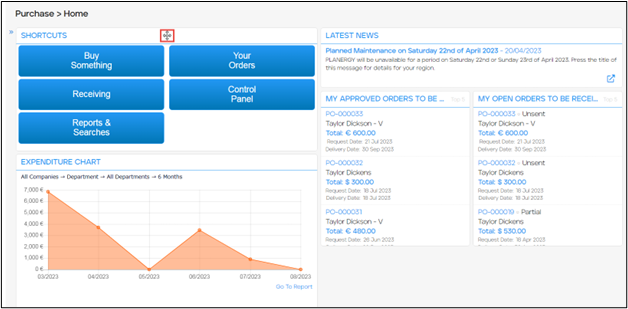
- On the Purchase > Home page, press the Add New Panel icon.
The list of available panels is displayed.
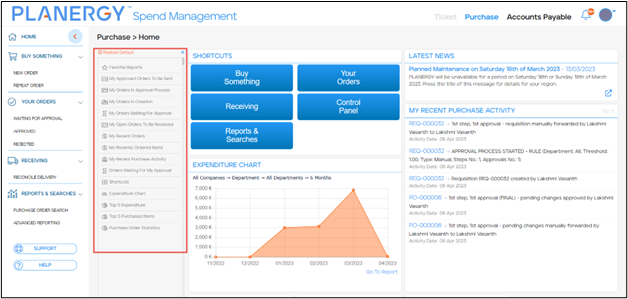
- When your mouse hovers over the list of panels the Move icon is displayed.Press and hold the panel you wish to add, and then drag and drop it to the dashboard.
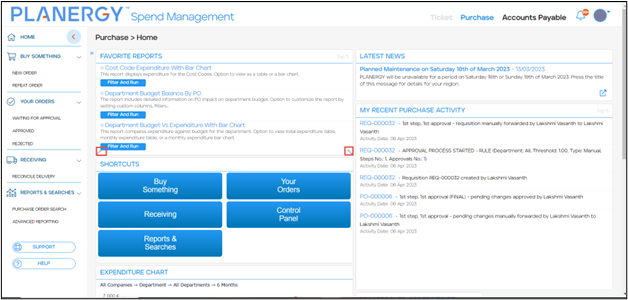
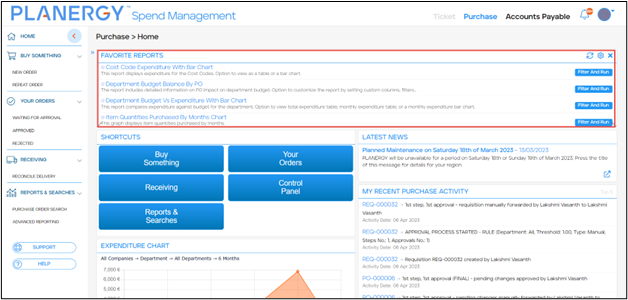
In the following example, we have added the Favorite Reports panel.

- When you have finished adding panels press the Close Panel icon to hide the list of panels.
Resize a Panel
You can resize individual panels to maximize the use of the space on your dashboard.
To resize a panel, follow the steps below.
- On the Purchase > Home page, , hover your mouse over the panel you want to resize.The Resize icons are displayed in the bottom corners of the panel.
- To reduce/increase the size of the panel, press and hold one of the Resize icons and drag the panel to the size as needed.The panel is resized.
Reposition a Panel
You can drag and drop panels anywhere on the dashboard to rearrange it as needed.
To reposition a panel, follow the steps below.
- On the Purchase > Home page, mouse over the panel you want to reposition.The Move Panel icon is visible when you move the cursor on the top part of the panel.
- To move the panel, press the icon down and drag the panel to the space you wish to move it to.The panel is repositioned.

Remove a Panel
To remove a panel, follow the steps below.
-
- On the Purchase > Home page, hover the mouse over the top of the panel you want to remove.The Close icon is displayed.

- Press the Close icon.The panel is removed.

- On the Purchase > Home page, hover the mouse over the top of the panel you want to remove.The Close icon is displayed.
Restore the Dashboard to the Default Settings
At any time you can set the panels back to the default settings. To restore the default dashboard settings, follow the steps below.
-
-
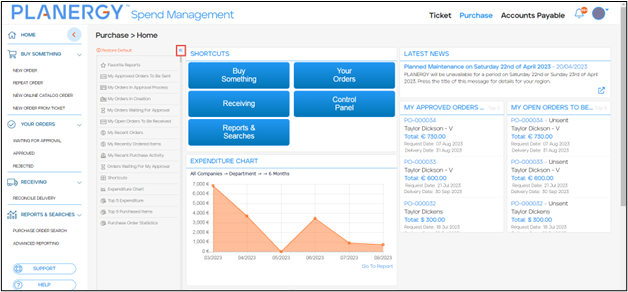
- Press Restore to Default at the top of the list of panels.

The Restore Default dialog is displayed.
- Press Restore Default.

The dashboard will be set back to the default settings.
- Press Restore to Default at the top of the list of panels.
-
PunchOut Delivery Address
You must add a Ship to Address to your user profile to create PunchOut orders.
Note
To set a Ship to Address for your user profile, follow the steps below.
-
-
- On the Home page, press the Profile icon.

The Profile menu is displayed.
- Press User Settings.

The Edit User Settings page is displayed.
- Scroll down to the PunchOut Ship To Address.

- You can select a location already added to the account by pressing the arrow icon to the right of the Street field.

The Locations dialog is displayed.
- Select the desired location to assign it to your user.

The selected location is auto-populated in the PunchOut Ship To Address section.
Note
The list of locations available to you will be restricted based on your user permissions. If you do not see the location you expect to assign, then you should contact your account administrator to request the additional permissions are added to your user. - Scroll down the Edit User Settings page and press Save.

The success notification is displayed.

- On the Home page, press the Profile icon.
-
Notifications
You can configure how you receive notifications in PLANERGY in the Notification Settings.
To access and update these settings, follow the steps below.
-
-
- On the Home page press the Notifications bell icon.

The Notifications section displays.
- Press the 3 dots.

The Notifications menu displays.
- Press Notification Settings.

The Notification Settings page displays.
- Configure how you want to receive different types of notifications from PLANERGY and press Save.
- On the Home page press the Notifications bell icon.
-
How to Create a Purchase Order
There are a number of ways to create a purchase order in PLANERGY. The options available to you will depend on your user permissions and the configuration of your PLANERGY account.
The possible available options are:
Note
Create a New Order
You can create a new purchase requisition by following the steps below.
-
-
- On the Purchase > Home page, press Buy Something > New Order.
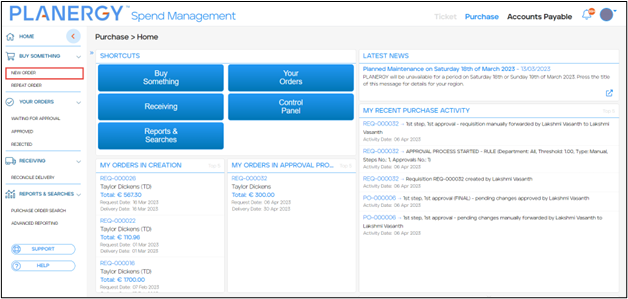
The Purchase > New Order page is displayed.
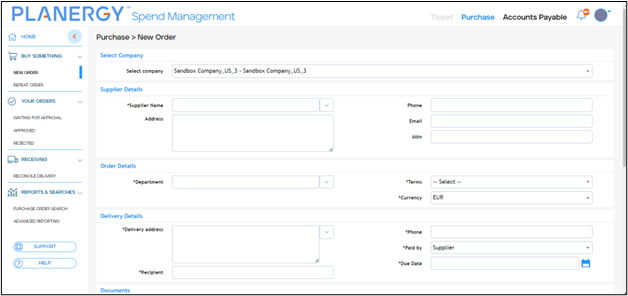
Note
All the fields with an asterisk (*) are mandatory. - Select the name of the company from the Select company dropdown list.

Note
If your account has only one company or your user permissions are restricted to one company you will not have the option to select a different company. - Under the Vendor Details, press the down arrow beside the Vendor Name field.

The Vendor Details dropdown list is displayed for you to select the vendor. You can search for the vendor by entering the name in the Search Vendor field provided in the dropdown list.
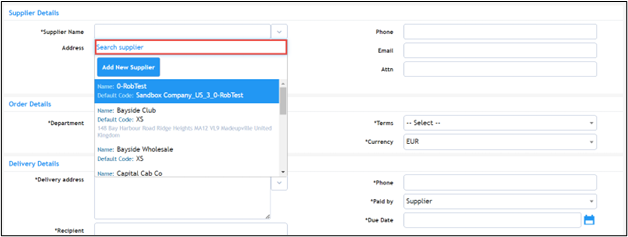
The Address, Phone, Email, and Attn fields are auto populated with the respective data when a vendor is selected. If Currency and Terms are set for the vendor they will also auto populate in the Order Details section. If Delivery Paid By is set for the vendor it will also auto populate in the Delivery Details section.

- In the Order Details section, press the down arrow to select the appropriate department for the order from the Department dropdown list. You can search for the department by entering the name in the Search department field provided in the dropdown list.

The Department dropdown list is displayed.
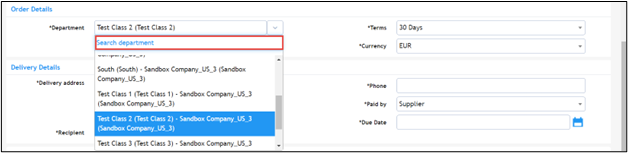
Note
Only the departments you have permission to order on behalf of will be listed in the Department dropdown list. - Select the credit terms from the Terms dropdown list.

Note
Terms can be selected only if it is not set for the vendor. - Select the currency from the Currency dropdown list.
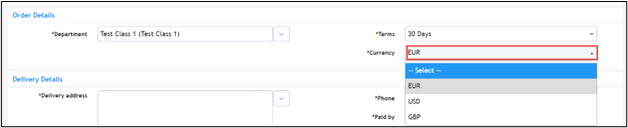
Note
Currency can be selected only if it is not set for the vendor. - In the Delivery Details section, select the address from the Delivery address dropdown list.

The Delivery Address dropdown list is displayed. You can search for the address by entering the characters in the Search delivery address field provided in the dropdown list.
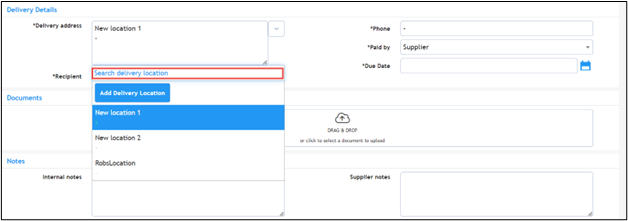
- Enter the name of the delivery recipient in the Recipient field.

- Select the appropriate option from the Paid by dropdown list.
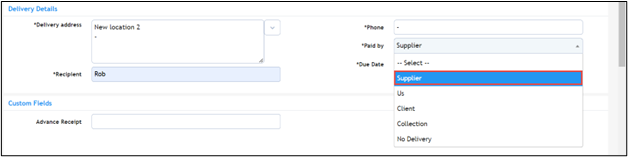
Note
Delivery Paid By can be selected only if it is not set for the vendor. - Select the date you would like the order to be delivered by from the Due Date calendar select.

- In the Documents section, upload any document related to the purchase requisition. Drag and drop any files into the highlighted section to upload immediately. Or press the Drag & Drop field to use File Exploer to select a file.

If you press the Drag & Drop field, your systems File Explorer will open. Select the required document to be uploaded from your system and press Open.

The document is uploaded.

Note
Any documents uploaded on the New Order page will be set as internal documents that will not be sent to the vendor. After saving the requisition you can change this per document. - In the Notes section, enter the instructions or description related to the purchase requisition for the reference of the people within your company in the Internal notes textbox.

- Enter any additional instructions or description related to the purchase requisition for the reference of the vendor in the Vendor notes field. These notes will be included on the purchase order sent to the vendor.

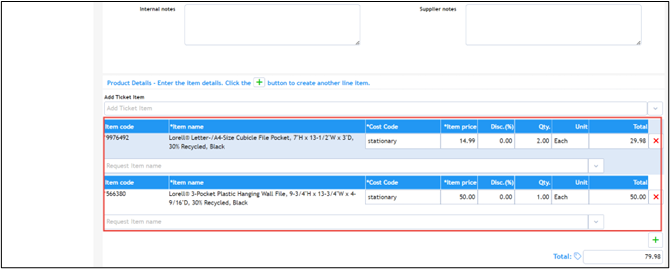
- Enter the Product details.
Note
If you are using item catalogs you can use the downward arrow beside the item name field to select items.Enter the vendor catalog code for the item in the Item Code column, if available, and the item name in the Item Name field.

- Select the GL code for the item in the GL Code column.

Note
Depending on the configuration of your PLANERGY account this field may not appear on the PO form. - Select the cost code for the item in the Cost Code column.
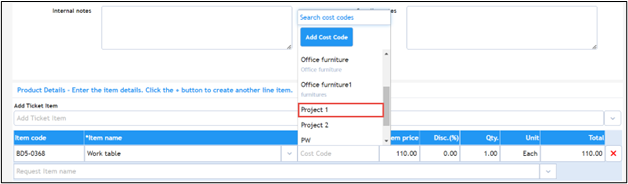
Note
Cost code may appear with a different name on your Planergy account. - Enter the unit price of the item in the Item price column.

- Enter the percentage of discount for the item, if relevant, in the Disc (%) column.

- Enter the quantity of the product you want to order in the Qty column.

- You can add more items by clicking the Add icon.

- The total is calculated automatically and displayed in the Total column.
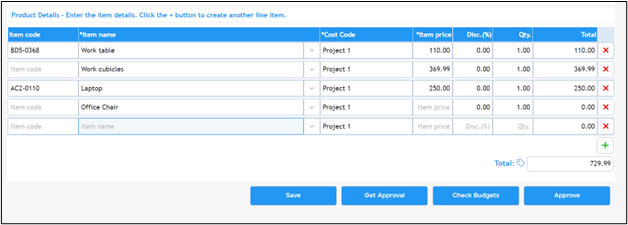
- If you have partially completed the form and want to save it and come back to finalize the order later, you can press Press Save.

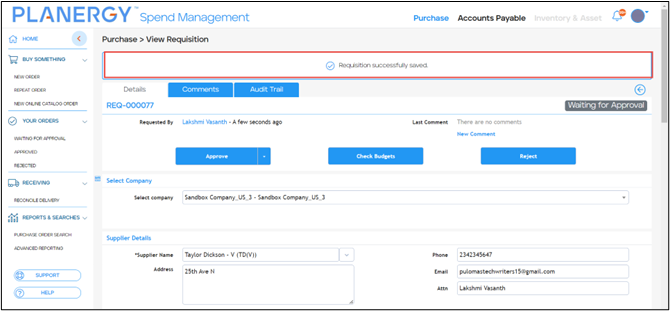
The success notification is displayed and the requisition is saved.
- If you have the correct user permissions to approve an order you can press Approve to give your approval.

Note
Depending on the value of the order and the department it is for it may require multiple approvers.If you do not have the correct permissions, you will need to press Get Approval to send the PO for approval.

If the approval rule is automated the requisition will be automatically sent to the first person that needs to approve it.
If the approval rule is not automated you will see a list of users you can request approval from.
Select the user using the checkbox and press Forward.

After the approval request is sent you will see a message on the Home page confirming the requisition was sent for approval.

- On the Purchase > Home page, press Buy Something > New Order.
-
Repeat an Order
You can use the data of a purchase requisition/order as a template for a new order by following the steps below.
-
-
- Navigate to Purchase > Home and press Buy Something > Repeat Order.
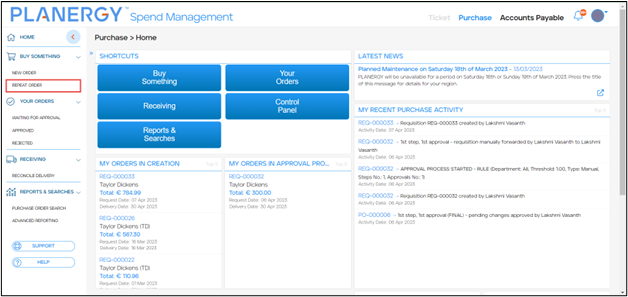
The Purchase > Repeat Order page is displayed.
- Press anywhere in the row of the order you wish to create a similar order to.
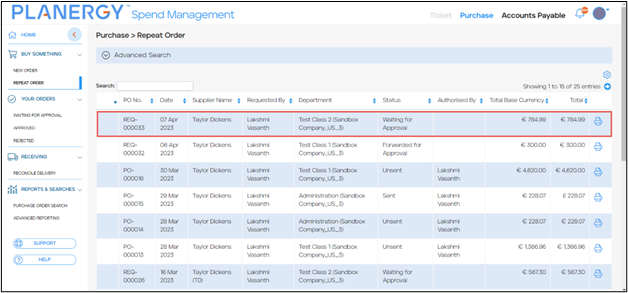
Note
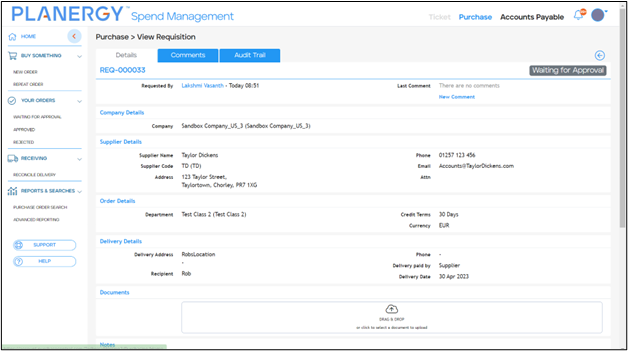
You can narrow down the order list using the quick search or Advanced Search to find a specific order. For more information, refer to Using Advanced Search.The View Requisition page is displayed.
- Scroll down the order page and press Replicate.
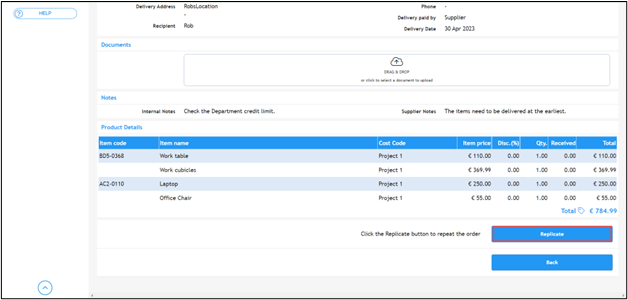
The Purchase > New Order page is displayed.

All the fields on the New Order page are prepopulated with the data from the order you selected. But you can still edit any of the fields as needed.
- Press Save. The order is saved as a new requisition with a new requisition number.
Note
You can similarly replicate any order listed in the Your Orders section or search for an order using the search feature. For more information, refer to How to Search the Purchase Order Search Table.
- Navigate to Purchase > Home and press Buy Something > Repeat Order.
-
Create a PunchOut Order
-
-
- Press the New Online Catalog Order button on the left navigation menu.

- Press the vendor name in the list, Amazon Business in this example, to open their online catalog.

Note
The Integration Type will show as PunchOut for vendors that support this type of order.The Amazon Business page is displayed.

- Add the desired items to the Amazon shopping cart as you normally would when ordering directly with Amazon.

- When your order is complete, go to the checkout and press Submit order for approval

- A new purchase requisition will be created in PLANERGY, prepopulated with vendor and items from the shopping cart.

Note
It is not possible to make changes to the vendor or items on a PunchOut order. - You will need to add additional information to the form (see How to Create a New Order) before it can move forward for approval.When this information is filled press either Approve or Get Approval.

- Once approved, the order is automatically placed with Amazon and a purchase order number is assigned to the order in Amazon.
Note
If the order requires multiple people to approve it the order will only be placed with the vendor when the final approval is given. - Amazon will send an order confirmation for items and this will be visible on the PO in PLANERGY at the left of each line item.Green for accepted, red for rejected, and no color for unconfirmed.

- Amazon will also send shipping notifications when delivery details are confirmed. These notifications will be visible on the PO in PLANERGY in the Shipment section.

There will be a record for each shipment.

- Press the New Online Catalog Order button on the left navigation menu.
-
Create a PLANERGY CheckOut Order
To create a PLANERGY CheckOut order, follow the steps below.
Note
-
-
- Press New Online Catalog Order.

The Purchase > Online Catalog Order page is displayed.
- Press anywhere in the row of the vendor you wish to place a PLANERGY CheckOut order with.
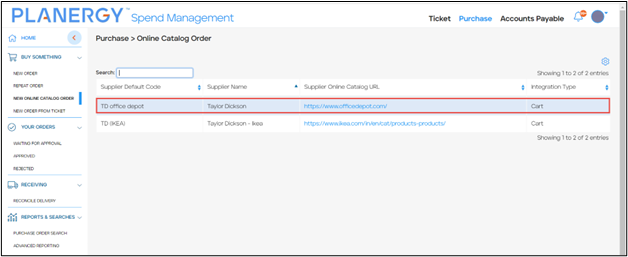
Note
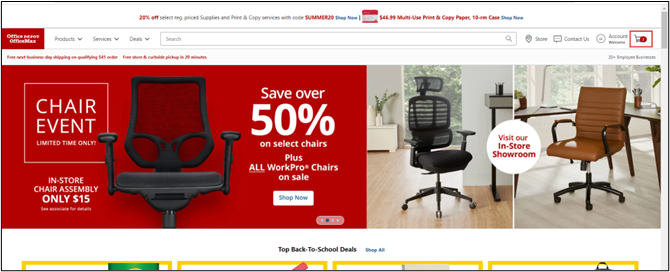
Cart is displayed in the Integration Type column for the vendors you can use PLANERGY CheckOut with.The vendor home page is displayed.
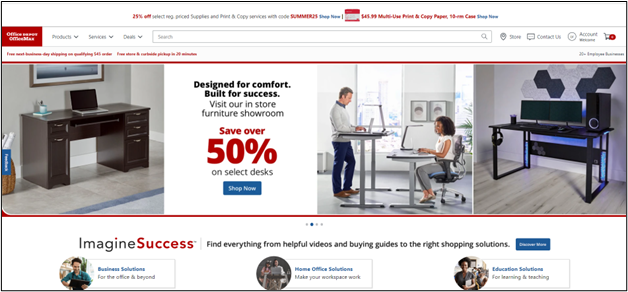
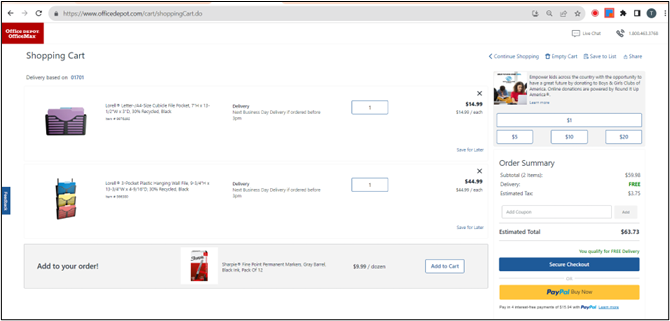
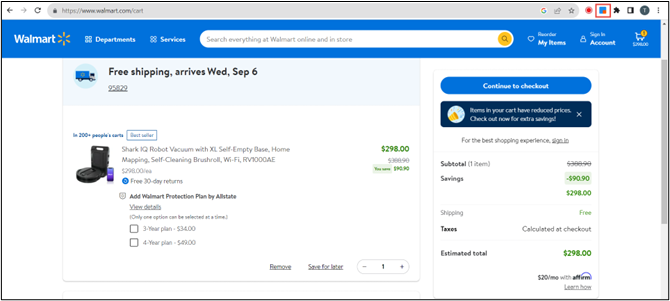
- Select the desired items and add them to the shopping cart. This is the normal step you follow when ordering directly within the website.After adding the desired items, proceed to the cart to initiate the checkout process.
- Press the PLANERGY CheckOut icon in your browser.

If you have not pinned the extension in your browser, it will be hidden in the extensions menu. You can access it from the jigsaw piece icon.

The PLANERGY CheckOut Extension popup is displayed.
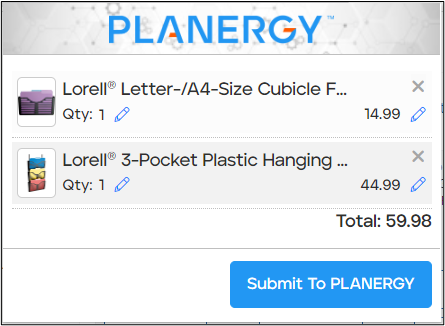
At this point you can update the quantity and price of items added to cart if they are detected incorrectly.
For more information, refer to How to Edit Incorrect Item Quantity and Price in Cart Using PLANERGY CheckOut Extension.
- Once you have verified the quantity and price of the items in the cart, press Submit To PLANERGY.
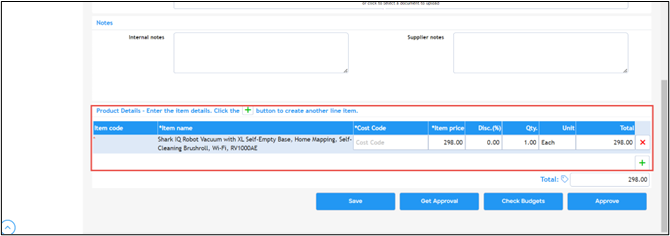
The Purchase > New Order page is displayed.
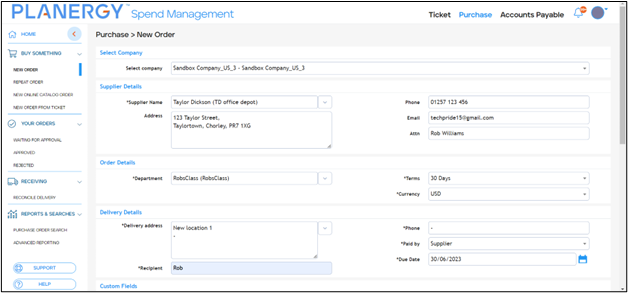
Note that the list of the items is auto populated from the vendor’s website.
You can edit the new requisition form as needed. For more information, refer to How to Create a New Order.
Note
When the order is approved you will need to return to the vendor website. Unlike PunchOut integration orders, PLANERGY CheckOut does not directly integrate with the supplier’s website.
- Press New Online Catalog Order.
-
How to Edit Incorrect Item Quantity and Price in Cart Using PLANERGY CheckOut Extension
In case the details of the item such as quantity and price detected by PLANERGY in the CheckOut extension are incorrect, you can edit them.
To edit the quantity in the cart using the PLANERGY CheckOut extension, follow the steps below.
-
-
- After adding the desired items to the cart in the vendor site, proceed to the shopping cart to initiate the checkout process.

- Press the PLANERGY CheckOut icon in your browser.
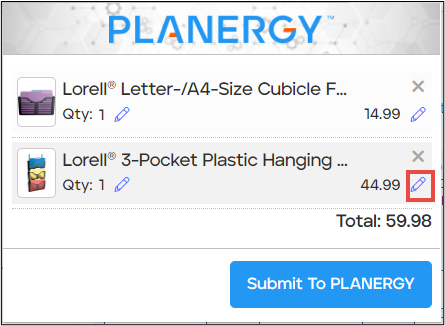
The PLANERGY CheckOut Extension popup is displayed.

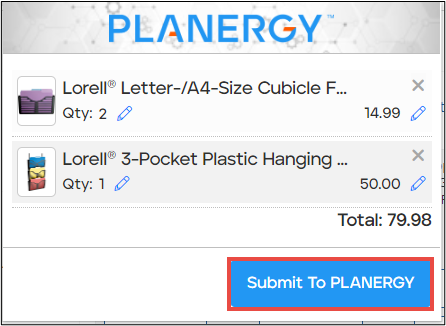
- Press the pencil icon beside Qty in the row of the item you wish to update.

- Enter the required quantity in the space provided.

You can similarly edit the item price in the PLANERGY CheckOut Extension popup by simply pressing the pencil icon next to the price in the corresponding item row.
- To continue with the CheckOut order, press Submit To PLANERGY. For more information, refer to PLANERGY CheckOut Order.
- After adding the desired items to the cart in the vendor site, proceed to the shopping cart to initiate the checkout process.
-
How to Integrate Vendor Shopping Cart Fields Using PLANERGY CheckOut Extension
In cases where the vendor website’s shopping cart fields are not automatically detected, you have the option to manually map the shopping cart using the CheckOut Extension.
So the next time you buy from the online shop, the shopping cart fields will be automatically detected.
To map the shopping cart fields using the PLANERGY CheckOut extension, follow the steps below.
-
-
- After adding the desired items to the cart on the vendor site, proceed to the shopping cart to initiate the checkout process.

- Press the PLANERGY CheckOut icon in your browser.

The PLANERGY CheckOut Extension popup is displayed.
- Press Shopping Cart Mapping.

The Shopping Cart Mapping Wizard is displayed.

- Hover the mouse over the product name to highlight the product name on the Shopping Cart page and press the highlighted area.
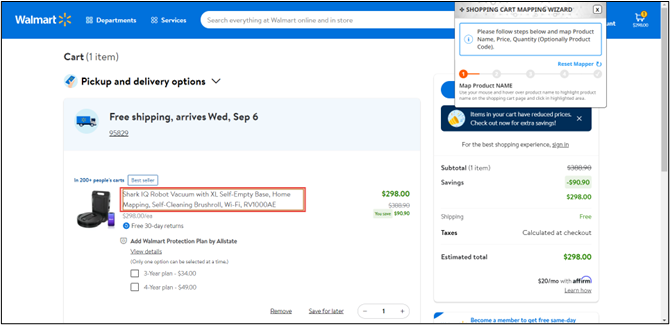
The Shopping Cart Mapping Wizard advances to the next step.

- Hover the mouse over the quantity to highlight the product quantity on the Shopping Cart page and press the highlighted area.

The Shopping Cart Mapping Wizard advances to the following step.

- Hover the mouse over the product price to highlight the price on the Shopping Cart page and press the highlighted area.

The Shopping Cart Mapping Wizard advances to the next step.
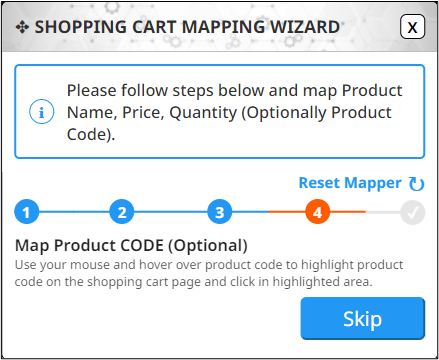
- Hover the mouse over the code to highlight the product code on the Shopping Cart page and press the highlighted area or press Skip to skip this step.

The Shopping Cart Mapping Wizard indicates the successful completion of the mapping process.
- Press the close icon.

- Press the PLANERGY CheckOut icon in your browser again.
The PLANERGY CheckOut Extension popup is displayed.
- Press Submit To PLANERGY.

The product details are imported to PLANERGY.
- Fill any remaining mandatory fields. For more information, refer to PLANERGY CheckOut Order.
- Press Save.
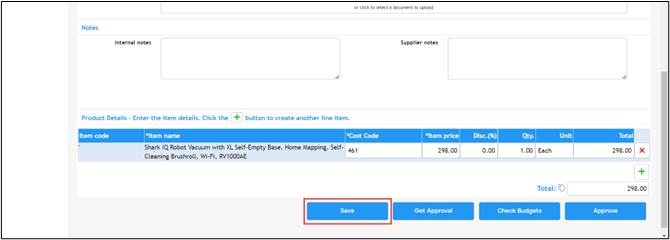
The requisition is saved notification is displayed.
Note
The mapping process concludes once the order is saved in PLANERGY and the mapping is stored for the vendor. It becomes accessible when the shop is revisited.

- After adding the desired items to the cart on the vendor site, proceed to the shopping cart to initiate the checkout process.
-
How to Approve Purchase Orders Waiting for Your Approval
You can approve a purchase requisition that is waiting for your approval if the user permission setting allows you to approve it.
There are a number of different ways you can approve a purchase order in PLANERGY.
Email Approval
When you receive an approval request by email there are two options at the top of the email:
-
-
- Click Here to Log in and Approve, Review or Reject
- Click Here to Quick Approve with your Password
-

Press the option you want to use. The workflow will be different in each scenario.
Click Here to Log in and Approve, Review or Reject
-
-
- The PLANERGY Log In page is displayed.

- Log in by filling your login credentials and pressing Login.

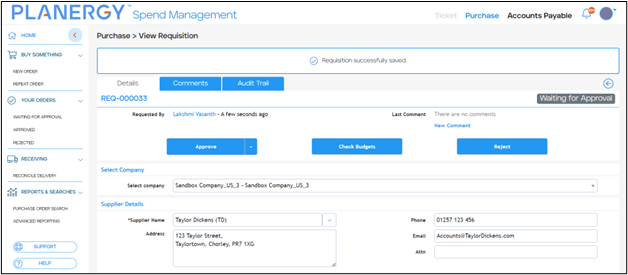
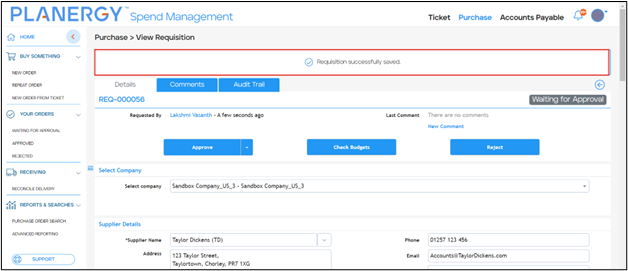
The Purchase > View Requisition page is displayed.

You can review the information in the order, check the current budget status, or send a Comment back to requester if you need clarification on any information.
- If you are happy to approve the order, press Approve.

The success notification is displayed and the requester is sent a notification confirming the approval.

If the order requires further approval it will automatically send to the next approver.
- The PLANERGY Log In page is displayed.
-
Click Here to Quick Approve with your Password
-
-
- The Confirm Approval page opens.

- Fill in your password and press Confirm.

Note
If your password is saved on your device you just need to press Confirm. - A confirmation message appears on screen.

- The Confirm Approval page opens.
-
Approving Purchase Orders Directly In PLANERGY
You can customize your Planergy dashboard to show any orders waiting for your approval by adding the Orders Waiting For My Approval panel to the dashboard.
See Customize Your Home Page Dashboard for more details of how to add the panel to your dashboard.
The Orders Waiting For My Approval panel displays all the purchase requisitions that are waiting for your approval.
The purchase requisition details such as the order number, supplier name, name of the user requesting approval, the total order amount, and the date of approval request are displayed on the panel.

Press the requisition number in the list to access the View Requisition page for a particular requisition.

The Purchase > View Requisition page is displayed.
You can review the information in the order, check the current budget status, or send a Comment back to requester if you need clarification on any information.
If you are happy to approve the order, press Approve.
The success notification is displayed and the requester is sent a notification confirming the approval.
If the order requires further approval it will automatically send to the next approver.
How to Request a New Vendor
To add a vendor, follow the steps below.
Note
-
-
- Go to the Profile menu by using your initials in the top right of the screen.

The Profile menu is displayed.
- Press Control Panel.

The Control Panel is displayed.
- Navigate to Control Panel > Catalogue section and press Vendors.

The Control Panel > Vendors page is displayed.
- On Control Panel > Vendors page, press Add New Vendor.

The Add Vendor page is displayed.

- Enter the required fields on the form. These are outlined below in more detail.
- Once all the fields are entered, press Get Approval.

- The vendor is sent to the relevant approver automatically or if there is group of possible approvers you can choose from the group of users to send it to.
- Go to the Profile menu by using your initials in the top right of the screen.
-
How to Reconcile Delivery
You can reconcile the delivery of a purchase order by following the steps below.
-
-
- On the Purchase > Receiving page, press the row of the purchase order you wish to reconcile the delivery.
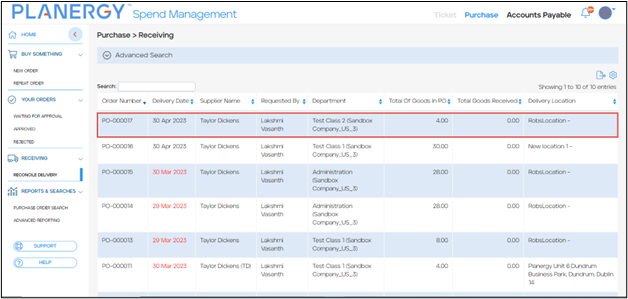
The Purchase > Receive Goods page is displayed.
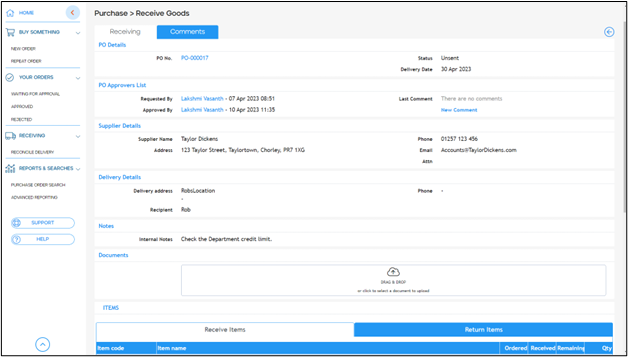
You can now receive the items or return the items listed on the purchase order.
- On the Purchase > Receiving page, press the row of the purchase order you wish to reconcile the delivery.
-
Receive Items
To receive items while reconciling delivery of the purchase order, follow the steps below.
-
-
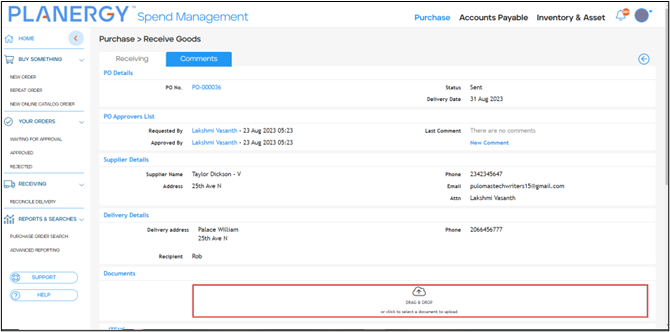
- On the Purchase > Receive Goods page, scroll down the page to the Documents section. Here, you have the option to attach any relevant document related to receiving goods such as delivery notes, packing slips, warranty information, etc.
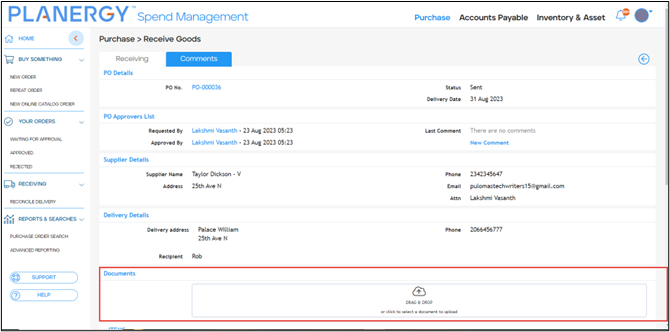
- Drag and drop the required document from your system in the space provided or press Drag & Drop to select the document using the Open dialog.
- In the Items section, press the Receive Items tab.
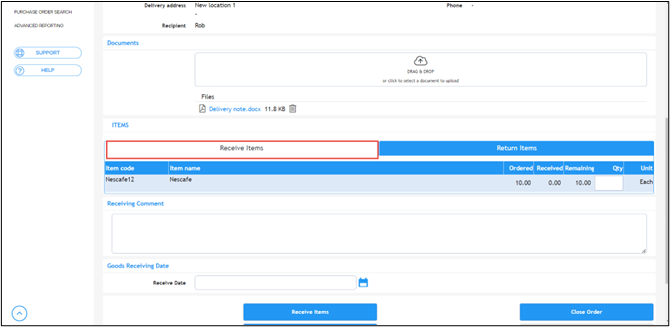
- Enter the quantity of the items to be received in the Qty column of the table

Note
The quantity of the items must be less than or equal to the quantity in the Remaining column. - Enter a comment or note about receiving the items in the Receiving Comments section, if needed.

- Select the date of receiving the goods from the Goods Receiving Date dropdown calendar, if it is different to the date you are following the receive process.

Note
Today’s date will be used unless you select a different date. - Press Receive Items.

The goods received notification is displayed.

- On the Purchase > Receive Goods page, scroll down the page to the Documents section. Here, you have the option to attach any relevant document related to receiving goods such as delivery notes, packing slips, warranty information, etc.
-
- You can receive all items at once by pressing Receive All Items.

- The Receive All? dialog is displayed where you can enter any comment or note in the Comment textbox and press Confirm.

The goods received notification is displayed.

- You can receive all items at once by pressing Receive All Items.
-
Return Items
To return items while reconciling delivery of purchase order for various reasons such as damaged/defective products or incorrect fit, follow the steps below.
-
-
- On the Purchase > Receiving page, enter the required search criteria in the Advanced Search fields to refine the Order list.In the following example, we are showing you how to use the Status criteria to search for the Partially Received orders.

Note
If the order is fully received you will need to edit the Status filter because the report shows only orders with an Open status by default. - Press Search.

The list of all partially received orders is displayed.
- Press anywhere in the row of the order you wish to return items.

The Purchase > Receive Goods page is displayed.

- Scroll down to the Items section and press the Return Items tab.

- Enter the number of items to be returned in the Qty column for each item.

- Select the date of returning the goods from the Goods Return Date dropdown calendar, if it is different to the date you are following the return process.

Note
Today’s date will be used unless you select a different date. - Press Return Items.

Note
If the order is closed you will need to first press Reopen Order before you can return items.The Goods have been returned notification is displayed.

- On the Purchase > Receiving page, enter the required search criteria in the Advanced Search fields to refine the Order list.In the following example, we are showing you how to use the Status criteria to search for the Partially Received orders.
-
- You can return all items at once by pressing Return All Items.

- The Return All? dialog is displayed where you can enter a comment or note in the Comment textbox and press Confirm.

- You can return all items at once by pressing Return All Items.

- You can return all items at once by pressing Return All Items.
-
How to Process an Invoice
-
- On the Accounts Payable > Invoice Documents page, press the Reconcile Invoice icon in the row of the invoice you wish to reconcile.

The Reconcile Invoice page is displayed.

The Reconcile Invoice page provides you with a side by side view of the invoice document, the invoice data being processed, and the purchase order.
You can compare different combinations in the side by side view using the navigation at the top of the page or the orange arrows on the left and right of the screen.
- Review the details on the invoice to be processed and update the invoice as needed.Some information will be prepopulated while some fields may be blank. For example, you may need to update the tax rates per line item by pressing the relevant field in each line.

- When you are happy with the coding and details Press Save.

The invoice is reconciled and ready to be authorized for payment.
- The invoice can either be authorized by pressing Authorise or forwarded authorisation by selecting the user from the dropdown list and pressing the Forward button in the Forward For Authorisation section.

Note
If additional authorisation is not needed you can skip to step 6 to authorise yourself if you have the required permissions. - The authoriser will receive an email requesting their approval.They will have two options at the top of the email.
They can authorise directly from the email if they are happy with the information they see.
Or they can log in and review before authorising for payment.

- If they log in to review they will need to press the Authorise button to assign their approval.

The person who forwarded the invoice for authorisation will receive a notification when the invoice is authorised.
- On the Accounts Payable > Invoice Documents page, press the Reconcile Invoice icon in the row of the invoice you wish to reconcile.
User Guide FAQ
How to disable AP Automation notifications
Q: I’m getting way too many notification emails from Accounts Payable – can this be disabled?
A: You can do this by hovering over the bell icon in the top right corner. Hover over the ‘…’ (three dots) on the popup that opens and click on ‘Notification settings’. Once you do that – please click on the ‘Accounts Payable’ tab, and uncheck the needed notifications – in this case for ‘New invoice received’ but also – from this menu, and different tabs there, you can customize the notifications that you wish to receive, and in the manner that you wish to receive them (application, email, etc.).
Once you’ve went through the needed tabs and customized the notifications in each tab that you wish, and don’t want, to receive – please click on the ‘Save’ button, and that should be it.