The Buy Something section gives you the available options to create purchase requisitions and purchase orders.
You can do this directly in PLANERGY using the New Order to start a new order from scratch, or the Repeat Order option to use a previously order as a template.
You can also use New Online Catalog Order to import items from web shops directly using your accounts online catalog integration options.
If you are using the PLANERGY Ticket module you can also create purchase requisitions from approved ticket items.
For more information, refer to the following sections:
- Accessing The Buy Something Section
- How To Create a New Order
- How To Repeat an Order
- How To Create a New Online Catalog Order
- How To Create a New Order From Ticket
Accessing The Buy Something Section
- On the Purchase > Home page, press the Buy Something option in the Shortcuts panel or Buy Something in the left navigation panel.
 The Purchase > Buy Something subsections are displayed.
How to Create a New Order
You can create a new purchase requisition by following the steps below.
- On the Purchase > Home page, press Buy Something > New Order.
 The Purchase > New Order page is displayed.
Note
All the fields with an asterisk (*) are mandatory. - Select the name of the company from the Select company dropdown list.

- Under the Supplier Details, press the down arrow against the Supplier Name field.
 The Supplier Details dropdown list is displayed for you to select the supplier. You can search for the supplier by entering the name in the Search supplier field provided in the dropdown list.
 The Address, Phone, Email, and Attn fields are auto populated with the respective data when a supplier is selected.If Currency and Terms are set for the supplier they will also auto populate in the Order Details section. If Delivery Paid By is set for the supplier it will also auto populate in the Delivery Details section.
Note
If you have the required permissions you can also create a new supplier. Refer to How to Add a New Supplier from the New Order Page for more information.
- In the Order Details section, press the down arrow to select the appropriate department for the order from the Department dropdown list. You can search for the department by entering the name in the Search department field provided in the dropdown list.
 The Department dropdown list is displayed.
Note
Only the departments you have permission to order on behalf of will be listed in the Department dropdown list. - Select the credit terms from the Terms dropdown list.

Note
Terms can be selected only if it is not set for the supplier. - Select the currency from the Currency dropdown list.

Note
Currency can be selected only if it is not set for the supplier. - In the Delivery Details section, select the address from the Delivery address dropdown list.
 The Delivery Address dropdown list is displayed. You can search for the address by entering the characters in the Search delivery address field provided in the dropdown list.
Note
If you have the required permissions you can also create a new delivery address. Refer to How to Add Delivery Address on New Order Page for more information. - Enter the name of the delivery recipient in the Recipient field.

- Select the appropriate option from the Paid by dropdown list.

- Select the date you would like the order to be delivered by from the Due Date calendar select.

- In the Documents section, upload any document related to the purchase requisition. Drag and drop any files into the highlighted section to upload immediately. Or press the Drag & Drop field to use File Exploer to select a file.
 If you press the Drag & Drop field, your systems File Explorer will open. Select the required document to be uploaded from your system and press Open.
 The document is uploaded.
Note
Any documents uploaded on the New Order page will be set as internal documents that will not be sent to the supplier. After saving the requisition you can change this per document. - In the Notes section, enter the instructions or description related to the purchase requisition for the reference of the people within your company in the Internal notes textbox.

- Enter any additional instructions or description related to the purchase requisition for the reference of the supplier in the Supplier notes field.

- Enter the Product details. The details of the product can be added in the following 2 ways:
- Manual Entry/Free-text Approach – Enter the code of the item in the Item code column and other relevant details in their respective columns.

Note
Free-text is only available if you have the required user permissions. - From the Item Catalog – Select the name of the item in the Item name column by pressing the down arrow.
 The dropdown list is displayed from which you can search for an item using the quick search. The items with matching characters in their name will be displayed as you type.
 You can also select multiple items by checking the corresponding check boxes and press Pick All Checked Items.
 When you select items from the catalog, the item details such as the Item Code and Item Price will be auto populated in the respective columns.
Note
If you have the required permissions you can also create a new item. Refer to How to Add New Item on New Order Page for more details.- Select the cost code for the item in the Cost Code column.

Note
If you have the required permissions you can also create a new item. Refer to How to Add a New Cost Code on New Order Page for more information. - Enter the unit price of the item in the Item price column. Note that if the item price is updated in the Control Panel > Catalogue > Items, the Item price will be auto populated.

- Enter the percentage of discount if applicable for the item in the Disc (%) column.

- Enter the quantity of the product you want to order in the Qty column.

- You can add more items by clicking the Add icon.

- The total is calculated automatically and displayed in the Total column.
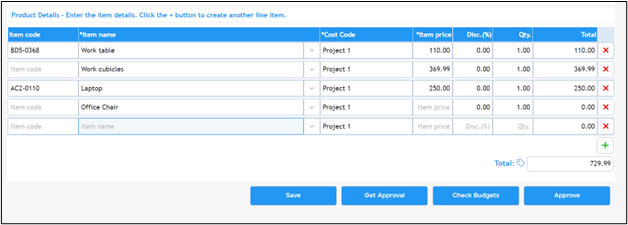
Note
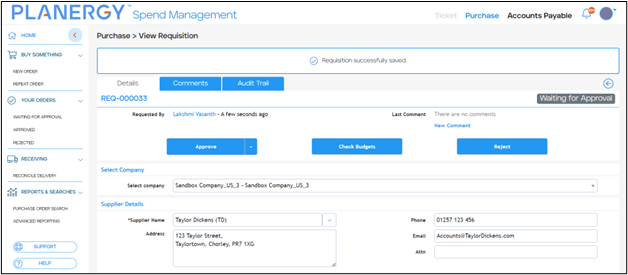
The Item code, Item price, and Total will be auto populated when you select the item in the Item name column. You can edit them if needed. - Press Save.
 The success notification is displayed.
- Select the cost code for the item in the Cost Code column.
- Manual Entry/Free-text Approach – Enter the code of the item in the Item code column and other relevant details in their respective columns.
How to Repeat an Order
You can use the data of a purchase requisition/order as a template for a new order by following the steps below.
- Navigate to Purchase > Home and press Buy Something > Repeat Order.
 The Purchase > Repeat Order page is displayed.
 - Press anywhere in the row of the requisition/order you wish to repeat the data.
 The View Requisition page is displayed.
Note
You can narrow down the order list using the quick search or Advanced Search to find a specific order. For more information, refer to How to Quick Search a Table.
- Scroll down the order page and press Replicate.
 The Purchase > New Order page is displayed.
 All the fields on the New Order page are auto populated with the data from the selected order. But you can still edit any of the fields as needed.
 - Press Save.The order is saved as a new requisition with a new requisition number.

Note
You can similarly replicate any order listed in the Your Orders section or search for an order using the search feature. For more information, refer to How to Search the Purchase Order Search Table.
How to Create a New Online Catalog Order
You can create a new online catalog purchase requisition in PLANERGY or directly from the supplier’s website using the PLANERGY Checkout Extension or for any suppliers where you have a PunchOut integration in place.
For more information, refer to the following sections:
- PLANERGY Checkout Order
- PunchOut Order
Note
PLANERGY CheckOut Order
To create a CheckOut order in PLANERGY, follow the steps below.
- Navigate to Purchase > Home and press Buy Something > New Online Catalog Order.
 The Purchase > Online Catalog Order page is displayed.
 - Press anywhere in the row of the supplier you wish to place a CheckOut order. Note that Cart is displayed in the Integration Type column for the CheckOut Suppliers.
 The supplier home page is displayed.
- Select the desired items and add them to the shopping cart. This is the normal step you follow when ordering directly within the website.After adding the desired items, proceed to the cart to initiate the checkout process.

- Press the PLANERGY icon.
 The PLANERGY CheckOut Extension dropdown list is displayed.
Note
From here,- You can update the quantity and price of items added to cart if they are detected incorrectly. For more information, refer to How to Edit Incorrect Item Quantity and Price in Cart Using PLANERGY CheckOut Extension.
- You can directly map the shopping cart fields of the supplier website with PLANERGY in case they are not integrated. For more information, refer to How to Integrate Supplier Shopping Cart Fields Using PLANERGY CheckOut Extension.
- Once you have verified the quantity and price of the items in the cart, press Submit To PLANERGY.
 The Purchase > New Order page is displayed.
 Note that the list of the items is auto populated from the supplier’s website.
 You can edit the new requisition form as needed. For more information, refer to How to Create a New Order.
How to Edit Incorrect Item Quantity and Price in Cart Using PLANERGY CheckOut Extension
In case the details of the item such as quantity and price detected by PLANERGY in the CheckOut extension are incorrect, you can edit them.
To edit the quantity in the cart using the PLANERGY CheckOut extension, follow the steps below.
-
- After adding the desired items to the cart in the supplier site, proceed to the shopping cart to initiate the checkout process.

- Press the PLANERGY icon.
 The PLANERGY CheckOut Extension dropdown list is displayed.
- Press the pencil icon against Qty in the row of the item you wish to update.

- Enter the required quantity in the space provided.

- To continue with the CheckOut order, press Submit To PLANERGY. For more information, refer to PLANERGY CheckOut Order.
Note
You can similarly edit the item price in the PLANERGY CheckOut Extension dropdown list by simply pressing the pencil icon next to the price in the corresponding item row.
- Enter the price in the space provided.
 You can now submit it to PLANERGY. For more information, refer to PLANERGY CheckOut Order.
- After adding the desired items to the cart in the supplier site, proceed to the shopping cart to initiate the checkout process.
How to Integrate Supplier Shopping Cart Fields Using PLANERGY CheckOut Extension
In cases where the supplier website’s shopping cart fields are not automatically detected, you have the option to manually map the shopping cart using the CheckOut Extension.
So the next time you buy from the online shop, the shopping cart fields will be automatically detected.
To map the shopping cart fields using the PLANERGY CheckOut extension, follow the steps below.
- After adding the desired items to the cart on the supplier site, proceed to the shopping cart to initiate the checkout process.

- Press the PLANERGY icon.
 The PLANERGY CheckOut Extension dropdown is displayed.
 - Press Shopping Cart Mapping.
 The Shopping Cart Mapping Wizard is displayed.
- Hover the mouse over the product name to highlight the product name on the Shopping Cart page and press the highlighted area.
 The Shopping Cart Mapping Wizard advances to the next step.
- Hover the mouse over the quantity to highlight the product quantity on the Shopping Cart page and press the highlighted area.
 The Shopping Cart Mapping Wizard advances to the following step.
- Hover the mouse over the product price to highlight the price on the Shopping Cart page and press the highlighted area.
 The Shopping Cart Mapping Wizard advances to the next step.
- Hover the mouse over the code to highlight the product code on the Shopping Cart page and press the highlighted area or press Skip to skip this step.
 The Shopping Cart Mapping Wizard indicates the successful completion of the mapping process.
 - Press the close icon.

- Press the PLANERGY icon.
 The PLANERGY CheckOut Extension dropdown is displayed.
 - Press Submit To PLANERGY.
 The product details are imported to PLANERGY.
- Fill any remaining mandatory fields. For more information, refer to PLANERGY CheckOut Order.
- Press Save.
 The requisition is saved notification is displayed.
Note
The mapping process concludes once the order is saved in PLANERGY and the mapping is stored for the supplier. It becomes accessible when the shop is revisited.
PunchOut Order
To create a PunchOut order in PLANERGY, follow the steps below.
- Navigate to Purchase > Home and press Buy Something > New Online Catalog Order.
 The Purchase > Online Catalog Order page is displayed.
 - Press anywhere in the row of the PunchOut enabled supplier you wish to place an online order.In the following example, we are showing you how to place Amazon PunchOut order.You can follow similar steps to place PunchOut orders with other PunchOut enabled suppliers.
 The Amazon Business page is displayed.
- Add the desired items to the Amazon shopping cart as you would normally do when ordering directly from Amazon.
- Once the order is complete, on the Amazon Checkout page, press Submit order for approval.
 The Purchase > New Order page is displayed.
 Note that the supplier details, delivery details, and the list of the items are auto populated on the PLANERGY requisition form.
 You can edit the new requisition form as needed. For more information, refer to How to Create a New Order. When saved, the new order is created in the system and would need to go through the approval process.
How to Create New Order From Ticket
You can create new orders from ticket items present in the system if the Ticket module is enabled for you by your system admin.
- On the Purchase > Home page, press Buy Something > New Order From Ticket.
 The Purchase > New Order From Ticket page is displayed.
Note
All the fields with an asterisk (*) are mandatory. - Select the name of the company from the Select company dropdown list.
 The ticket items are filtered based on the selection of the company.
- Select the supplier from the Supplier dropdown list to further narrow down the filtered result of the ticket items.
 The ticket items filtered based on the selected supplier are displayed.
- Select the department from the Department dropdown list to further narrow down the ticket items based on the department. This field is optional.
 The ticket items filtered based on the selected supplier are displayed.
Note
The ticket items filtered can be rejected from here by pressing Reject in the row of the item. The Reason for rejection dialog is displayed.
 - Enter the item rejection reason in the space provided and press Reject.
 The item will be rejected and removed from the listed ticket items.
 - Press the Next icon.
 Step 2 of the New Order From Ticket page is displayed.
 - Check the box(es) against the items you wish to add to the Selected Ticket Items list. You can also drag and drop items to Selected Ticket Items.

- Press Add to Selected Items List.
 The selected items are moved to the Selected Ticket Items list.
 - Press the Next icon.
 The Purchase > New Order page is displayed.
 The steps to continue creating the order from here are similar to those while creating a new order.
For more information, refer to How to Create a New Order. When saved, the new order is created in the system and would need to go through the approval process.
Adding New Data From The New Order Page
When viewing the new order form you can add new data directly on the page if you have the required permissions.
How to Add a New Supplier from the New Order Page
To add a new supplier when you place a new purchase requisition, follow the steps below.
- On the Purchase > New Order page, press the down arrow icon in the Supplier Name field.
 The Supplier Name dropdown list is displayed.
 - Press Add New Supplier.
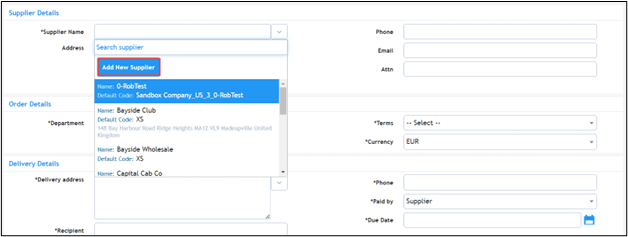 The Add New Supplier dialog is displayed.
Note
All the fields with an asterisk (*) are mandatory. - Enter the name of the supplier in the Supplier Name field.

- Enter the default code for the supplier in the Supplier Default Code.
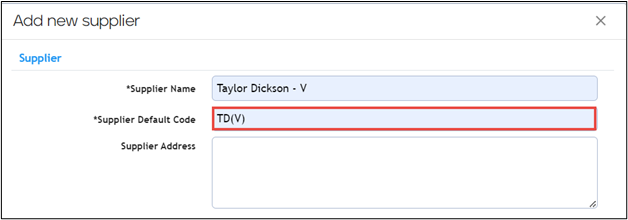
- Enter the address of the supplier in the Supplier Address field.

- Enter the phone number of the supplier in the Supplier Phone field.

- Enter the email address of the supplier in the Supplier Email field.

- Enter any comments in the Supplier Comments field. Note that this is an optional field and the comments entered here are for internal usage while viewing the supplier details in Control Panel.

- Select the currency from the Supplier Currency dropdown list.

- Select the credit terms for the supplier from the Supplier Credit Days field.

- Enter the contact name for the supplier in the Contact name field.

- Enter the email address of the contact in the Contact email field.

- Enter the phone number of the contact in the Contact phone field.

- Press Add.
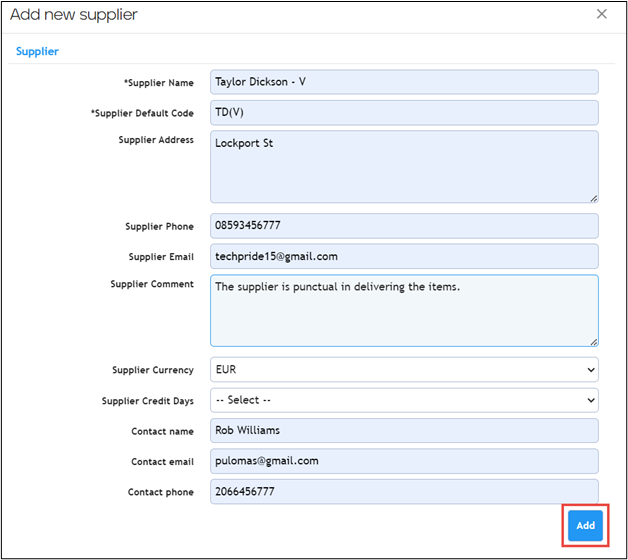 The supplier details are added to the Supplier dropdown list to be selected when needed.
How To Add A New Delivery Address on New Order Page.
You can add a new delivery address to the new purchase requisition by following the steps below.
- On the Purchase > New Order page, press the down arrow icon in the Delivery address field.
 The Delivery address dropdown list is displayed.
 - Press Add Delivery Location.
 The Add delivery location dialog is displayed.
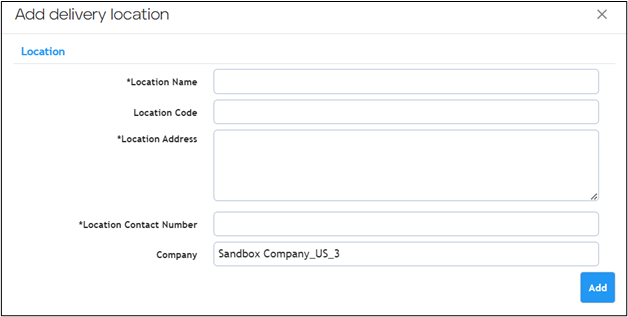
Note
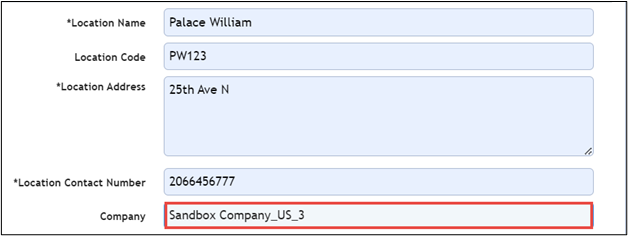
All the fields with an asterisk are mandatory. - Enter the name of the delivery location in the Location Name field.

- Enter the code of the delivery location in the Location Code field.
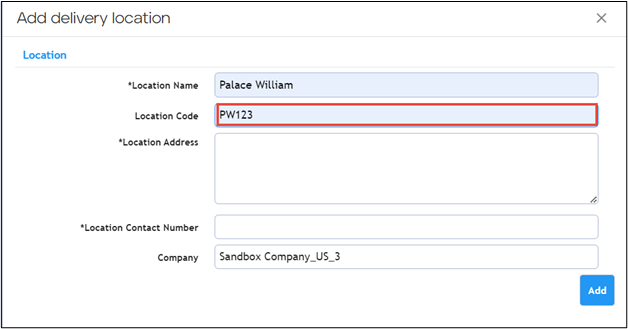
- Enter the address of the delivery location in the Location Address field.

- Enter the contact number at the delivery location in the Location Contact Number field.
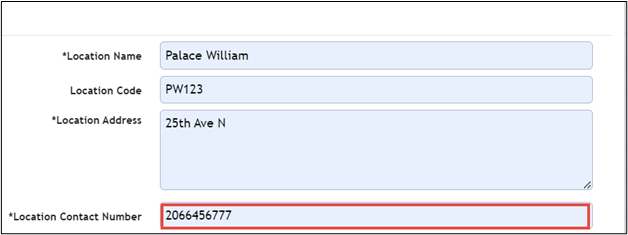 The Company field by default is auto populated from the Select Company field of the New Order page.
- Press Add.
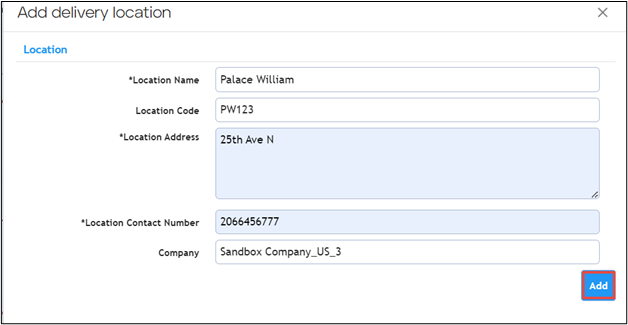 The delivery location is added to the Delivery Address.
How to Add New Item on New Order Page
To add new items on the new purchase requisition page, follow the steps below.
- On the Purchase > New Order page, press the down arrow icon in the Item name column.
 The Item name dropdown list is displayed.
 - Press Add New Item.
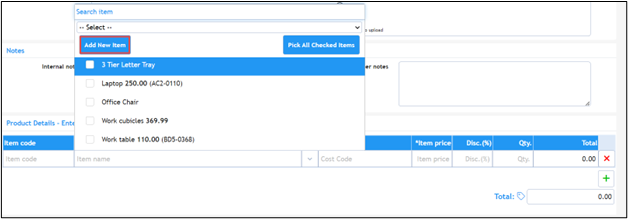 The Add new item dialog is displayed.
- Enter the information in the fields. It is similar to adding the New Items under Control Panel.
For more information, refer to How to Add/Edit New Item - Press Add.
 The item is added to the product list.
How to Add a New Cost Code on New Order page
You can add a new cost code on the new order page by following the steps below.
- On the Purchase > New Order page, press the Cost Code column.
 The Cost Code dropdown list is displayed.
 - Press Add Cost Code.
 The Add Cost Code dialog is displayed.
- Enter the information required in the respective fields. This is similar to adding a new cost code in the Control Panel > Finance Functions section. For more information, refer to How to Add/Edit Cost Code.
- Press Add.
 The new cost code is added.
