The PLANERGY inventory management software enables you to monitor and manage incoming and outgoing inventory in real time with the help of advanced analytics and automation. Your team can easily access your existing purchases and place orders for goods from your storage, thus effortlessly saving money.
Note
The Inventory & Asset module allows you to create a new requisition for a user or a department and also approve them if you have the user’s permission to do so.
You can receive assets back to storage, view your stock queue, search for your orders, check the order status, receive shipments for a department, dispatch items from the warehouse, write off items in the warehouse, run reports on inventory, and return stock to the warehouse from a department based on your user permission settings.
- Navigate to Inventory & Asset.
 The Inventory & Asset > Home page is displayed.
For more information, refer to the following sections:
- Common Operations Across Inventory & Asset Module
- Sections in the Inventory & Asset Module
- Inventory & Asset Permissions
- Inventory & Asset Approval Rule
- Inventory Item Tags
- Item Bundles
- Department Stock Location Settings
- Inventory & Asset Home Page
- My Actions
- Department Actions
- Warehouse
- Reports & Searches in Inventory & Asset
Common Operations Across Inventory & Asset Module
You can perform few actions that are common across the Inventory & Asset module.
For more information, refer to the following sections:
- How to Replicate a Stock Requisition
- How to Download PDF of Stock Requisition
- How to Print a Stock Requisition
- How to Search for Stock Requisition/ Order
- How to View Stock Requisition/ Orders in Detail
How to Replicate a Stock Requisition
To duplicate a requisition with similar details to save time and effort, follow the steps below.
In the following example, we are showing you how to duplicate a requisition in My Order Search list. You can follow similar steps to duplicate a requisition across the various sections of the Inventory & Asset module.
- Navigate to My Actions > My Order Search.
 The Order Search page is displayed.
 - Press anywhere in the row of the requisition you wish to duplicate or you can search for a requisition using the search criteria fields.
For more information, refer to How to Search for Stock Requisition/ Order.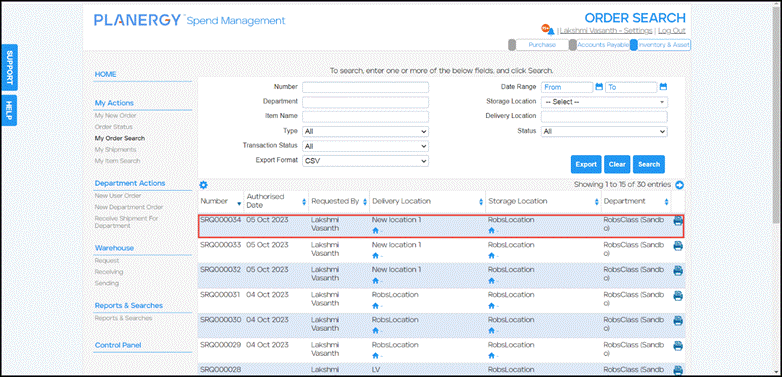 The Details section of the View Requisition For Person page is displayed.
 - Press Replicate.
 The New Requisition For Person page is displayed.
- Make the necessary changes to the fields and press Save.
For more information on the fields, refer to How to Create Your New Stock Requisition. The Requisition successfully saved notification is displayed.
How to Download PDF of Stock Requisition/ Order
To download the PDF of the requisition/order for any offline work or documentation, follow the steps below.
In the following example, we are showing you how to download a PDF of a requisition in the My Order Search list. You can follow similar steps to download the PDF of a requisition across the various sections of the Inventory & Asset module.
- Navigate to My Actions > My Order Search.
 The Order Search page is displayed.
 - Press anywhere in the row of the requisition you wish to duplicate or you can search for a requisition using the search criteria fields.
For more information, refer to How to Search for Stock Requisition/ Order. The Details section of the View Requisition For Person page is displayed.
 - Press Download PDF.
The requisition in PDF format is downloaded to your system.  On pressing the downloaded PDF file, the requisition PDF is displayed.
How to Print a Stock Requisition
To print the requisition for any offline work or documentation, follow the steps below.
In the following example, we are showing you how to print a requisition in My Order Search list. You can follow similar steps to print a requisition across the various sections of the Inventory & Asset module.
- Navigate to My Actions > My Order Search.
 The Order Search page is displayed.
 - Press anywhere in the row of the requisition you wish to print or you can search for a requisition using the search criteria fields.
For more information, refer to How to Search for Stock Requisition/ Order. The Details section of the View Requisition For Person page is displayed.
 - Press Print.
 The Print preview is displayed.
 - Press the Print icon.
 The requisition will be printed.
How to Search for Stock Requisition/ Order
To search for your stock requisitions or orders in a section, follow the steps below.
In the following example, we are showing you how to search for a requisition in My Order Search section. You can follow similar steps to look up for requisitions/ orders within the various sections of the Inventory & Asset module.
-
- On the Inventory & Asset Home page, press My Order Search in the left navigation menu.
 The Order Search page is displayed.
- To narrow down your list of orders, enter the data in the search criteria fields needed. Note that the search criteria fields will vary based on the sections of the Inventory & Asset module.Some of the common search criteria fields are as follows:
- Number – The identity number or code for a requisition/ order/ item
- Department – The associated department to which the requistion/ order/ item belongs
- Type – The subsections within the Inventory & Asset module to which the requistion/ order/ item belongs
- Transaction Status – The status of the shipments classified as follows:
- All – Displays the list of all orders or shipments
- Completed – Displays the list of all orders or shipments where the last transaction was completed
- Error – Displays the list of all orders or shipments where the last transaction had failed
- Pending – Displays the list of all orders or shipments where the last transaction is still pending.
- Export Format – The format list to export the reuisition/ order document
- Date Range – The period specifying the start date and end date
- Storage Location – The specific locations of item storage defined in your system
- Delivery Location – The specific location where the items needed should be delivered
- Status – The status of the requisition/ orders such as Open, Closed, Waiting for Approval, Approved, Edited Not Approved, Cancelled, Rejected, Partial, Approved Not Closed, Sent, Unsent, and Shipment.
- On the Inventory & Asset Home page, press My Order Search in the left navigation menu.
- Press Search.
 The Order(s) matching the search criteria is displayed.
 You can press anywhere in the row of the order to see its details.
For more information, refer to How to View Stock Requisition/ Order in Detail.
How to View Stock Requisitions/ Orders in Detail
You can view the details of stock requisitions/ orders in the system using following the steps below.
In the following example, we are showing you how to view the details of a requisition in the My Order Search list. You can follow similar steps to view requisitions/ orders from other sections of the Inventory & Asset module.
- Navigate to My Actions > My Order Search.
 The Order Search page is displayed.
 - Press anywhere in the row of the requisition you wish to view the details.
 The Details page of the requisition is displayed.
- Scroll down to perform actions such as Cancel Requisition, Edit, Replicate, Download PDF, and Print the requisition.

For more information, refer to the following sections.
- Press Shipments.
Note
The associated tabs vary depending on the various documents across the sections of the Inventory & Asset module. The steps to view the tabs are the similar to the steps described below which you can follow to view the corresponding details. The shipment sent for the requisition is displayed.
 - Press anywhere in the row of the shipment to view the details.

For more information, refer to How to View Your Shipments. - Press Audit Trail.
 The chronological record of the actions performed on the requisition is displayed.
Sections in the Inventory & Asset Module
The sections in the Inventory & Asset module are as follows:
- Home – The Home is the landing page that allows easy navigation across the various sections of the Inventory & Asset.

- My Actions – This section allows you perform various actions such as creating your stock requisition, viewing your order status, viewing the list of shipments en route to your location, and searching for your orders and items received.
For more information, refer to the following sections.
 Department Actions – This section enables you to perform actions such as placing an order for a user or a department, receiving your shipments, and receiving the shipments for a department. Note that you can perform these actions only if you have the user permission to do so.
For more information, refer to Department Actions.
- Warehouse – This section allows you perform actions such as requesting stock relocation, receiving items into stock, returning stock from a user or department, receiving the relocated stock, dispatching items, and writing off items.
Note
Note that these actions can be performed only if you have the user permissions to do so.
For more information, refer to Warehouse. - Reports & Searches – This section allows you to perform actions such as searching orders, checking the shipments en route to your location, reviewing asset and stock quantities, and viewing stock notifications.

For more information, refer to Reports & Searches in Inventory & Asset.
Inventory & Asset Permissions
Once the admin has enabled the Inventory & Asset module on your account, you can gain access by updating your user permission settings in the Control Panel.
To update the user permission settings, follow the steps below.
- Press the Profile icon on the top right corner of the Home page.
 The profile menu is displayed.
 - Press the Control Panel in the profile menu.
 The Control Panel page is displayed.
 - Press Users under Organization.
 The Control Panel > Users page is displayed.
 - Press anywhere in the row of the user you wish to edit the user permission.
 The Edit User page is displayed.
 - Scroll down to the User Permissions section and press the Inventory & Asset tab.
 The Inventory & Asset section is displayed.
 - Press Stock Requisition Permission.

Note
By default, the Requisition Access tab is displayed. - Select the appropriate option to determine the stock requisitions that the user can view in the system.

The available options are:
-
- Own Requisitions – The user can view only the requisitions created by him in the system.
- All Requisitions – The user can view all the requisitions available in the system.
- Requisitions for department(s) – The user can view all the requisitions available for the selected department(s).
- To add a department to the selected department(s) list, press the Add icon.
 The Department dialog is displayed.
- Check the box in the row of the department you wish to add.
- Press Add All Selected Departments.
 The selected departments are added to the Department list.
Note
You can remove a department from the list by pressing the Close icon in the row of the department.
- To add a department to the selected department(s) list, press the Add icon.
- Press the Requisition on behalf tab.
 The Requisition on behalf section is displayed.
 - Select the appropriate option that determines for whom the user can initiate the requisition orders.

The available options are:
-
- Own user – The user can initiate requisitions for only himself in the system.
- All departments – The user can initiate requisitions for all the departments in the company.
- Other selected department(s) – The user can initiate requisitions for only the selected department(s).
- To add a department to the selected department(s) list, press the Add icon.
 The Department dialog is displayed.
- Check the box in the row of the department you wish to add.
- Press Add All Selected Departments.
 The selected departments are added to the Department list.
Note
You can remove a department from the list by pressing the Close icon in the row of the department.
- To add a department to the selected department(s) list, press the Add icon.
- Press the Requisition edit tab.
 The Requisition edit section is displayed.
 - Select the appropriate option to determine the requisitions the user can edit.

The available options are:
-
- Own Requisitions– The user can edit only his requisitions/ orders in the system.
- All Requisitions – The user can edit all requisitions/ orders.
- Requisitions for department(s) – The user can edit requisitions/ orders for only the selected department(s).
- To add a department to the selected department(s) list, press the Add
 The Department dialog is displayed.
- Check the box in the row of the department you wish to add.
- Press Add All Selected Departments.
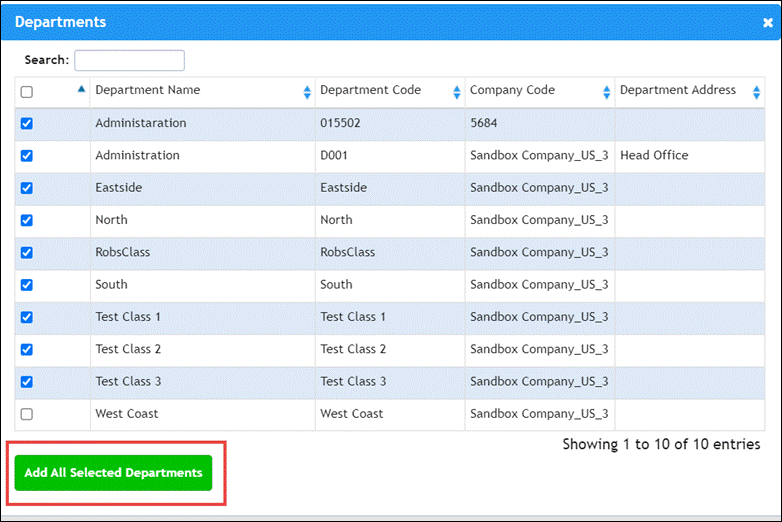 The selected departments are added to the Department list.
Note
You can remove a department from the list by pressing the Close icon in the row of the department.
- To add a department to the selected department(s) list, press the Add
- Press the Requisition cancellation tab.
 The Requisition cancellation section is displayed.
 - Select the appropriate option to determine the requisitions that the user can cancel in the system.

The available options are:
-
- Own Requisitions– The user can cancel only his requisitions/ orders in the system.
- All Requisitions – The user can cancel all requisitions/ orders.
- Requisitions for department(s) – The user can cancel requisitions/ orders for only the selected department(s).
- To add a department to the selected department(s) list, press the Add
 The Department dialog is displayed.
- To add a department to the selected department(s) list, press the Add
-
-
- Check the box in the row of the department you wish to add.
- Press Add All Selected Departments.
 The selected departments are added to the Department list.
Note
You can remove a department from the list by pressing the Close icon in the row of the department.
-
- Press the Requisition authorisation tab.
 The Requisition authorisation section is displayed.
 - Select the appropriate option to determine if the user can authorise his own requisitions.
 The available options are:
-
- Yes – The user can authorise his own requisitions.
- No – The user cannot authorise his own requisitions.
- Press Stock Permissions.
 The Stock access section is displayed by default.
 - Select the appropriate option to determine the stocks that the user can view.

The available options are:
-
- Own Stock– The user can view only the stock he has added to the system.
- All Stocks – The user can view all stocks available in the system.
- Stock(s) – The user can view only the stock specified for the selected location.
- To add stock(s) to the selected stock list, press the Add icon.
 The Location dialog is displayed.
- To add stock(s) to the selected stock list, press the Add icon.
-
-
- Check the box in the row of the stock location you wish to add.

- Check the box in the row of the stock location you wish to add.
-
-
-
- Press Add All Selected Locations.
 The selected locations are added to the stock Location list.
Note
You can remove a location from the list by pressing the Close icon in the row of the location.
- Press Add All Selected Locations.
-
- Press the Stock edit tab.
 The Stock edit section is displayed.
 - Select the appropriate option to determine the stock that the user can edit.

The available options are:
-
- Own Stock– The user can edit only the stock added by him in the system.
- All Stocks – The user can edit all stocks.
- Stock(s) – The user can edit stock(s) in the selected location(s).
- To add stock(s) to the selected stock list, press the Add icon
 The Location dialog is displayed.
- To add stock(s) to the selected stock list, press the Add icon
-
-
- Check the box in the row of the stock location you wish to add.

- Press Add All Selected Locations.

- The selected locations are added to the stock Location list.

Note
You can remove a location from the list by pressing the Close icon in the row of the location.
- Check the box in the row of the stock location you wish to add.
-
- Press the Stock manage tab.
 The Stock manage section is displayed.
 - Select the appropriate option to determine the stock that the user can manage.
 The available options are:
-
- All Stocks – The user can manage all stocks in the system.
- Stock(s) – The user can manage stock(s) in the selected location(s).
- To add stock(s) to the selected stock list, press the Add icon
 The Location dialog is displayed.
- To add stock(s) to the selected stock list, press the Add icon
-
-
- Check the box in the row of the stock location you wish to add.
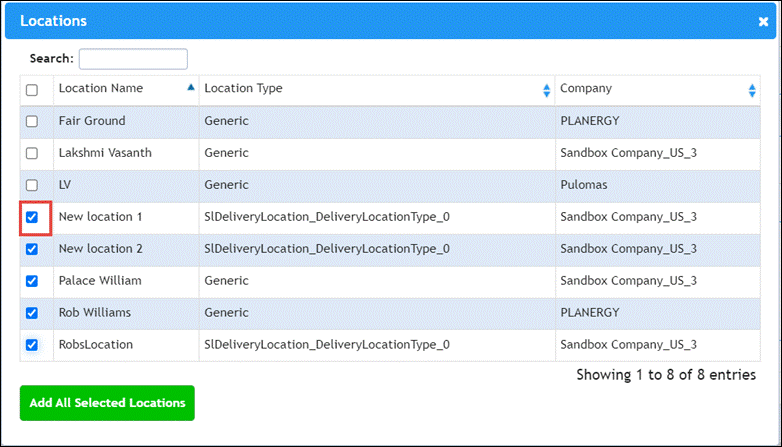
- Check the box in the row of the stock location you wish to add.
-
-
-
- Press Add All Selected Locations.
 The selected locations are added to the stock Location list.
Note
You can remove a location from the list by pressing the Close icon in the row of the location.
- Press Add All Selected Locations.
-
-
- Once you have updated the User permissions, scroll down the Edit User page and press Save to update the permission settings for the user.

- The permissions are now set and when you re-login, the Inventory & Asset module will be activated.

- Once you have updated the User permissions, scroll down the Edit User page and press Save to update the permission settings for the user.
Inventory & Asset Approval Rule
When the Inventory & Asset module is enabled on your account, you can set the approval rules in the Control Panel for the Inventory & Asset module. The approval rules define the approval process required for stock requisitions.
- On the Home page, press the Profile icon in the top right corner.
 The profile menu is displayed.
 - Press the Control Panel in the profile menu.
 The Control Panel page is displayed.
 - Navigate to the Advanced Controls section and press Approval Rules.
 The Control Panel > Approval Rules page is displayed.
 - Press Inventory & Asset.
Note
Note that this tab is available to you only if you have the required permissions to access the Inventory & Asset module.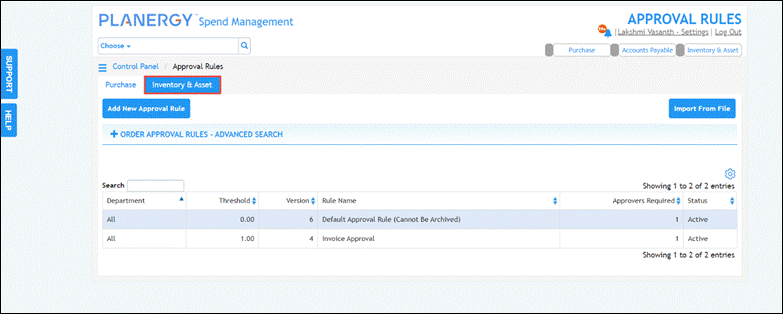 The Inventory & Asset section is displayed.
 - Press Add New Approval Rule.
 The Add new approval rule dialog is displayed.
 - Enter the name of the approval rule in the Rule Name field.

- Press the down arrow in the Department field.

- Select the department you wish to set the rule for from the Department dropdown list.
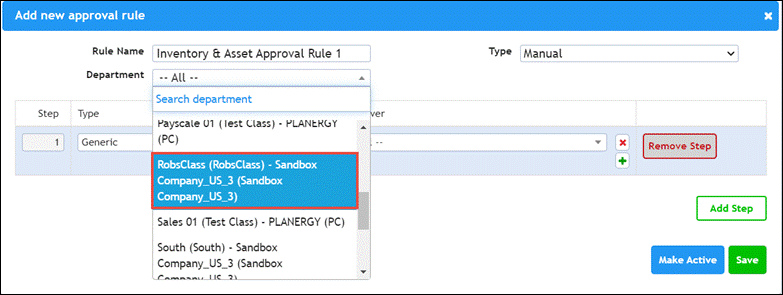
- Select the Manual or Automatic option to manually/automatically trigger the approval rule from the Type dropdown list.

- Select the number of approvers required to approve the stock from the dropdown list in the Approvers Required column.
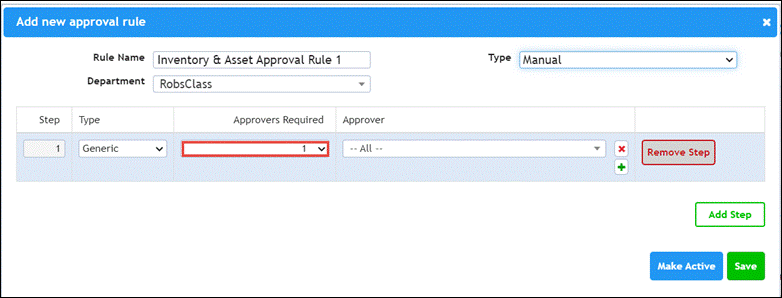
- Select the user you wish to set as the approver from the dropdown list in the Approver column.

Note
You can press the Add icon in the Approver column to set more users as approvers.
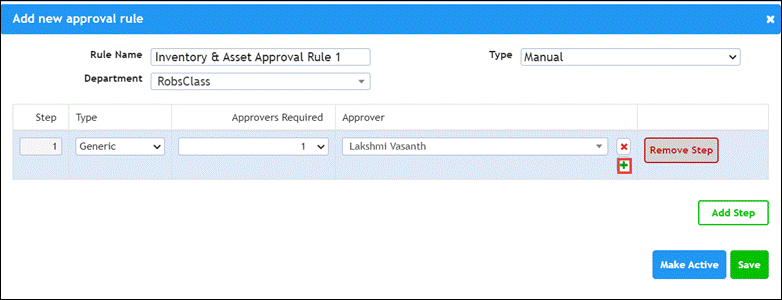 You can press Add Step to add additional steps or Remove Step to delete any additional step added if needed.
- Press Make Active to enable the approval rule.

- Press Save.
 The success notification is displayed and the approval rule is added.
Note
You can edit and view the audit trail of the approval rule by pressing the row of the approval rule you wish to update.
Inventory Item Tags
When the Inventory & Asset module is enabled on your account, the Inventory Item Tags section in the Control Panel is visible to you. Here, you can add inventory item tags that are useful for improved inventory control and streamlined workflows.
- On the Home page, press the Profile icon in the top right corner.
 The profile menu is displayed.
 - Press the Control Panel in the profile menu.
 The Control Panel page is displayed.
 - Navigate to the Catalogue section and press Inventory Item Tags.
 The Control Panel > Inventory Item Tag page is displayed.
 - Press Add New Inventory Item Tag.
 The Add New Inventory Item Tag page is displayed.
Note
All the fields with an asterisk (*) are mandatory. - Enter a name for the inventory item tag in the Inventory Item Tag Name field.

- Enter the description for the inventory item tag in the Inventory Item Tag Description field.

- Select the GL code for the item from the GL Code dropdown list.
Note
Note that this is an optional field.
- Enable the Default button to set this inventory item tag default for all new stock items.

- Enable the Serial Number Required button to mandate the requirement of serial number for the item.

- Enable the Service Date Required button to mandate the requirement of the service date on the item.

- Enable the Expiration Date Required button to mandate the requirement of the expiration date on the item.

- Select the master tag for the inventory item from the Master Inventory Item Tag dropdown list.

- Enable the Show Owner Department button to display the item owner’s department name.

- Enable the Show Operator button to display the operator of the item.
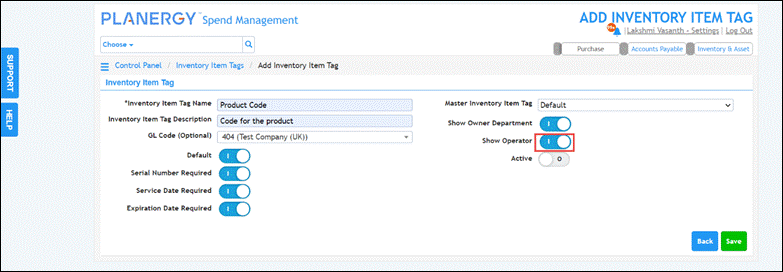
- Enable the Active button to activate this inventory item tag.

- Press Save.
 The item tag is saved.
Item Bundles
When the Inventory & Asset module is enabled on your account, the Item Bundles section in the Control Panel is visible to you. Here, you can add item bundles to group items together.
- On the Home page, press the Profile icon in the top right corner.
 The profile menu is displayed.
 - Press the Control Panel in the profile menu.
 The Control Panel page is displayed.
 - Navigate to the Catalogue section and press Item Bundles.
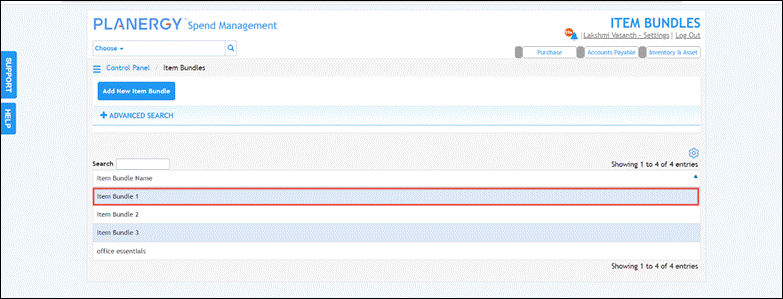
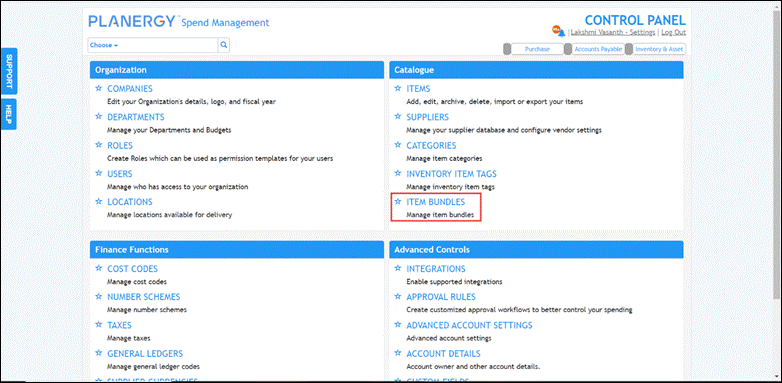 The Control Panel > Item Bundles page is displayed.
 - Enter the name of the item bundle in the Item Bundle Name field.
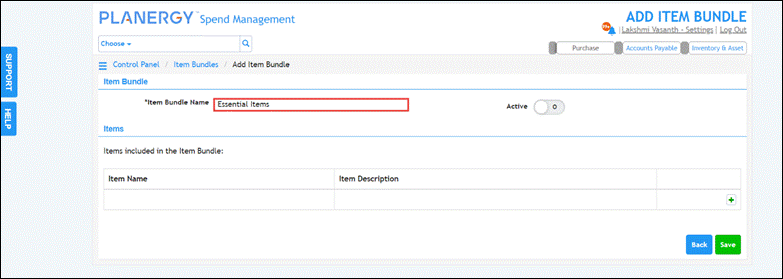
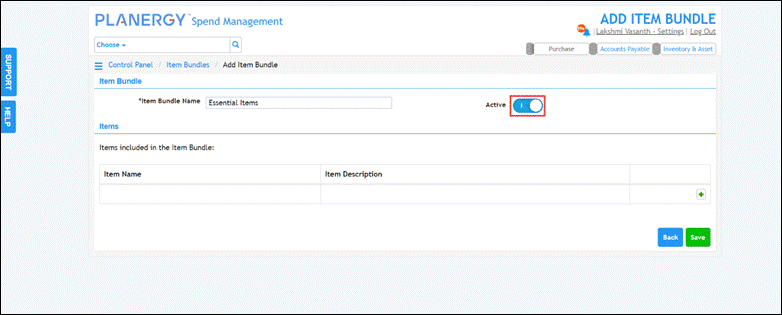
- Enable the Active button to activate this item bundle.
- Press the Add icon to add items to the bundle.
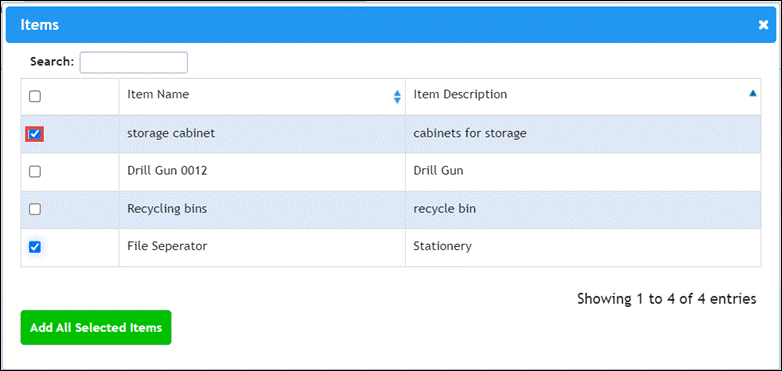
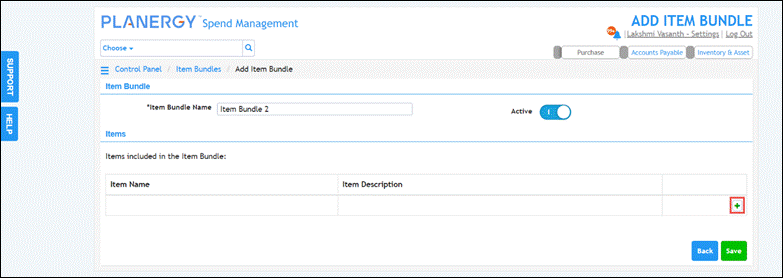 The Items dialog is displayed.
 - Select the items to be included in the bundle by checking the box in the row of the associated item.
Note
Only the items that have been designated as Stockable within the Control Panel > Items section will appear in the item list here. - Press Add All Selected Items.
 The selected items are added to the bundle.
 - Press Save.
 The item bundle is created.
Department Stock Location Settings
It is important to configure the location details within the Stock Location section in the Control Panel > Department to enable the department and its users to incorporate department-specific location details.
To add the location details in the Department, follow the steps below.
- On the Home page, press the Profile icon in the top right corner.
 The profile menu is displayed.
 - Press the Control Panel in the profile menu.
 The Control Panel page is displayed.
 - Press Departments under Organization.
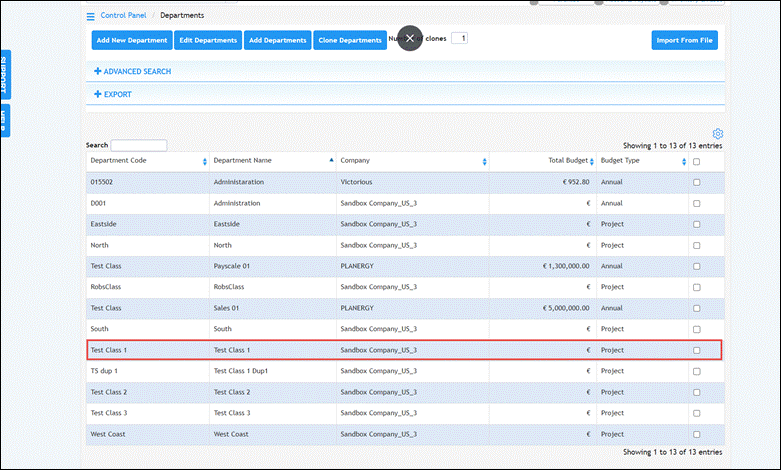
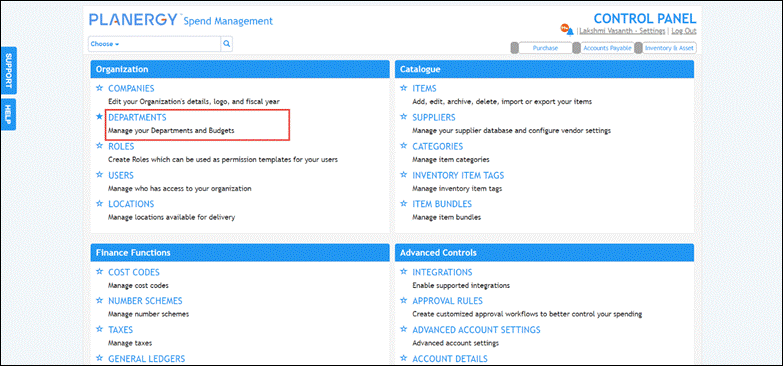 The Control Panel > Departments page is displayed.
 - Press anywhere in the row of the department you wish to add the stock location.
 The Edit Department page is displayed.
Note
All fields with an asterisk (*) are mandatory. - Press the down arrow icon against the Department_Location_Text field.
 The Locations dialog is displayed.
 - Press anywhere in the row of the location to select it from the Locations dialog.
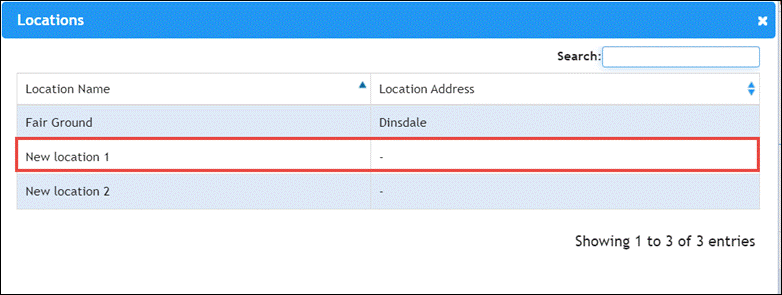
- Press the Add icon to allow this department and its users to request items from the specified storage locations under Users from this department and department itself can requisition items from following storage locations
 The Delivery Location dialog is displayed.
 - Check the box in the row of the location you wish to add.
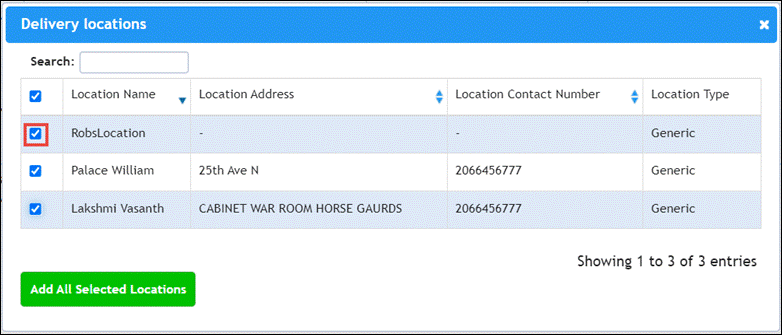
- Press Add All selected Locations.
 The selected locations are added.
-
- You can follow similar steps above to add locations for enabling this department to request item transfer between the storage locations if needed under the Department can requisition item transfer from following storage locations to another storage location section.

- Similarly, you can follow the above steps to add locations for this department to store, receive, and write off items under the Department can store, receive and write off items on following storage locations section.

- You can set any location added to the Stock Location as default by checking the corresponding checkbox in the Default Location under each section.

- You can remove any location added to the Stock Location by pressing the Close icon in the corresponding row.

- You can follow similar steps above to add locations for enabling this department to request item transfer between the storage locations if needed under the Department can requisition item transfer from following storage locations to another storage location section.
- Scroll down the page and press Save.
 The Department saved successfully notification is displayed.
