Inventory & Asset Home Page
The Home page is the landing page of the Inventory & Asset module. It allows you easy navigation through the core sections provided in this module and the PLANERGY Control Panel.
- Navigate to PLANERGY > Inventory & Asset.
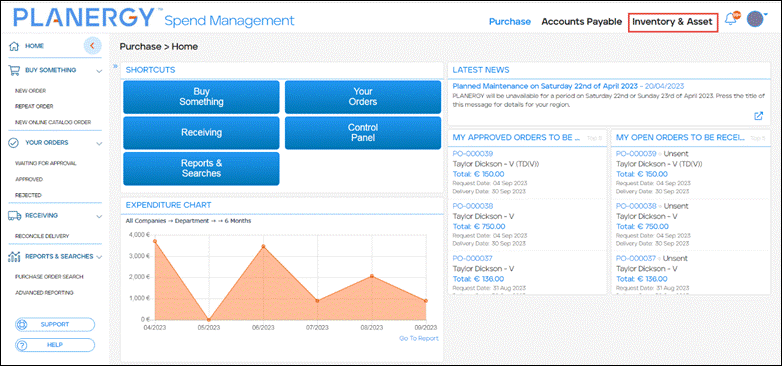 The Inventory & Asset > Home page is displayed.
For more information, refer to the following sections:
My Actions
The My Actions section provides you the ability to create your stock requisition, view your order status, search for your order, view the list of shipments en route to your location, and search through items you have ordered and received.
- Navigate to the Inventory & Asset Home page.

- Press My Actions.
 The My Actions page is displayed.
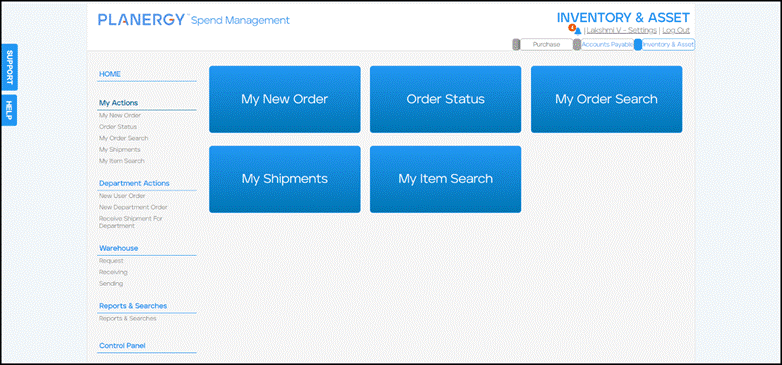
This section is further classified into the following subsections for easier access to the required stock requisition data.
- My New Order – This subsection allows you to place requisition orders for new stock. For more information, refer to How to Create Your New Stock Requisition.
- Order Status – This subsection allows you to view the list of your orders that are classified based on their status. The order status is as follows:
- Waiting for approval – This section displays the list of orders associated with you that are waiting to be approved by you or an approver.
- Approved – This section displays the list of your orders that have been approved.
- Rejected – This section displays the list of orders that have been rejected.
For more information, refer to How to View the Order List with Various Statuses.
- My Order Search – This allows you to search through requisitions you have placed. You can also narrow down the search results of the requisitions by using the search criteria to filter them. For more information, refer to How to Search Your Orders.
- My Shipments – This allows you to view the details of the shipments headed to your location. For more information, refer to How to View Your Shipments.
- My Item Search – This allows you to search for the items that you or other users have ordered and received in the inventory. For more information, refer to How to Search for You Items.
How to Create Your New Stock Requisition
To create your new stock requisition, follow the steps below.
- On the My Actions page, press My New Order.
Note
You can also press My New Order under My Actions on the left navigation menu. The New Requisition For Person page is displayed.
 - Press the down arrow against the Request From Location field.
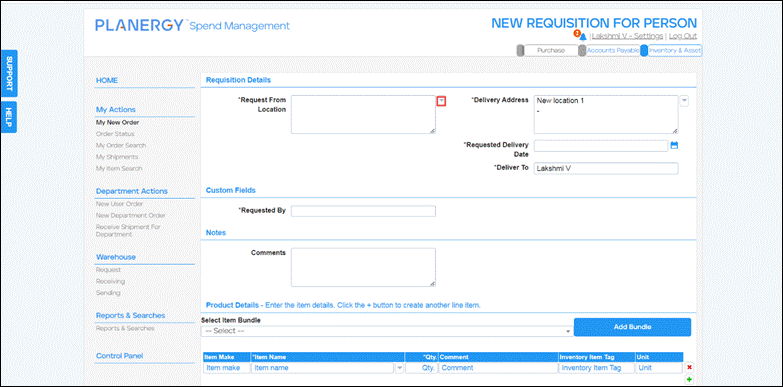 The Location dropdown list is displayed.
 - Select the warehouse location for the items requested from the Location dropdown list.

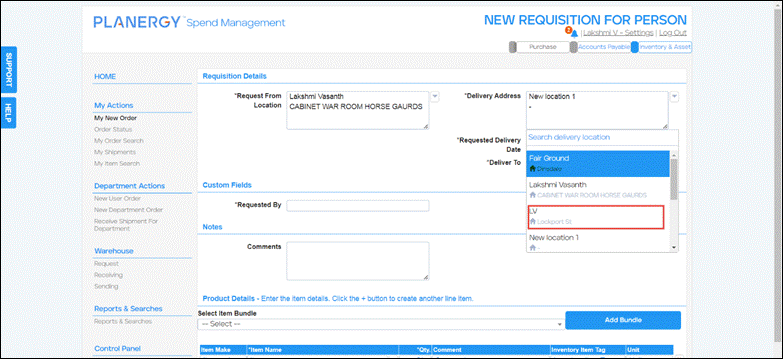
- Press the down arrow corresponding to the Delivery Address field.
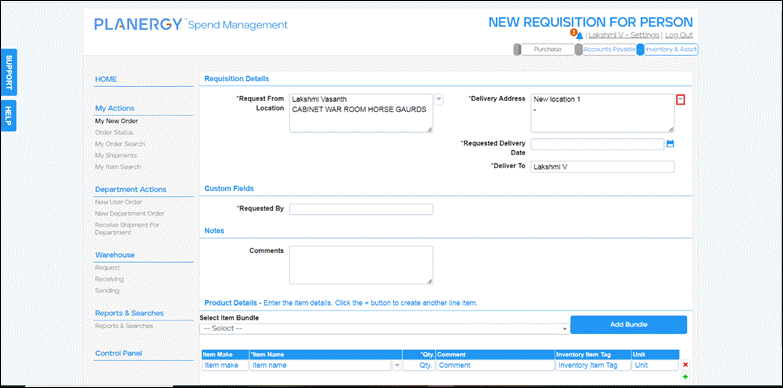 The Delivery Address dropdown list is displayed.
 - Select the delivery location for the items to be received from the Delivery Address dropdown list.
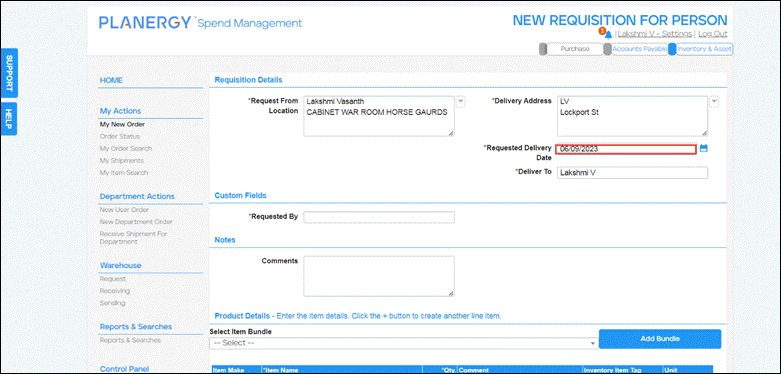
- Select the date of delivery from the Requested Delivery Date dropdown calendar.
- Enter the recipient’s name for receiving the requested items in the Deliver To field.
Note
By default, this will be your name which can be changed if needed.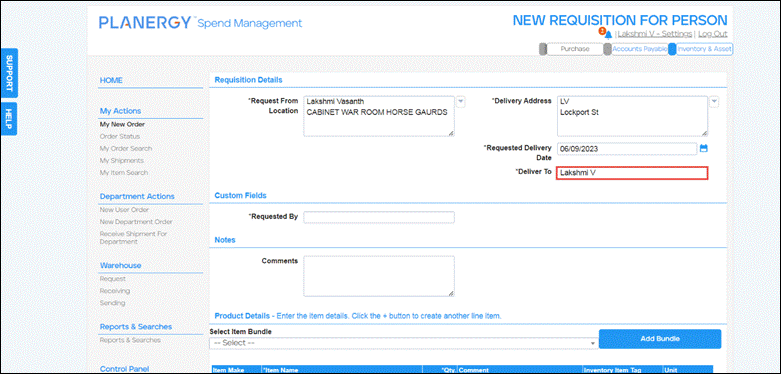
- Enter the person or department that has requested the items in the Requested By field.

- Enter any notes or comments about the requisition in the Comments textbox.

- Select the item bundle from the Select Item Bundle dropdown list if you wish to add items from a bundle.
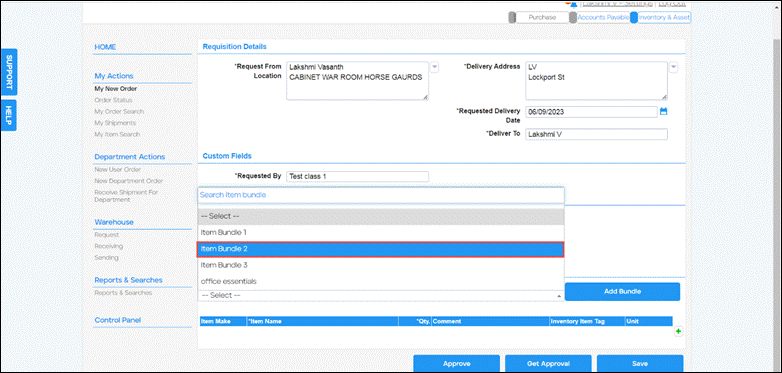
- Press Add Bundle.
 The items from the item bundle are added. You can change the quantity of the items or add new items.
 - Press the Add icon to add a new item.
 A new row to add the item is displayed.
 - Press the down arrow in the Item Name column in the new row to add an item.
 The Items dropdown list is displayed.
 - Check the box against the item you wish to add to the requisition.
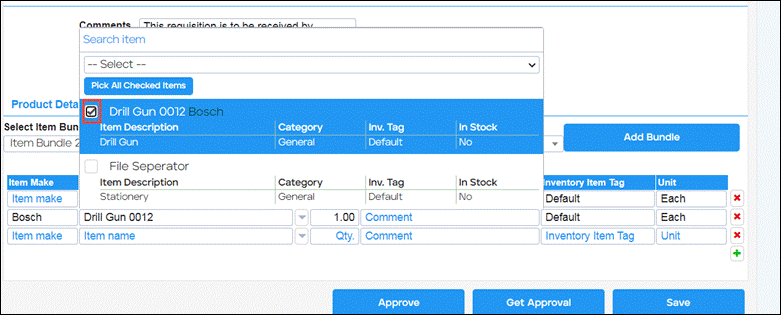
Note
Using the quick search field you can narrow down your search results for an item. - Press Pick All Checked Items.
 The selected item(s) are added.
 - Press Save.
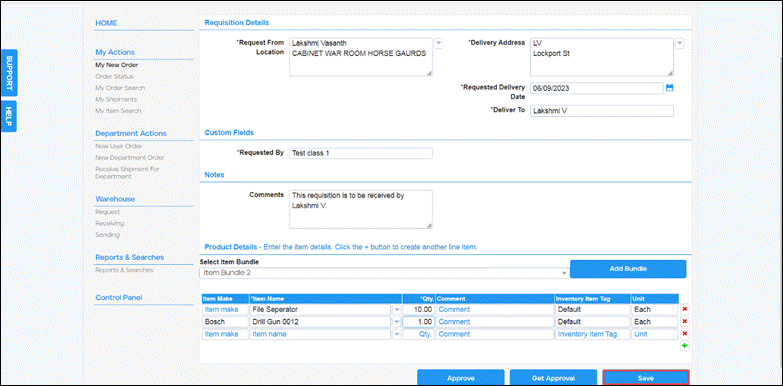
Note
You can directly approve the requisition if you have the permission to do so by pressing Approve or send the requisition for approval from other approvers by pressing Get Approval.
The Requisition successfully saved notification is displayed.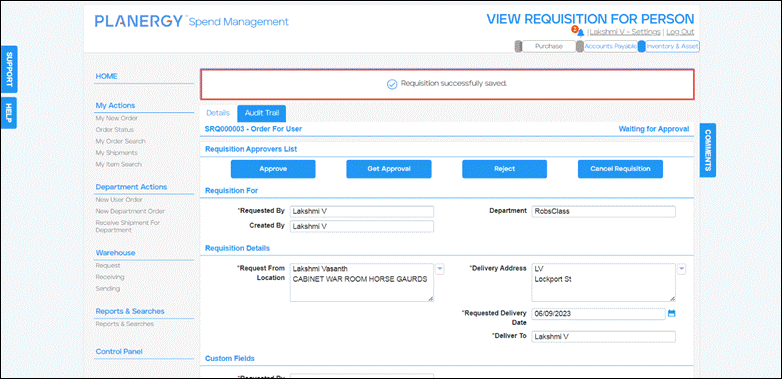
How to View the Order List with Various Statuses
To view your orders with different statuses, follow the steps below.
- On the Inventory & Asset Home page, press Order Status in the left navigation menu.
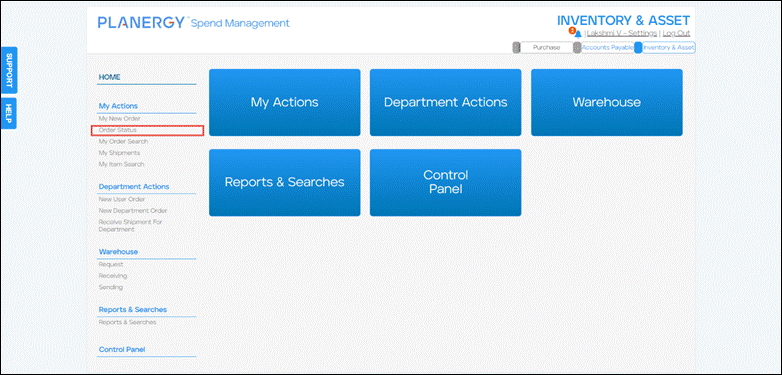 The Waiting For Approval page is displayed by default.
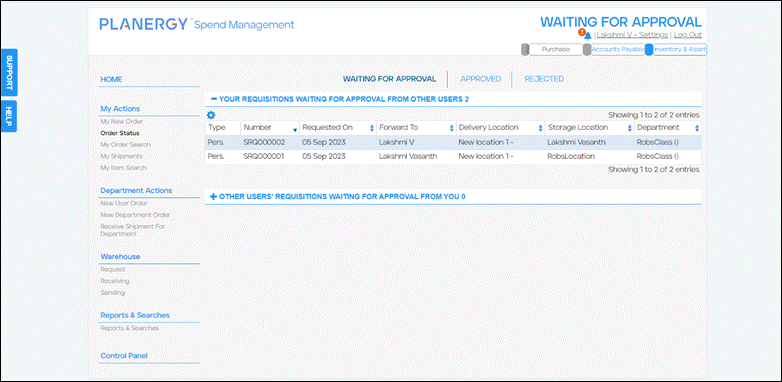 You can view all your orders that have the status as Waiting for Approval. This section is again classified into two subsections:
-
- Your Requisitions Waiting For Approval From Other Users – This subsection displays all your orders that are waiting to be approved by other users.

- Other Users’ Requisitions Waiting For Approval From You – This section displays all the pending requisitions of other users that require your approval if you have the user permission to do so.
 You can approve or reject any requisition if you have the user permission to do so.
For more information, refer to the following sections:
- Your Requisitions Waiting For Approval From Other Users – This subsection displays all your orders that are waiting to be approved by other users.
- To view your order list with the status approved, press Approved.
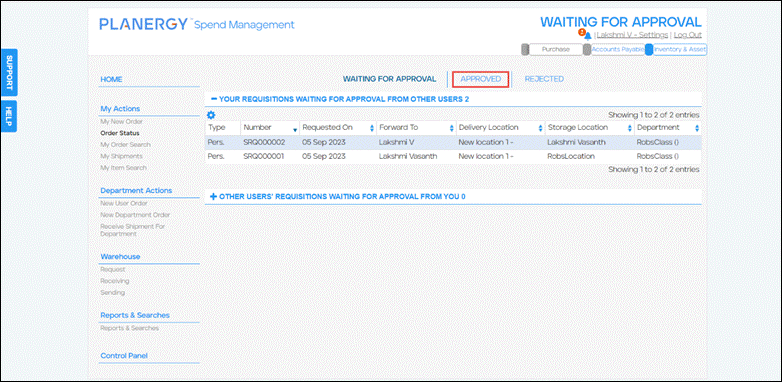 The Approved page is displayed.
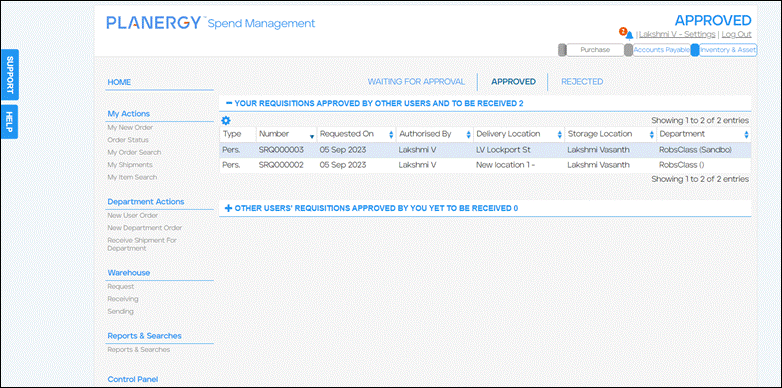 You can view all your orders that have the status as approved. This section is further classified into two subsections as follows:
- Your Requisitions Approved by Other Users and to Be Received – This subsection is displayed by default and shows the list of all your requisitions that are approved by other users. The items on these requisitions are yet to be received.

- Other Users’ Requisitions Approved by You Yet to Be Received – This subsection displays the list of other users’ requisitions that are approved by you. The items on these requisitions are yet to be received. Note that you can approve other users’ requisitions only if you have permission to do so.
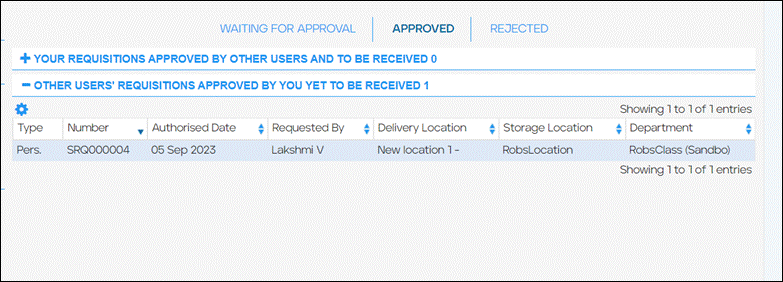
- To view your order list with the status as rejected, press Rejected.
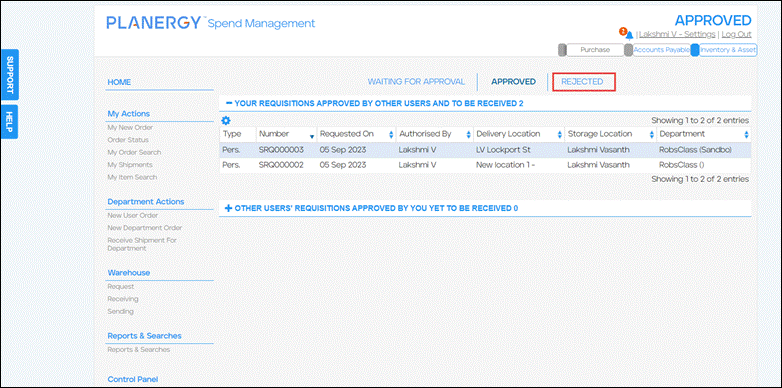 The Rejected page is displayed.
 You can view all your orders that have the status as rejected.
These orders are further classified into two subsections as follows:
-
- Your Requisitions Rejected by Other Users – This subsection displays all your orders that are rejected by other users.
- Other Users’ Requisitions Rejected by You – This subsection displays all the requisitions of other users that are rejected by you if you have the users’ permission to do the same.
How to Approve a Stock Requisition/ Order
You can approve or get approval for any stock requisition based on your user permission settings. To approve a requisition if you have permission to do so, follow the steps below.
- Navigate to My Actions > Order Status.
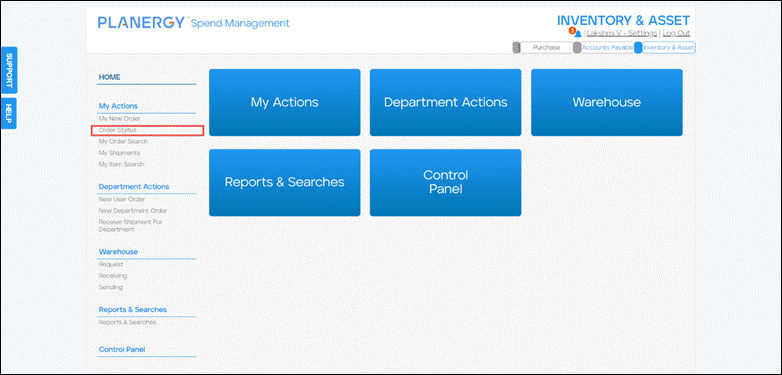 The Waiting For Approval page is displayed.
 - Press the row of the requisition you wish to approve.
Note
You can approve your own/ others’ requisitions if you have configured the user permission to do so.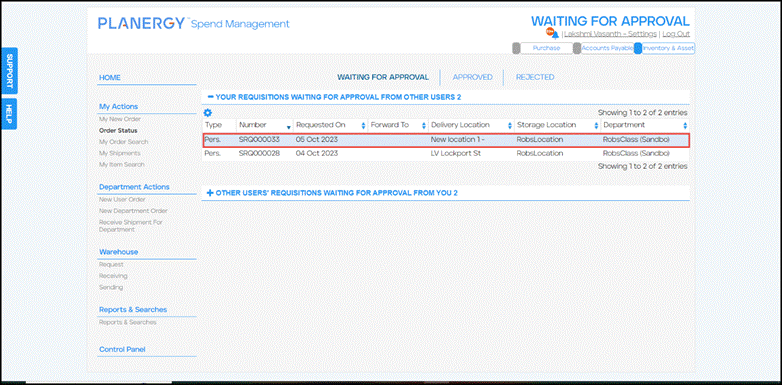 The selected requisition is displayed.
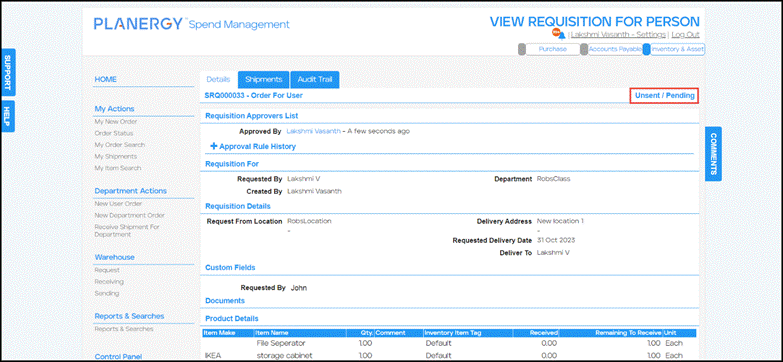
 - Press Approve.
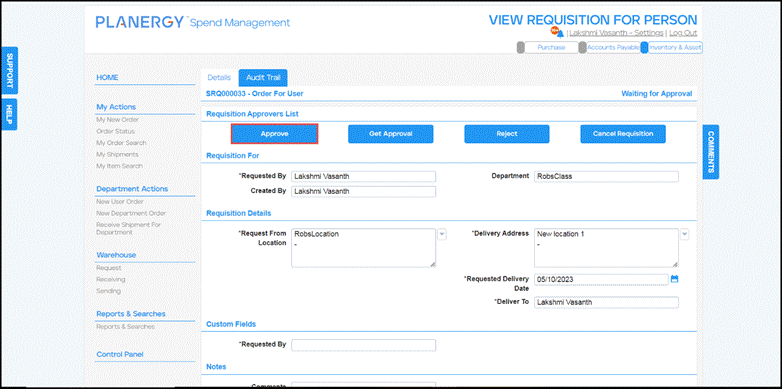 The requisition status changes to Unsent/Pending.
Note
You can send the requisition for approval if you do not have the user permission to approve by following the steps below. - Press Get Approval
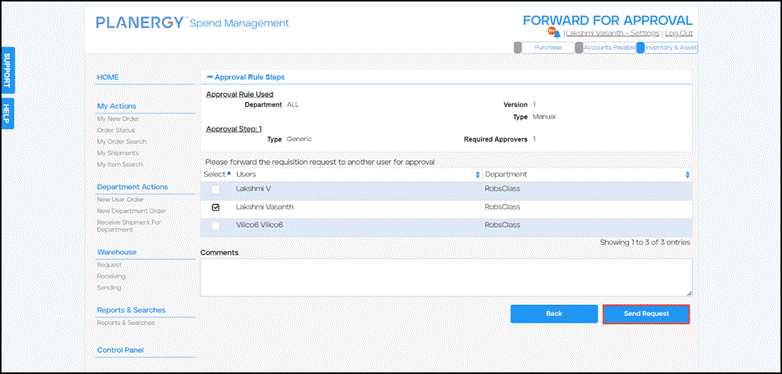
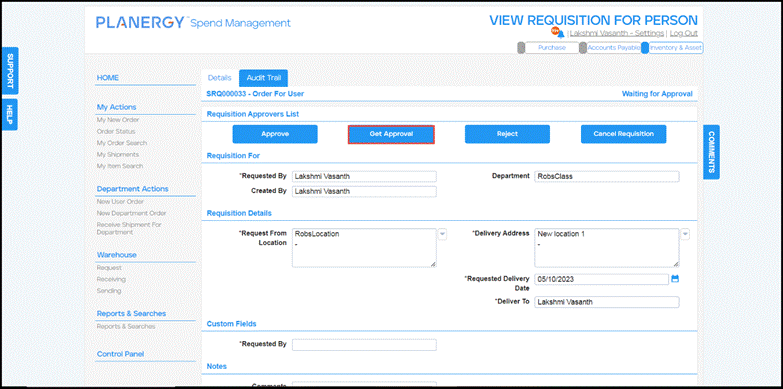 The Forward For Approval page is displayed.
 - Select the user you wish to forward the requisition for approval from the Users list given.

- Press Send Request.
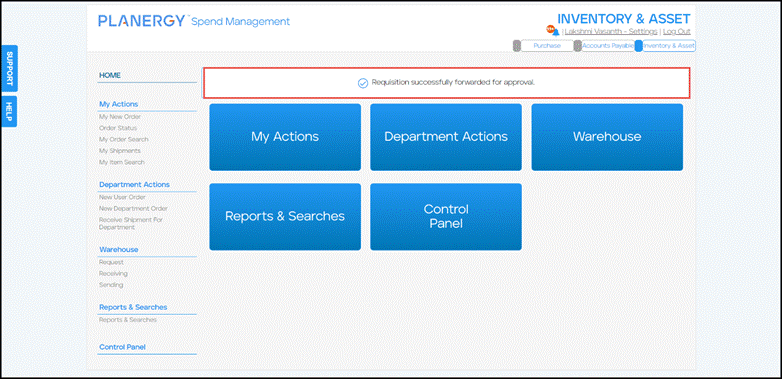
 The Requisition successfully forwarded for approval notification is displayed.
How to Reject a Stock Requisition/Order
You can reject any requisition/ order pending approval if your user permission setting allows you to do so.
To reject a requisition, follow the steps below.
- Navigate to My Actions > Order Status.
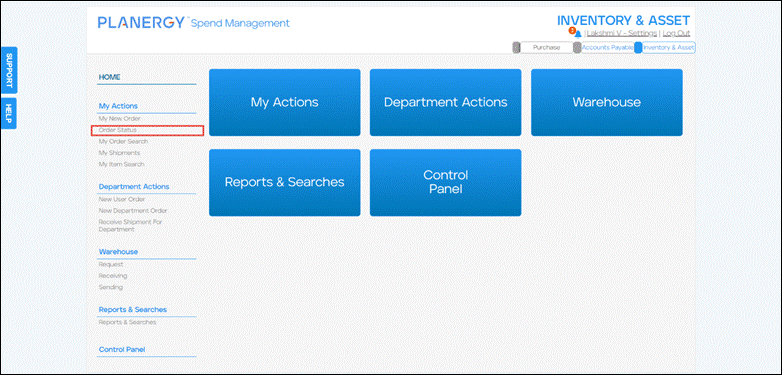 The Waiting For Approval page is displayed.
 - Press the row of the requisition you wish to reject.
Note
You can reject your own/ others requisition if you have configured the user permission to do so.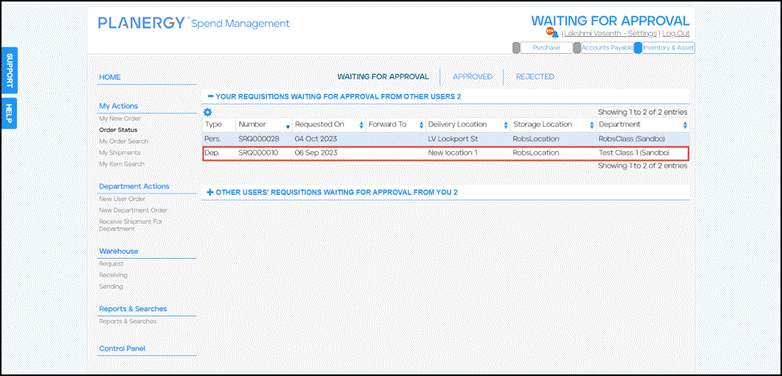 The selected requisition is displayed.
 - Press Reject.
 The Reason for Rejection dialog is displayed.
 - Enter the reason for rejecting the requisition in the space provided.
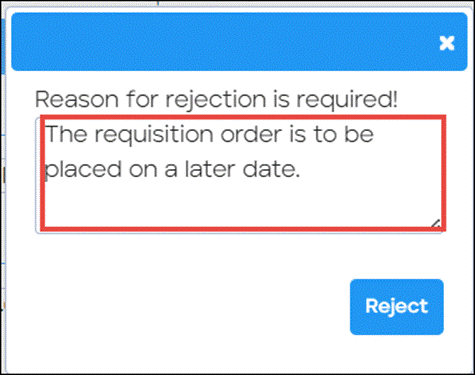
- Press Reject.
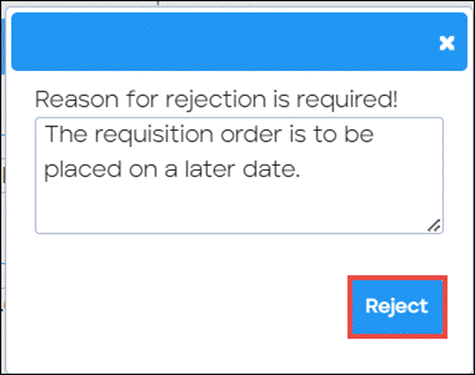 The requisition status changes to Rejected.
How to Cancel Stock Requisition
To cancel a requisition, follow the steps below.
In the following example, we are showing you how to cancel a requisition in My Order Search list. You can follow similar steps to cancel requisitions from the Order Status > Approved section and Report & Searches section.
- Navigate to My Actions > My Order Search.
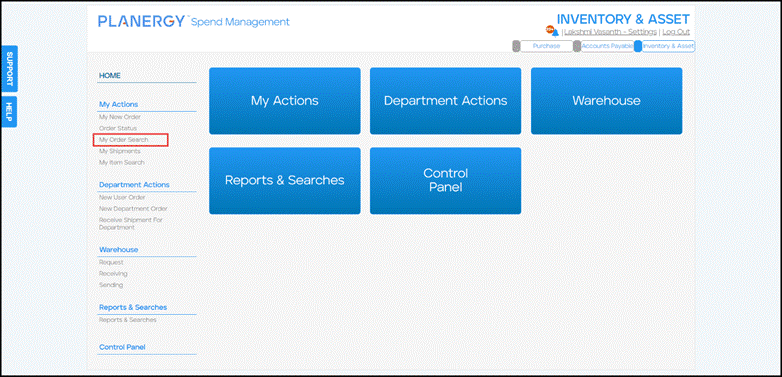 The Order Search page is displayed.
 - Press anywhere in the row of the requisition you wish to cancel or you can search for a requisition using the search criteria fields.
For more information, refer to How to Search for Stock Requisition/ Order.Note
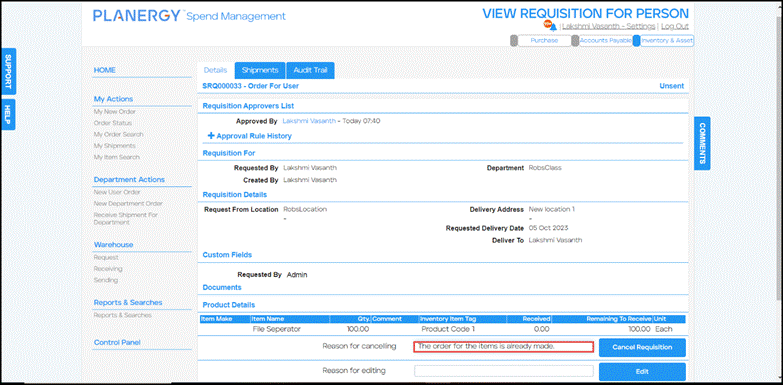
Only the requisitions that are approved and unsent can be canceled. The Details section of the View Requisition For Person page is displayed.
 - Enter the requisition cancellation reason in the Reason for Cancelling field.
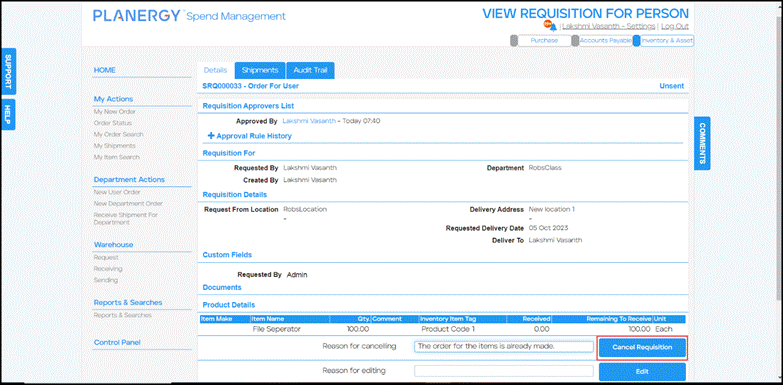
- Press Cancel Requisition.
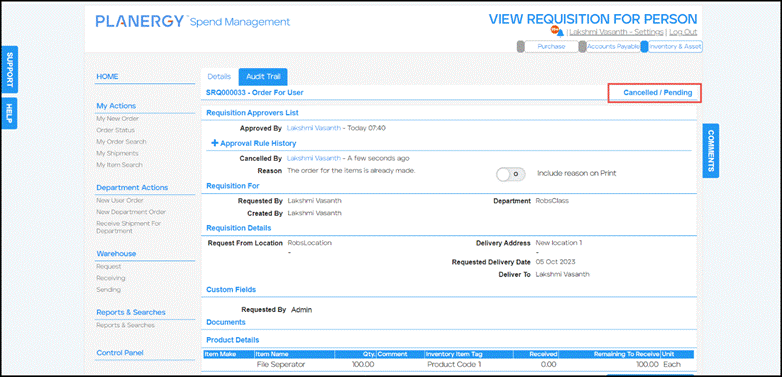
 The requisition status changes to Cancelled/ Pending.
How to Edit Stock Requisition
In the following example, we are showing you how to edit a requisition in the My Order Search list. You can follow similar steps to cancel requisitions from the Order Status > Approved section and Reports & Searches section.
To edit a requisition, follow the steps below.
- Navigate to My Actions > My Order Search.
 The Order Search page is displayed.
 - Press anywhere in the row of the requisition you wish to cancel or you can search for a requisition using the search criteria fields.
For more information, refer to How to Search for Stock Requisition/ Order.Note
Only the requisitions that are approved and unsent can be edited. The Details section of the View Requisition For Person page is displayed.
 - Enter the reason for updating the requisition in the Reason for editing field.
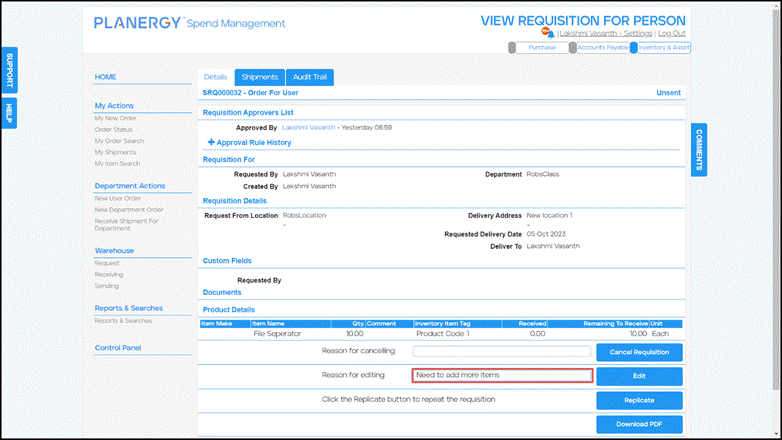
- Press Edit.
 The Pending Changes section of the View Requisition For Person page is displayed.
 - Make the necessary changes to the fields and press Save.
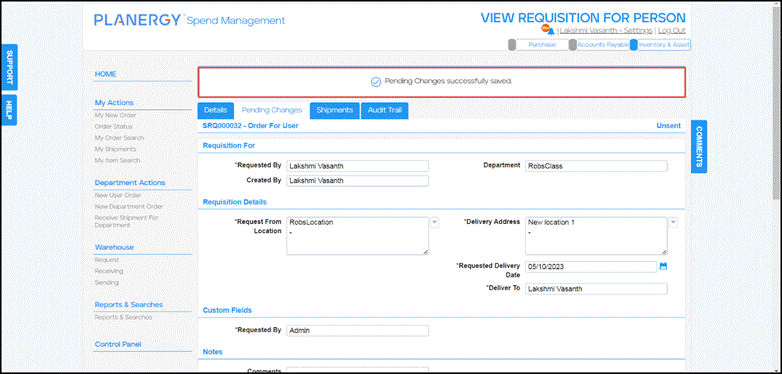
For more information regarding the fields, refer to How to Create Your New Stock Requisition.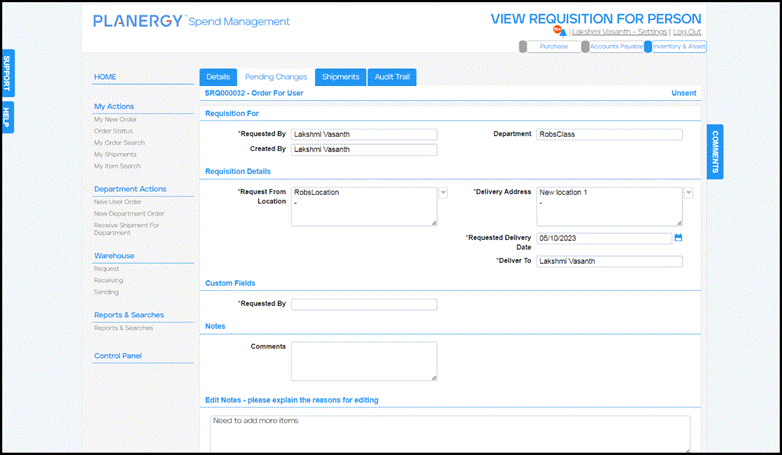 The Pending Changes successfully saved notification is displayed.
How to View Your Shipments
To view the details of the shipment headed to your location, follow the steps below.
- Navigate to My Actions > My Shipments.

The Shipment Receiving page is displayed.
You can view the following details in the table displayed here.
- Shipment Number – Specifies the unique number given for the shipment.
- Delivery Date – Specifies the date of delivery.
- Order Type/ Number – Specifies the type of order and its unique number. The various order types are as described below:
- Pers – Indicates an order placed by the user
- Dep – Indicates an order placed by the department
- Stock Relocation – Indicates the order for stock relocation
- Request from Location – Specifies the location from where the request has been initiated.
- Delivery Location – Specifies the location where the items need to be delivered.
- Requested By – Specifies the person who initiated the request.
- Shipment Info – Specifies the information of the shipment for tracking purposes.
- Shipment Status – Specifies the status of the items received in the shipment.
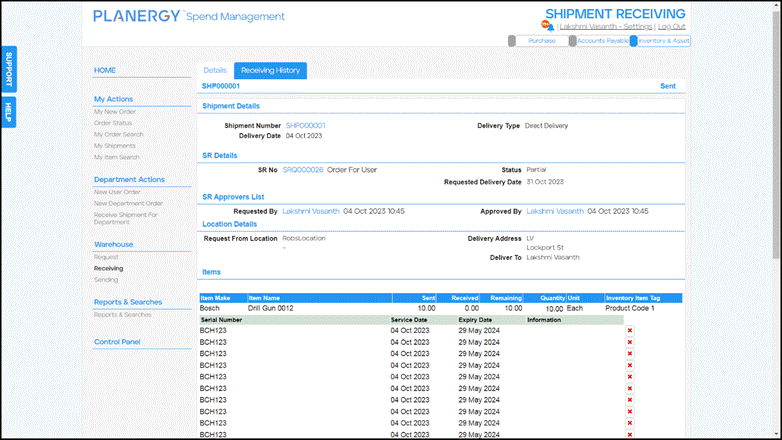
- Press anywhere in the row of the shipment you wish to view or you can use the various search criteria field to search for the required shipment.
 The shipment Details page is displayed.
How to Search for Your Items
To search for the items you have ordered and received in the inventory and across all the other users’ items that you have access to, follow the steps below.
- Navigate to My Actions > My Item Search.
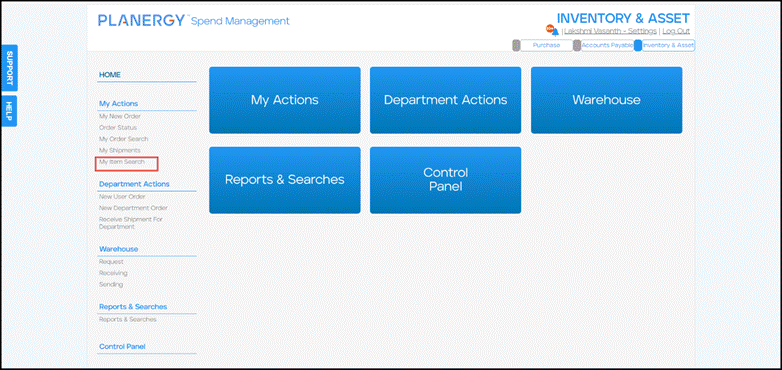 The My Items page is displayed.
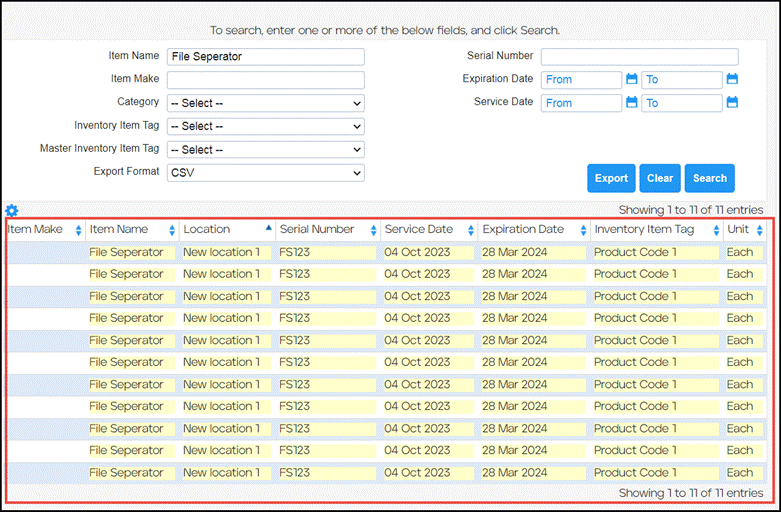
 - To narrow down your list of items, enter the data in the search criteria fields needed.

- Press Search.
 The Items matching the search criteria are displayed.
How to Receive Your Shipment
To receive items from your shipment, follow the steps below.
- Navigate to My Actions > My Shipments.
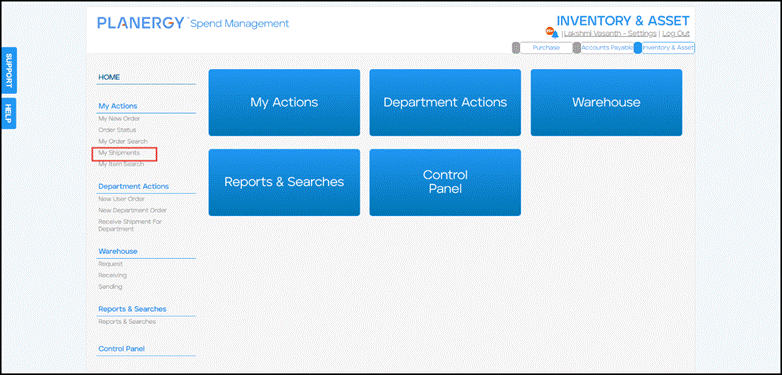 The Shipment Receiving page is displayed.
 - Press anywhere in the row of your user order that you wish to receive the items.
 For more information, refer to How to Search for Stock Requisitions/ Orders.
Note
You can use the search criteria fields to search for the required shipment.
The Details page of the shipment order is displayed. - Scroll down and press Receive Items.
 The Shipment has been saved notification is displayed.
