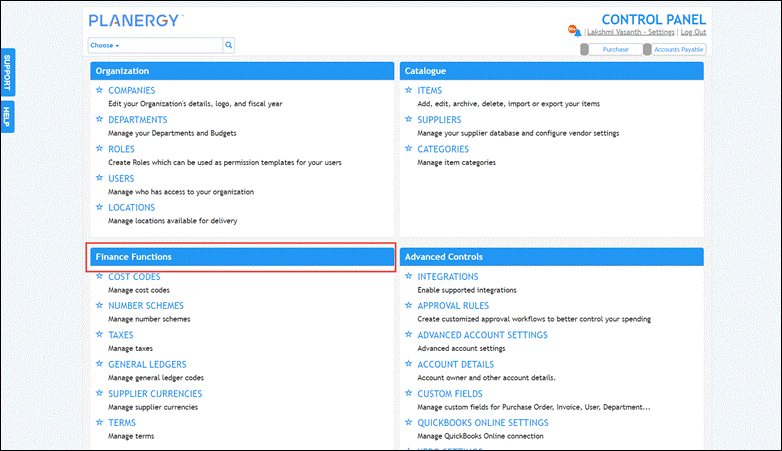
The Finance Functions section allows you to set up the various elements in the system broadly related to finance functionality.
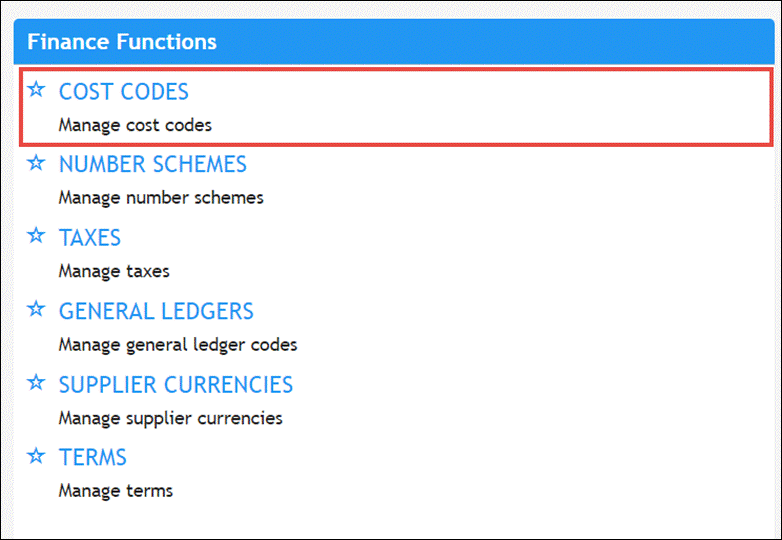
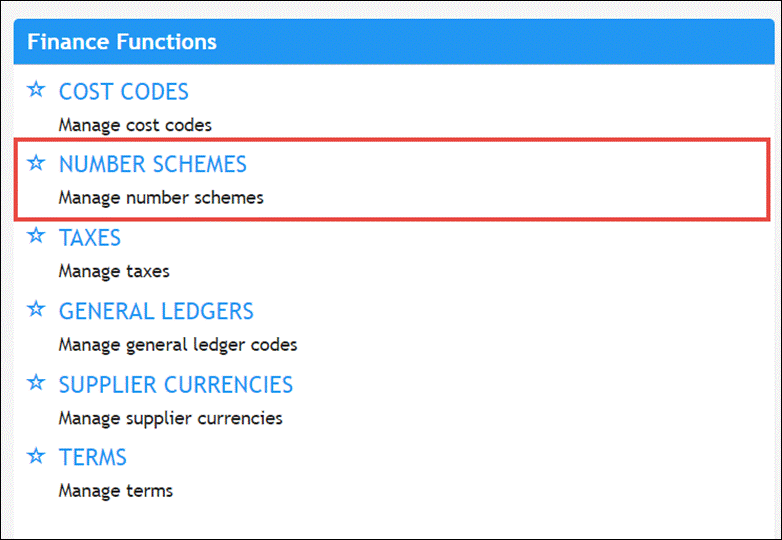
The Finance Functions section is classified into Cost Codes, Number Schemes, Taxes, General Ledgers, Supplier Currencies, and Terms.
You can also perform the common actions of the Control Panel that is applicable to this section.
For more information, refer to the following sections:
Cost Codes
Cost Codes Overview
The cost codes are generally used instead of categories to generate reports on locations, expenditures, etc.
You can also use them to classify purchases or expenditures and to assign a job number.
You can link the cost codes to delivery locations to automatically assign them when the location is selected.
In the Cost Code section, you can add a new cost code, import it from a file, and also view the integration history and the audit trail.
- Navigate to Control Panel > Finance Functions section and press Cost Codes.
 The Control Panel > Cost Code page is displayed.
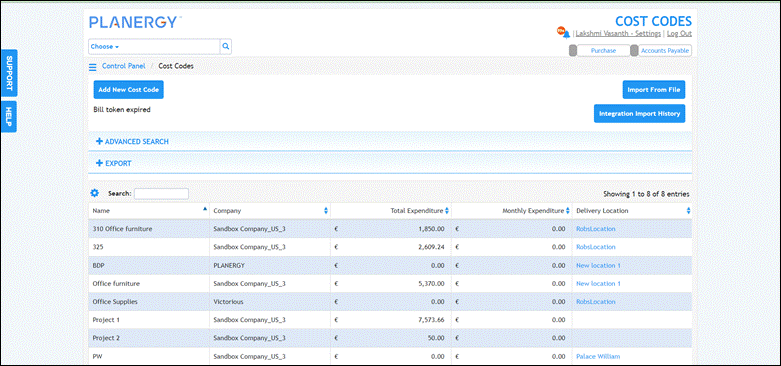
For more information, refer to the following sections:
- Common Operations Across All Core Sections of Control Panel
- How to Add/Edit Cost Code
- How to View Cost Code Integration Import History
How to Add/Edit Cost Code
To add a new cost code, follow the steps below.
- On the Control Panel > Cost Codes page, press Add New Cost Code.
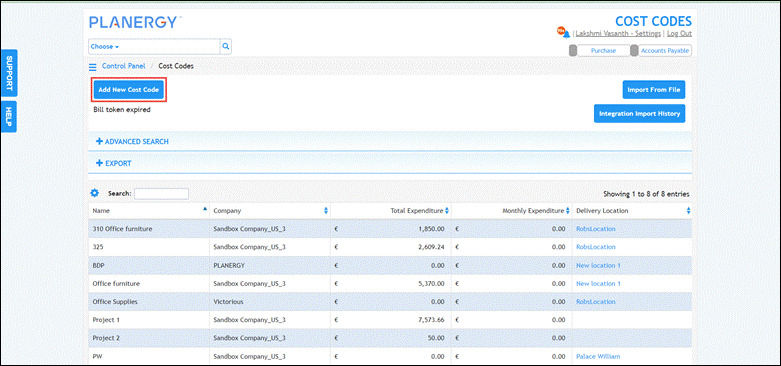 The Add Cost Code page is displayed.
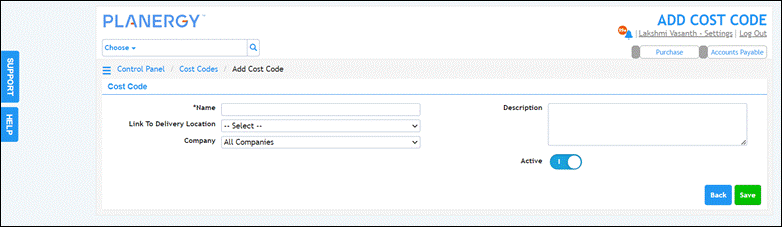
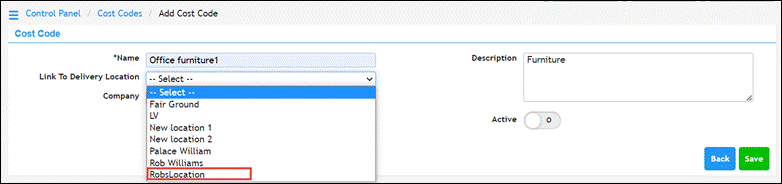
- Enter the name of the cost code in the Name field.
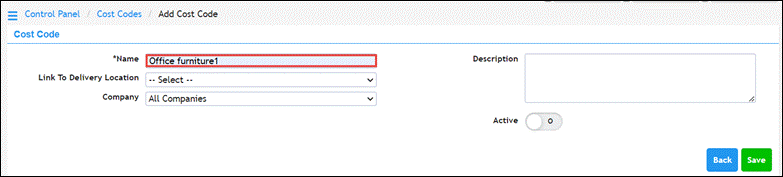
- Enter any information or description about the cost code in the Description field.

- Select the delivery location to link the cost code from the Link To Delivery Location dropdown list.
- Select the company to link the cost code from the Company dropdown list.

- Enable/disable the Active button to set the cost code as active/inactive. By default, the button is enabled.

- Press Save.
 The success notification is displayed.
Note
To edit a cost code, press anywhere in the row of the cost code you wish to update on the Control Panel > Cost Codes page. The Edit Cost Code page is displayed.
 You can now make the necessary changes and press Save.
Number Scheme
Number Schemes Overview
The Number Scheme in PLANERGY is used for the numbering of requisitions and purchase orders in the system in a sequence.
The number sequentially assigned for a requisition will start with REQ by default and is based on the time of the order when saved for the first time.
The number sequentially assigned for a purchase order will start with PO by default and is based on when the order is given the required level of approval.
You will need to contact the support team using the Support button on the left of the page if you wish to make any changes to the default number scheme.
- Navigate to Control Panel > Finance Functions section and press Number Schemes.
 The list of all the number schemes available in the system is displayed.
- Press anywhere in the row of the Number Scheme you wish to view the details. The Edit Number Scheme dialog is displayed with details of the number scheme.

Taxes
Taxes Overview
The Taxes section allows you to create the various tax rates applicable to the goods and services bought for your business.
You can assign a tax type such as federal or state tax, set the tax percentage rate, assign the tax to a specific company, and mark it as a default tax
You can also perform the common actions of the Control Panel that is applicable to this section.
- Navigate to Control Panel > Finance Functions section and press Taxes.
 The Control Panel > Taxes page is displayed.
For more information, refer to the following sections:
- Common Operations Across All Core Sections of Control Panel
- How to Add/Edit Tax
- How to Import Taxes from Xero
How to Add/Edit Tax
To add a new tax, follow the steps below.
- On the Control Panel > Taxes page, press Add New Tax Code.
 The Add Tax dialog is displayed.
Note
All fields with an asterisk (*) are mandatory. - Enter the type of tax in the Tax Type field.

- Enter any information or description about the tax in the Tax Description textbox.

- Select the company that is entitled to this tax from the Company dropdown list.

- Check the box Default Tax if you wish to set this tax as default.
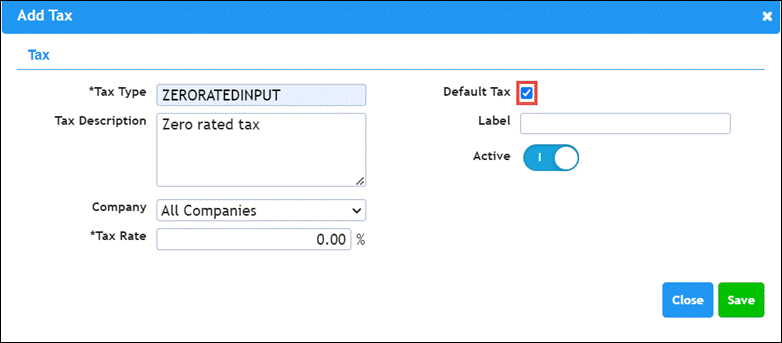
- Enter a label for the tax in the Label field.

- Enable/disable the Active button to set the tax as active/inactive. By default, the button is enabled.

- Enter the percentage of tax applicable in the Tax Rate field.

- Press Save.
 The success notification is displayed.
Note
To edit any tax, press anywhere in the row of the tax you wish to edit. The Edit Tax dialog is displayed.
 Make the necessary changes and press Save.
How to Import Taxes from Xero
To import taxes from your accounting software such as Xero, follow the steps below.
- On the Control Panel > Taxes page, press Import from Xero.
 The progress notification is displayed.
General Ledgers
General Ledgers Overview
The General Ledgers section allows you to configure the GL Codes that can be assigned against the items of an order.
The GL code assigned is used to match the items on an invoice against the purchase order.
Note that you can create the same GL codes in PLANERGY as that of your accounting software so that tracking and reporting on purchases are made easier.
You can view, edit, or add new GL codes based on your user permissions.
You can also perform the common actions of the Control Panel that is applicable to this section.
- Navigate to Control Panel > Finance Functions section and press General Ledgers.
 The Control Panel > General Ledgers page is displayed.
For more information, refer to the following sections:
- Common Operations Across All Core Sections of Control Panel
- How to Add/Edit GL Code
- How to Import GL Code from Accounting Software (Xero)
How to Add/Edit GL Code
To add a new general ledger code, follow the steps below.
- On the Control Panel > General Ledgers page, press Add New GL Code.
 The Add GL Code dialog is displayed.
Note
All the fields marked with an asterisk (*) are mandatory. - Enter the unique general ledger code in the GL Code field.

- Enter any information or description about the GL Code in the GL Description textbox.

- Select the company for which the GL Code is applicable from the Company dropdown list.
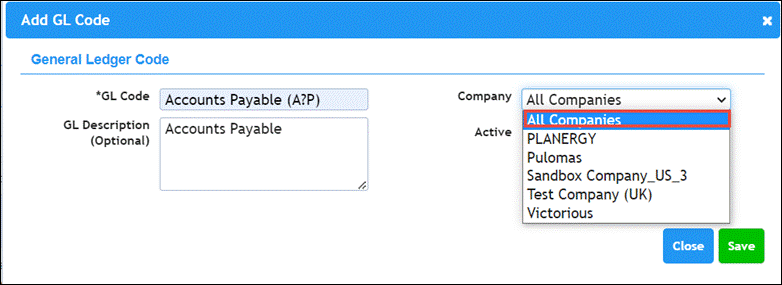
- Enable or disable the Active button to activate or inactivate the GLCode as needed. Note that by default, the Active button is enabled.

- Press Save.
 The success notification is displayed.
Note
To edit a GL Code, press anywhere in the row of the GL Code you wish to edit. The Edit GL Code dialog is displayed.
 Make the necessary changes and press Save.
How to Import GL Code from Accounting Software (Xero)
To import GL Code from your accounting software such as Xero, follow the steps below.
- On the Control Panel > General Ledgers page, press Import from Xero.
 The progress notification is displayed.
Supplier Currencies
Supplier Currencies Overview
The Supplier Currencies section allows you to set the currencies available for creating an order in the system.
You can view, edit, or add new currencies based on your user permissions.
You can also perform the common actions of the Control Panel that is applicable to this section.
- Navigate to Control Panel > Finance Functions section and press Supplier Currencies.
 The Control Panel > Supplier Currencies page is displayed.
For more information, refer to the following sections:
- Common Operations Across All Core Sections of Control Panel
- How to Add/Edit Supplier Currency
- How to View Exchange Rate Audit Rate of Supplier Currency
How to Add/Edit Supplier Currency
To add a supplier currency, follow the steps below.
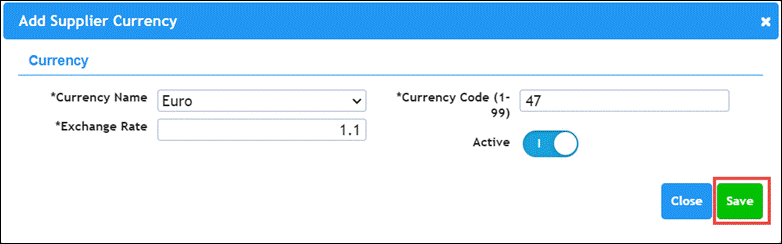
- On the Control Panel > Supplier Currencies page, press Add New Supplier Currency.
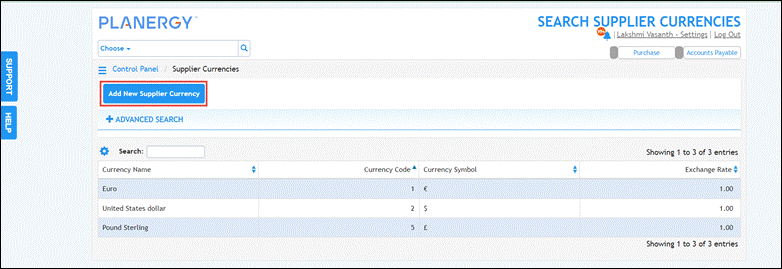 The Add Supplier Currency dialog is displayed.
Note
All the fields marked with an asterisk (*) are mandatory. - Select the name of the currency from the Currency Name field.

- Enter the rate of exchange in the Exchange Rate field.

- Enter the country code between 1 to 99 in the Country Code (1-99) field.

- Enable or disable the Active button to activate or inactivate the Supplier Currency as needed. Note that by default, the Active button is enabled.

- Press Save.
 The success notification is displayed.
Note
To edit a supplier currency, press anywhere in the row of the supplier currency you wish to update on the Control Panel > Supplier Currencies page. The Edit Supplier Currency dialog is displayed.
 You can now make the necessary changes and press Save.
How to View Exchange Rate Audit Trail of Supplier Currency
To view the audit trail of the exchange rate of a supplier currency added to the system, follow the steps below.
- On the Control Panel > Supplier Currencies page, press anywhere in the row of the supplier currency you wish to view the exchange rate history.
 The Edit Supplier Currency dialog is displayed.
- Press Exchange Rate Audit Trail. The Exchange Rate Audit Trail is displayed.

Terms
Terms Overview
The Terms section allows you to configure the payment terms that will be available when creating an order in the system.
You can view, edit, or add new terms based on your user permissions.
You can also perform the common actions of the Control Panel that is applicable to this section.
- Navigate to Control Panel > Finance Functions section and press Terms.
 The Control Panel > Terms page is displayed.
For more information, refer to the following sections below:
How to Add/ Edit Terms
To add a new term, follow the steps below.
- On the Control Panel > Terms page, press Add New Term.
 The Add Terms dialog is displayed.
Note
All the fields marked with an asterisk (*) are mandatory. - Enter the name of the term in the Term Name field.

- Enter the number of credit days in the Credit Days field.

- Enter any information or description in the Description field.

- Select the company for which the term is applicable from the Company dropdown list.

- Enable/disable the Active button to allow the term to be enabled/disabled. By default, this button is activated.

- Press Save.
 The success notification is displayed.
Note
To edit a term, press anywhere in the row of the term you wish to update on the Control Panel > Terms page. The Edit Terms dialog is displayed.
 You can now make the necessary changes and press Save.
How to View Term Integration Import History
To view the integration import history of terms, follow the steps below.
- On the Control Panel > Terms page, press anywhere in the row of the term you wish to view the integration import history.
 The Edit Terms dialog is displayed.
- Press Integration Import History. The Details of Integration Import/Export History page is displayed.

Units of Measure
Units of Measure Overview
The Units of Measure section allows you to define the general units of measure that can be used to associate with your items.
You can view, edit, or add new units of measure based on your user’s permission to do so.
You can also perform the common actions of the Control Panel that is applicable to this section.
- Navigate to Control Panel > Finance Functions section and press Units of Measure.
 The Control Panel > Search Units of Measure page is displayed.
For more information, refer to the following sections:
How to Add/Edit Unit of Measure
To add a new unit of measure, follow the steps below.
- On the Control Panel > Search Units of Measure page, press Add New Unit of Measure.
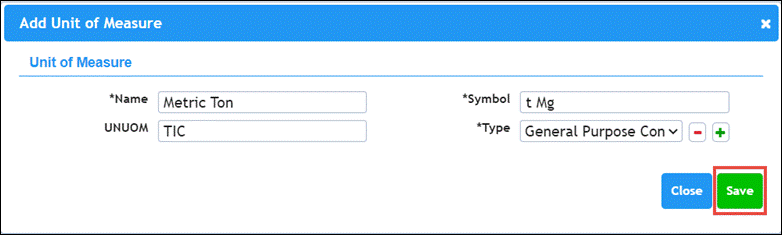
 The Add Unit of Measure dialog is displayed.
Note
All the fields marked with an asterisk (*) are mandatory. - Enter the name of the unit of measure in the Name field.

- Enter the United Nations code for the unit of measure in the UNUOM field.

- Enter the symbol for the unit of measure in the Symbol field.

- Select the type of unit of measure from the Type dropdown list.

Note
You can add a new type of unit measure by pressing the Add icon. The Add Unit of Measure Type dialog is displayed. Enter the name of the type in the field provided and press Add.
- Press Save.
 The success notification is displayed.
Note
To edit a unit of measure, press anywhere in the row of the unit of measure you wish to update on the Control Panel > Search Units of Measure page. The Edit Unit of Measure dialog is displayed.
 You can now make the necessary changes and press Save.