There are a few operations that are common across the Control Panel such as searching for specific data, archiving, exporting data of a section, importing data from a file into a section, viewing the audit trail of a section, and replicating the data.
For more information, refer to the following sections:
How to Search for Specific Data
You can also use the quick search bar or the advanced search feature to further narrow down your search in various sections of the core areas of the Control Panel.
In the following example, we are showing you how to search for a company in the Organizations > Companies section.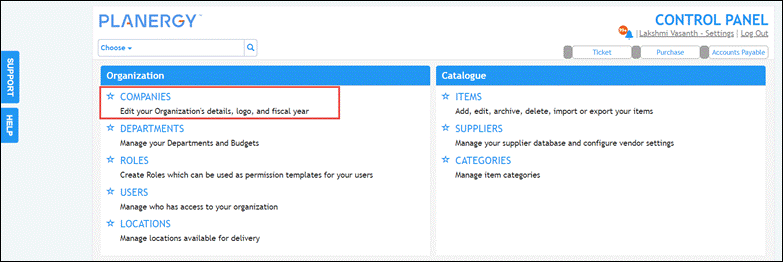
You can follow similar steps to search for data in the other sections of the core areas of the Control Panel.
Using the Quick Search Bar
To search for a company using the quick search, follow the steps below.
- Navigate to the quick Search bar in the Control Panel > Companies page.
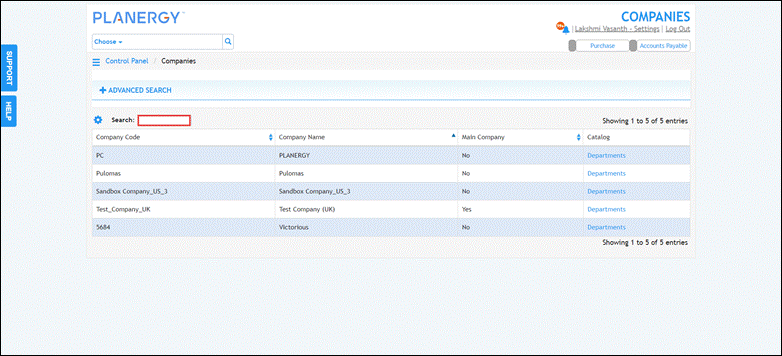
- Enter the characters present in the name of the company or the company code.
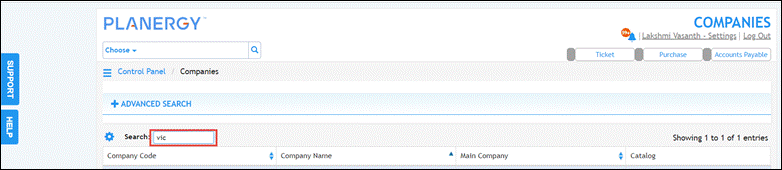 As you type the related characters in the quick search, the companies matching the search criteria are displayed.
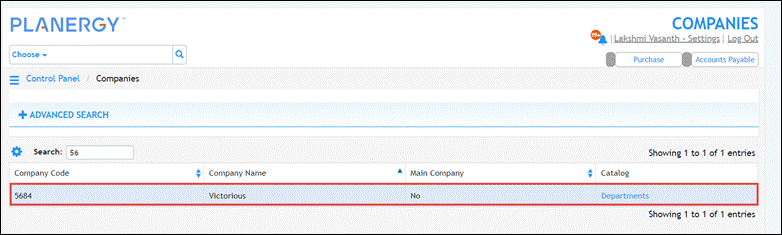
Using Advanced Search
To search for a company using Advanced Search, follow the steps below.
- Press Advanced Search on the Control Panel > Companies page.
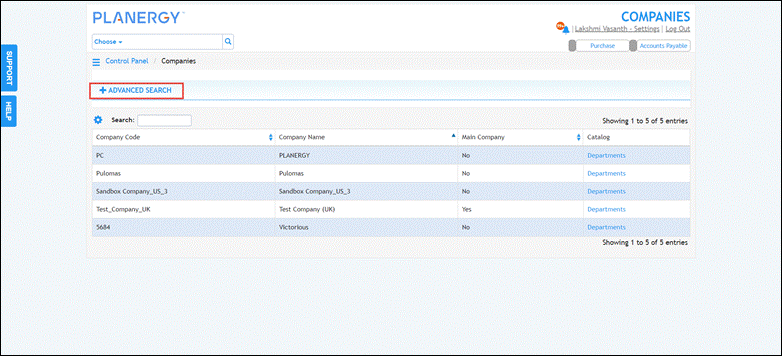 The Advanced Search section is displayed.
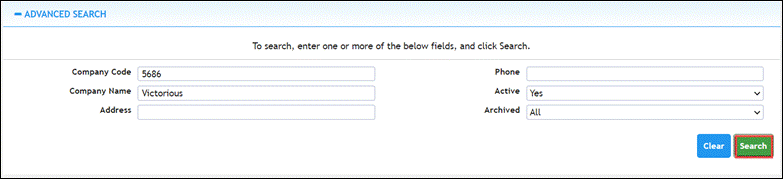
- Enter the search criteria to narrow down the search for the companies in the fields provided.
 You can search for a company based on the company code, company name, address, or phone number. You can also search for a company by the active status of the company or the archive status of the company.
 - Press Search after entering the search criteria.
 The companies matching the search criteria are displayed.
How to Search for Inactive Data
You can search for any data specific to a section across the PLANERGY Control Panel that is inactive.
In the following example, we are showing you how to search for an inactive company in the Organizations > Companies section.
You can follow similar steps to find the inactive data across other sections of PLANERGY Control Panel.
- Navigate to Control Panel > Companies.

The Control Panel > Companies page is displayed. - Press Advanced Search.
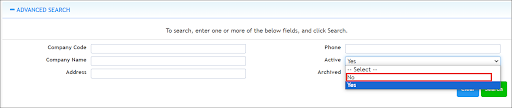
 The Advanced Search fields are displayed.
 - Select No from the Active dropdown list.
- Press Search.
 The list of companies that are currently inactive is displayed.
How to Search for Archived Data
You can search for any data specific to a section across the PLANERGY Control Panel that is archived.
In the following example, we are showing you how to search for an archived company in the Organizations > Companies section.
You can follow similar steps to find the inactive data across other sections of PLANERGY Control Panel.
- Navigate to Control Panel > Companies.

The Control Panel > Companies page is displayed. - Press Advanced Search.

The Advanced Search fields are displayed.
Note
By default, archived companies d will have the status as Inactive. - Select No from the Active dropdown list.

- Select Yes from the Archived dropdown list.

- Press Search.
 The list of companies that are archived is displayed.
How to Archive Specific Information
You can archive specific data in any of the various sections of the core areas of the Control Panel.
In the following example, we are showing you how to archive a company in the Companies section.
You can follow similar steps to archive data in the various sections of the core areas of the Control Panel.
- Navigate to Control Panel > Companies page.

- Press anywhere other than the Catalog column in the row of the company you wish to archive.
 The Edit Company page is displayed.
- Press Archive. The Archive? dialog is displayed.

- Press Confirm. The archive success notification is displayed and the company is archived.
How to Export Specific Data
You have the option to export data from several sections of the Control Panel core areas such as Departments, Users, Locations, Items, and many more.
In the following example, we are showing how to export data from the Departments section. You can follow similar steps to export data from the other section of the Control Panel.
-
- Navigate to the Control Panel > Departments page.

- Press Export.
 The Export section is displayed.
- Select the type of export from the Export dropdown list.

- Select the type of document format to export from the Export Type dropdown list.

Note
- By default, the basic Department details are exported in CSV
- You can also export the department details based on User Permission by Default template or Department Budget Audit Trail.

- The document can also be exported in XLS or XLSX formats.

- Navigate to the Control Panel > Departments page.
- Press Run Export.
 In this example, we are exporting department basic details in CSV format. You can follow similar steps to export details based on your user permission by Default template or Department Budget Audit Trail in any of the document formats. The Departments basic export CSV file is downloaded on your system.
- Press the downloaded document. The document is displayed.
 You can also customize the export. For more information, refer to Customize Export.
Customize Export in Control Panel Sections
You can further customize the exporting of data in the various core sections of the Control Panel.
In the following example, we are showing you how to custom export Department section data. You can follow similar steps to custom export data of other core sections in the Control Panel.
To customize the exporting of the department details, follow the steps below.
-
-
-
-
- In the Export section on the Control Panel > Departments page, press Customize.
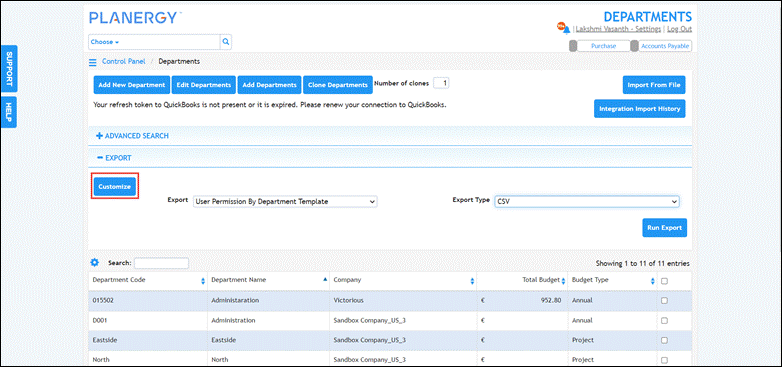 The Customization dialog is displayed.
  Note that the export Name and Description fields will be auto-populated with data from the original export. This can be changed as needed.
 - Enter a unique name for the export in the Name field. This field is a mandatory field.

- Enter a description or information about the export in the Description field.

- Enable the button Include Export Name if you wish to display the export name in the document.

- Enable the button Include Timestamp if you wish to display the export time and date on the document.

- Enable the button Include Header if you wish to display the header on the export document.

- Select the columns you wish to export from the Available columns list.

- Press Add to move the columns into the Selected columns list to export.
 Note that you can press Remove to move the columns from the Selected columns list back to the Available columns list.
 - Select the column names that you wish to reorder in the Selected columns list and press the up arrow button to move it up the order list.
 You can press the down arrow button to move the selected columns down the order list.
 - Press Save As New.
 The customized export is added to the Export list.
 - Select the customized export and press Run Export.
 The document is downloaded on your screen.
 - Press the downloaded document.
 The downloaded document is displayed.
- In the Export section on the Control Panel > Departments page, press Customize.
-
-
-
How to Import Data from File into Specific Subsections
You can upload data from your system, edit the data, export the errors that occurred while uploading the data, import valid uploaded data, and remove them.
In the following example, we are showing you how to import data from a file into the Departments section.
You can follow similar steps to import data from a file into the respective sections of the Control Panel by entering the relevant information required in the fields.
-
-
-
-
- Navigate to Control Panel > Departments page.

- Press Import From File.
 The Import Departments page is displayed.
- Navigate to Control Panel > Departments page.
-
-
-
For more information, refer to the following sections:
Download Template for Departments
You should consider downloading the PLANERGY template first as the data from the uploaded file must be in sync with PLANERGY format for the respective core sections.
To download the template, follow the steps below:
-
-
-
-
- Press Download Template on the Import Departments page.
 The template is downloaded on your screen.
 - Press the download file.
 The template is displayed.
  You can now update the required data in the template and save it as a new file. Note that the total budget must be equal to the sum of the amounts of the monthly budgets if entered.
- Press Download Template on the Import Departments page.
-
-
-
Upload Departments
To upload the departments from a file that is in sync with PLANERGY, follow the steps below.
-
-
-
-
- Press Upload on the Import Departments page.
 The Open dialog is displayed.
 - Select the department file you wish to upload and press Open.
 The success notification is displayed and the departments are added.
- Press Upload on the Import Departments page.
-
-
-
Export Errors
Once the departments are uploaded, you can check for any errors and export the errors for further review for further analysis.
To export errors, follow the steps below.
-
-
-
-
- Press Export Errors on the Import Departments page.
 The error file is downloaded on your screen.
 - Press the downloaded file.
 The file with all the errors is displayed.
- Press Export Errors on the Import Departments page.
-
-
-
Import Valid
To import the uploaded departments to the catalog, follow the steps below.
-
-
-
-
- Press Import Valid on the Import Departments page.
 The import success notification is displayed.
Note
Only the data without any errors are considered valid and are imported.
- Press Import Valid on the Import Departments page.
-
-
-
Edit Uploaded Departments
To edit the uploaded departments, follow the steps below.
-
-
-
-
- Scroll to the right end of the Import Departments page.

- Check the box in the row of the department(s) you wish to edit and press Edit Departments.
Note
Only the department data with errors can be selected for making any changes. The Department dialog is displayed.
 - Make the necessary changes and press Save. For more information on the fields, refer to How to Add/Edit Department.
 The department details are updated.
- Scroll to the right end of the Import Departments page.
-
-
-
Remove Uploaded Departments
To delete all the uploaded departments if no longer needed, follow the steps below.
-
-
-
-
- Press Remove Departments on the Import Departments page.
 The confirmation dialog is displayed.
 - Press Confirm.
 The success notification is displayed and all the departments uploaded are removed.
- Press Remove Departments on the Import Departments page.
-
-
-
How to View Audit Trail
You can view the audit trail to track and analyze the actions made on the specific section in any core areas of the Control Panel by following the steps below.
In the following section, we are showing you how to view the audit trail of Items.
You can follow similar steps to view the audit trail in the other various sections of the Control Panel.
-
-
-
-
- Navigate to Control Panel > Items page.

- Press anywhere in the row of the item you wish to view the price audit trail.
 The Edit Item page is displayed.
- Press Audit Trail. The Audit Trail is displayed.
 The latest action detail, including the last modified date, the names of the modifier and creator, and the date of creation are displayed.
 Note
You can view the details of all actions performed on the item by pressing Show All. The action history is displayed.
- Navigate to Control Panel > Items page.
-
-
-
How to Clone Data
You can replicate the data of a specific section in any core area of the Control Panel by following the steps below.
In the following section, we are showing you how to clone the data in the Department section.
You can follow similar steps to clone the data in the other various sections of the Control Panel.
-
-
-
-
- Navigate to Control Panel > Departments page.

- Check the box in the row of the department you wish to clone.

- Enter the number of copies you wish to create in the Number of clones field.

- Press Clone Departments.
 A dialog is displayed to add the department details.
  For more information on the fields, refer to How to Add/Edit Department.
 - Press Save.
 The clones of the department are created and added to the department list.
- Navigate to Control Panel > Departments page.
-
-
-