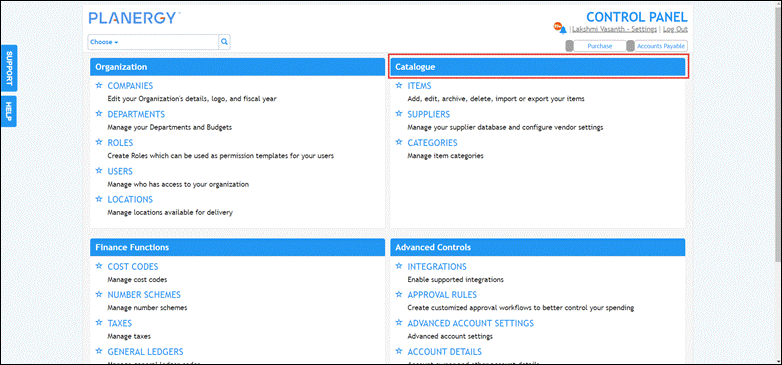
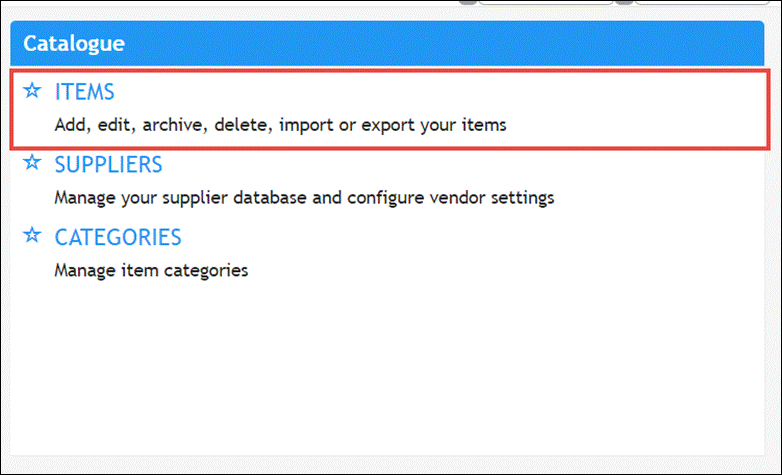
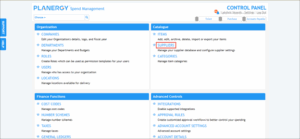
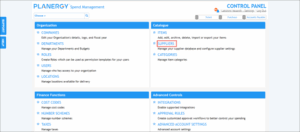
The Catalogue section of the PLANERGY Control Panel is divided into subsections namely Items, Suppliers, and Categories.
The Items section enables you to manage the list of items for the users to request and order. You can include the details of multiple suppliers for a single item so that users can choose the best price for it.
It also allows the users to identify another supplier in case a supplier cannot fulfil an order as requested.
The Suppliers section lets you manage suppliers and attach their items. You can also upload documents directly to the suppliers and thus track contracts for easier compliance management.
The Categories section allows you to manage categories to assign items to them, and also for easier budgeting and reporting purposes.
For more information, refer to the following sections:
Items
Items Overview
You can add the entire item catalogues of your approved suppliers in PLANERGY with the correct detail and pricing.
In this section, you can view, edit, or add new items based on your permissions which may not allow you to see all of the options.
- Navigate to Control Panel > Catalogue section and press Items.
 The Control Panel > Items page is displayed.
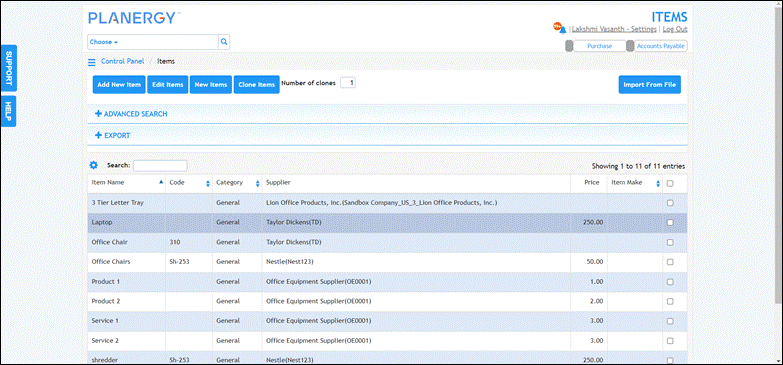
For more information, refer to the following sections:
- Common Operations Across All Core Sections of Control Panel
- How to Add/Edit New Item
- How to View Price Audit Trail of Items
How to Add or Edit New Item
To add a new item, follow the steps below.
- On the Control Panel > Items page, press Add New Item.
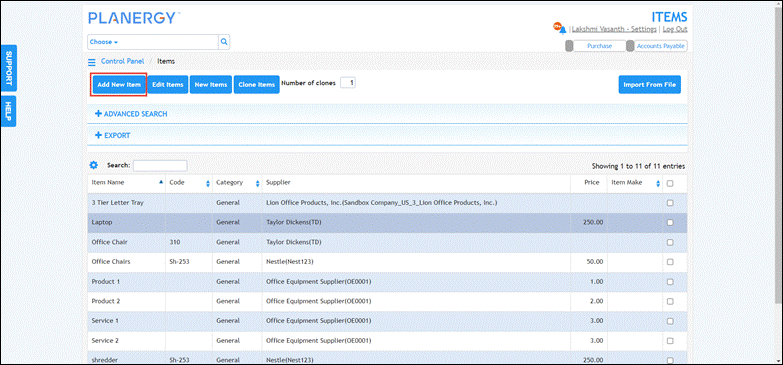 The Add Item page is displayed.
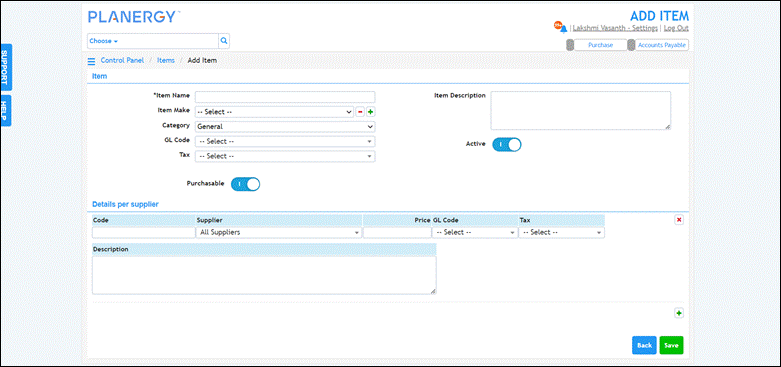
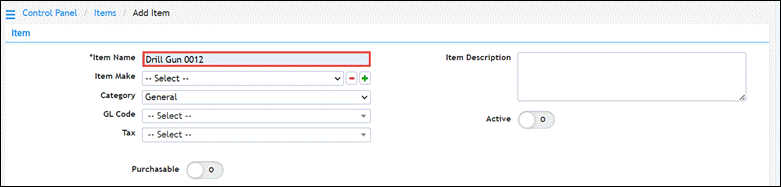
- In the Item section, enter the name of the item in the Item Name field.
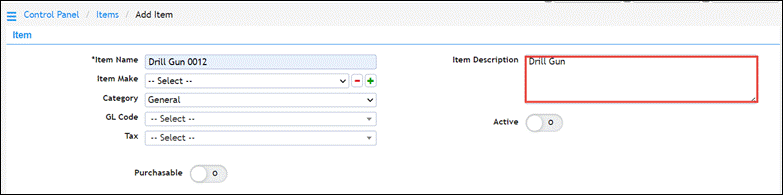
- Enter any description or information about the item in the Description field.
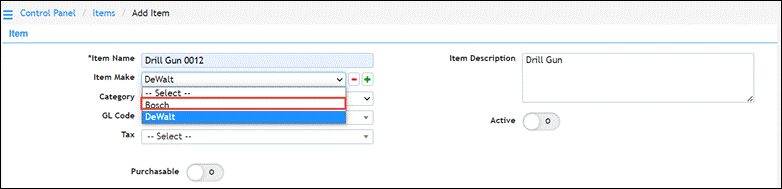
- Select the make of the item from the Item Make dropdown list.
Note
You can add the make of the item if it is not available in the list by pressing the Add icon. In the Add Item Make dialog displayed, enter the make name of the item in the field provided and press Add.
- Select the item category from the Category dropdown list.

- Select the general ledger code from the GL Code dropdown list.
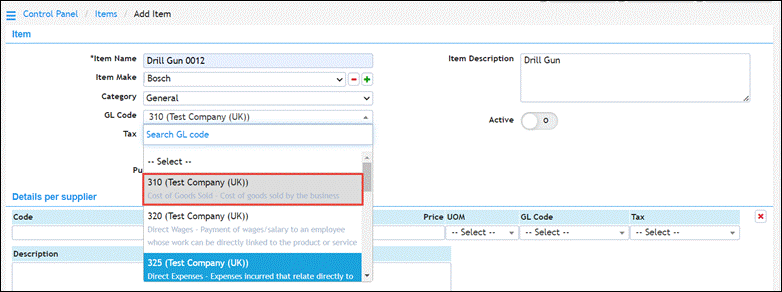
- Select the tax applicable to the item from the Tax dropdown list.

- Enable the Purchaseable button to allow the item to be purchased.

- Enable the Active button to allow the item to be displayed.

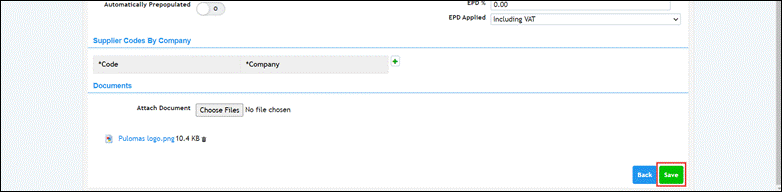
- In the Details Per Supplier section, enter the code for the supplier in the Code field.

- Select the supplier from the Supplier dropdown list.

- Enter the price from the Price field.

- Select the general ledger code from the GL Code dropdown list.

- Select the tax from the Tax dropdown list.

- Enter any information or description of the supplier in the Description field.

- Press Save.
 The success notification is displayed.
Note
To edit an item, press anywhere in the row of the item you wish to update on the Control Panel > Items page. The Edit Item page is displayed.
 You can now make the necessary changes to the fields and save the data.
How to View Price Audit Trail of Items
You can view the history of price changes made on an item by following the steps below.
- On the Control Panel > Items page, press anywhere in the row of the item you wish to view the price audit trail.
 The Edit Item page is displayed.
 - Press Price Audit Trail.
 The Price Audit Trail is displayed.
 The item details such as the item code, supplier, item price, created by, and date of creation are displayed.
Suppliers
Suppliers Overview
The Suppliers section enables you to manage the suppliers you are working with and also attach their items.
You can directly upload documents to the suppliers which will help you keep track of contracts. This will aid in easier compliance management.
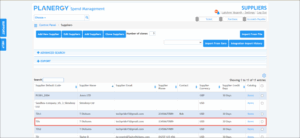
You can view, edit, add, or import suppliers based on your user permissions which may not allow you to see all of the options.
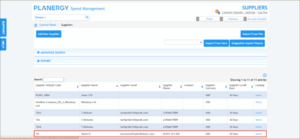
- Navigate to Control Panel > Catalogue section and press Suppliers.
 The Control Panel > Suppliers page is displayed.
For more information, refer to the following sections:
- Common Operations Across All Core Sections of Control Panel
- How to Add a Supplier
- How to Edit a Supplier
- How to Export a Supplier to your Accounting Software
- How to Import a Supplier from Accounting Software
How to Add a Supplier
To add a supplier, follow the steps below.
- On Control Panel > Suppliers page, press Add New Supplier.
 The Add Supplier page is displayed.
- Enter the required fields. For more information on entering the fields for adding the supplier, refer to the following sections:
- Supplier Details
- Supplier Main Contact Details
- Configure Early Payment Discount
- Supplier Code by Company
- Attach Document
- Once all the fields are entered, press Save.
 The success notification is displayed.
How to Edit a Supplier
- To edit supplier details, press anywhere in the row of the supplier you wish to update on the Control Panel > Suppliers page.

- The Edit Supplier page is displayed.

You can now make the necessary changes to the fields as required and save.
Supplier Details
To enter the primary details of the supplier, follow the steps below.
Note
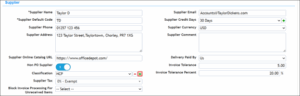
- In the Supplier section on the Add New Supplier page, enter the name of the supplier in the Supplier Name field.

- Enter the unique code for the supplier in the Supplier Default Code field.

- Enter the phone number of the supplier in the Supplier Phone field.
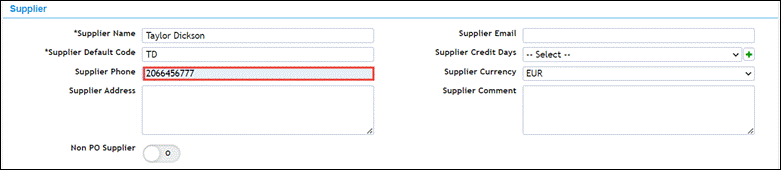
- Enter the address of the supplier in the Supplier Address field.

- Enter the email address of the supplier in the Supplier Email field.

- Select the credit term for the supplier from the Supplier Credit Days dropdown list.

Note
You can add a new credit term by pressing the Add icon. The Add Term dialog is displayed. Enter the required data in the fields provided and press Add.
- Select the currency used for transactions by the supplier from the Supplier Currency dropdown list.

- Enter any information or description about the supplier in the Supplier Comment textbox.

- Enable the Non PO Supplier button if the supplier provides the goods/services without a PO.

- Enable the Active button to allow the supplier to be available in the system.

Note
- By default all suppliers are active.
- Orders can only be created for active suppliers.
- If a supplier is set as inactive or archived, they are no longer available to be used in the system.
The primary supplier details are entered.
Supplier Main Contact Details
To enter the main contact details of the supplier, follow the steps below.
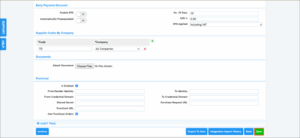
- On the Add New Supplier page, scroll down to the Main Contact section.

- Enter the name of the sales contact person of the supplier in the Contact Name field.

- Enter the phone number of the salesperson in the Contact Phone field.

- Enter the email address of the salesperson in the Contact Email field.
 The main contact details are entered.
Configure Early Payment Discount
To configure the early payment discount for the supplier, follow the steps below.
- On the Add New Supplier page, scroll down to the Early Payment Discount section.

- Activate the Enable EPD button to enable the early payment discounts from the supplier.

- Enable the Automatically Prepopulated button to display the early payment discount applicable automatically on the order.

- Enter the number of days prior to the due date to enable the early payment discount in the No. of Days field.

- Enter the percentage applicable for early payment discount in the EPD% field.

- Select the VAT criteria applicable for the early payment discount from the EPD Applied dropdown list.
 The early payment discount configuration for the supplier is set.
Supplier Code by Company
To add the supplier code for companies, follow the steps below.
- On the Add New Supplier page, scroll down to Supplier Codes By Company section.

- Press the Add icon to add a supplier code.The Code and Company fields are displayed. Note that both fields are mandatory.

- Enter the code of the supplier in the Code field.

- Select the company applicable for the supplier from the Company dropdown list.
 The supplier codes are added by the company. You can add multiple data by pressing the Add icon.
Attach Document
To attach a document to the supplier, follow the steps below.
- On the Add New Supplier page, scroll down to the Documents section.

- Press Choose Files. The Open dialog is displayed.

- Select the document from your system and press Open. The document is attached.

How to Export a Supplier to your Accounting Software
To export the supplier to the connected accounting software, follow the steps below.
In this example, we are showing you how to export supplier details to Xero. You can follow similar steps to export the supplier to other accounting software as well.
- On the Edit Supplier page, scroll down to the end of the page.

- Press Export to Xero. The success notification is displayed.
How to Import a Supplier from your Accounting Software
To import suppliers from your accounting software such as Xero, follow the steps below.
- On the Control Panel > Suppliers page, press Import from Xero.
 The success notification is displayed.
How to Configure a Supplier as Unavailable for Non-Punchout Orders
You can configure a supplier as a punchout-only supplier to ensure pricing by following the steps below.
- Navigate to Control Panel > Catalogue > SUPPLIERS.
The Control Panel > Suppliers page is displayed.
- Press anywhere in the row of the supplier you wish to configure as a non-punchout supplier. You can follow similar steps when adding a new supplier by pressing Add New Supplier.
The EDIT SUPPLIER page is displayed.

The PunchOut section is visible on the Supplier page when the PunchOut feature is enabled in your account.
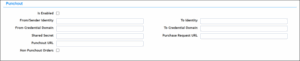
- Check the box Is Enabled.
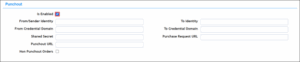
Note: You need to ask your Punchout suppliers for the required credentials and enter them in the Punchout section. Not all fields may be required.
- Enter the user identity set up on the supplier web store in the From/Sender Identity field.

- Enter the unique user credential domain in the From Credential Domain field.
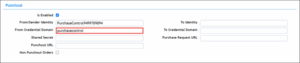
- Enter the user password set up on the supplier web store in the Shared Secret field.
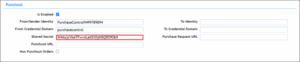
- Enter the Punchout URL to log in to the supplier web store in the PunchOut URL field.
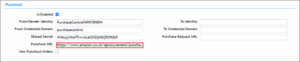
- Check the Non Punchout Orders box. When checked, the supplier is available for non-punchout orders. To configure the supplier as punchout-only, leave this box unchecked.
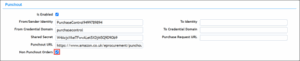
- Enter the supplier identity in the To Identity field.
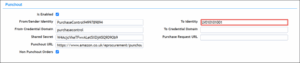
- Enter the unique supplier credential domain in the To Credential Domain field.
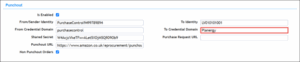
- Enter the request URL in the Purchase Request URL field.
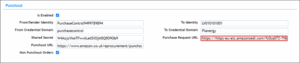
- Press Save.

The success notification is displayed.

You can now place PunchOut orders when needed. For more information, refer to Punchout Order.
How to Add a Supplier Classification
You can add a classification to a supplier to organize them into categories for improved spend analysis, compliance, and strategic sourcing.
- Navigate to Control Panel > Catalogue > SUPPLIERS.

The SUPPLIERS page is displayed.
- Press the row of the supplier you wish to add the classification.
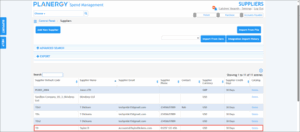
The selected supplier page is displayed.
- Scroll down to the Supplier section and select the required option from the Classification dropdown field.
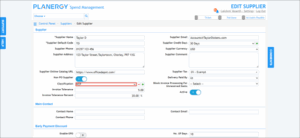
Note: You can add a new classification for the supplier by pressing the Add icon corresponding to the Classification dropdown list.
The Add Classification dialog is displayed where you are prompted to enter the name of the supplier classification in the Name field. Press Add.

The new classification is added to the dropdown list from where you can select.
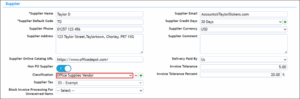
- Press Save.
The supplier classification is successfully added.
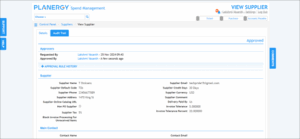
How to Get Approval/Approve a Supplier
You can request approval for a supplier from an approver or approve yourself if you have the user permission. Approving a supplier ensures quality and supports future procurement.
- Navigate to Control Panel > SUPPLIERS.
The SUPPLIERS page is displayed.
- Press the supplier row you wish to approve or get approval for.

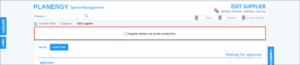
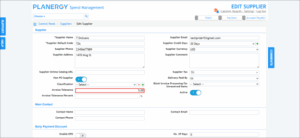
The EDIT SUPPLIER page is displayed.
- To get approval from another approver, press Get Approval.

The approval email is sent to the approver.

Note:
- If you have the user permission to approve a supplier, skip to step 4 to complete the approval process yourself.
- Once the approver receives the approval request, they must navigate to their email inbox, click the link as shown in the image below, and then proceed with the approval.

The EDIT SUPPLIER page is displayed.
- Click Approve.

The supplier is successfully approved.
How to Add Invoice Tolerance and Invoice Tolerance Percent at Supplier level
You can add invoice tolerance and the tolerance percent to a supplier to automatically accept minor invoice discrepancies. Invoice tolerances set on suppliers will override the tolerances set on main company.
- Navigate to the Control Panel > Catalogue > SUPPLIERS.
The SUPPLIERS page is displayed.
- Press anywhere in the row of the supplier you wish to add the invoice tolerance/invoice tolerance percent value.
The EDIT SUPPLIER page is displayed.
- Enter the acceptable difference amount in the Invoice Tolerance field.
- Enter the acceptable percentage deviation in the Invoice Tolerance Percent field.

- Press Save.

The invoice tolerance and tolerance percent are successfully added to the supplier.
Categories
Categories Overview
A category in PLANERGY refers to a group of products that can be used for easier budgeting and reporting purposes.
The Categories section enables you to manage all the categories in the system.
You can add, edit, or clone categories to assign items based on your user permissions.
You can also perform the common actions of the Control Panel that is applicable to this section.
- Navigate to Control Panel > Catalogue section and press Categories.
 The Control Panel > Categories page is displayed.
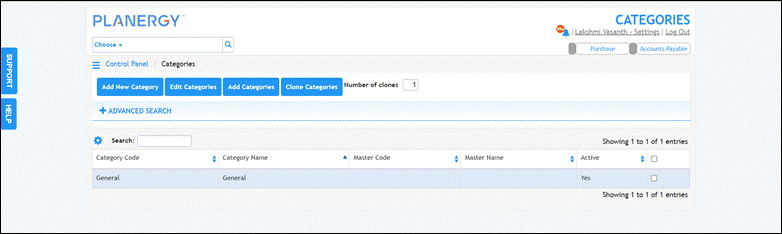
For more information, refer to the following sections:
How to Add/Edit Category
To add a new category, follow the steps below.
- On the Control Panel > Categories page, press Add New Category.
 The Add Category page is displayed.
- Enter the unique code for the category in the Category Code field.

- Enter the name of the category in the Category Name field.

- Select the master category from the Master Category dropdown list.

- Enter any information or description about the category in the Category Description field.

- Press Save.
 The success notification is displayed.
Note
To edit the category, press anywhere in the row of the category you wish to update in the Control Panel > Categories page. The Edit Categories page is displayed.
  You can now make the necessary changes and press Save.