The Reports & Searches section allows you easy access to review all invoices, outstanding POs, and various account payable reports.
In this section you can review reports in-app, export data, create custom reports, and schedule reports.
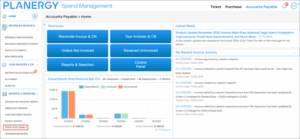
On the Accounts Payable > Home page, press the Reports & Searches button in the Shortcuts panel of the dashboard or Reports & Searches in the left navigation panel. The Reports & Searches subsections are displayed.
Note

For more information, refer to the following sections:
- How to Customize the Table
- How to Sort the Table
- How to Export Data in Table
- Received Not Invoiced Orders
- Orders Not Invoiced
- Purchase Order Search
- Invoice Search
- Advanced Reporting
How to Customize the Table
You can customize a table in any subsection to display only the columns that you wish to view.
In the following example, we are showing you how to customize the Invoice Search table.
Note
To customize the table in Invoice Search, follow the steps below:
- On the Accounts Payable > Invoice Search page, press the Settings icon.
 The Table Settings dialog is displayed.
- Select the number of rows you wish to display from the Showing Rows dropdown list.
- Check the boxes under Column Visibility to display the columns you wish to view on the invoice list. You can uncheck the boxes to hide the columns in the invoice list.The table displays only the selected columns.

How to Sort the Table
You can sort the data in a table in any subsection in ascending or descending order to organize the information and easily access it.
In the following example, we are showing you how to sort the data in the Orders Not Invoiced table. You can follow similar steps to sort all the tables in the Accounts Payable section.
To sort the Orders Not Invoiced table in ascending or descending order, follow the steps below:
- On the Accounts Payable > Orders Not Invoiced page, press the Sort icon in the column of the Orders Not Invoiced table to sort the data in descending order.

- In the example here, we have sorted the Order Total column.
 You can sort the columns in descending order by clicking the Sort icon.
How to Export Data in Table
You can export the data in the table for charting figures, generating pivot tables, or offline documentation.
In the following example, we are showing you how to export the data in the Orders Not Invoiced table.
You can follow similar steps to export the table data in Received Not Invoiced Orders, Purchase Order Search, and Invoice Search.
To export the Orders Not Invoiced data, follow the steps below:
- On the Accounts Payable > Orders Not Invoiced page, press the Export icon in the Summary section.
 The Export dialog is displayed.
- You can export the data at the header level only or export the data in detail. You can also customize the export.
For more information, refer to the following section:
Export with Line Items
This will export the individual line item detail for each purchase order as an individual row. This gives additional detail not available on the header level export.
- On the Export dialog, press the format type of the document in the Order Not Invoiced with line items Export row.
 The format type dropdown list is displayed.
- Select the type of format you wish to download from the dropdown list.

- Press the Run icon. The file is downloaded on your system screen.

- Press the downloaded file. The file is displayed in the selected format.

Basic Export
This will export the header level detail of the purchase orders including the overall values for the individual orders in a single row.
- On the Export dialog, press the format type you wish to export in the Order Not Invoiced basic export row.
 The format type dropdown list is displayed.
- Select the type of format you wish to download from the dropdown list.

- Press the Run icon. The file is downloaded on your system screen.

- Press the downloaded file. The file is displayed in the selected format.

Customize Export
To customize the export of a table, follow the steps below.
In the following example, we are showing you how to customize exporting while using the option Order Not Invoiced with line items export.
You can follow similar steps to custom export using the option Order Not Invoiced basic export.
- On the Export dialog, press the Edit icon in the Order Not Invoiced with line items Export row.
 The Customization dialog is displayed.
Note
The fields with an asterisk (*) are mandatory. - Enter a new name for the custom export in the Name field.
- Enter a description or information if any in the Description field.
- Enable the Include Export Name button if you wish to include the name of the export.
- Enable the Include Timestamp button if you wish to include the time.
- Enable the Include Header button if you wish to include the headers.
- Select the column you wish to add from the Available Columns list.
- Press the Move Right icon to move the columns into the Selected Columns list. You can press the Move Left icon to move the columns from the Selected Columns list back to the Available columns list.
- Select the column names that you wish to reorder in the Selected Columns list and press the Move Down icon to move them down the order list. You can press the Move Up icon to move the selected columns up the order list.In the following example, we are showing that the selected columns are moved down the order list.

- Press Save As New.
 The export is added to the Export dialog and can be run to download the customized document.
Note
You can archive the customized export by pressing Archive in the Customization dialog.
Received Not Invoiced Orders
The Received Not Invoiced Orders section displays all the purchase orders that are outstanding but not fully invoiced. The goods are marked as delivered.
- On the left navigation panel, press Reports & Searches > Received Not Invoiced Orders.
 The Accounts Payable > Received Uninvoiced page is displayed.
 - The Accounts Payable > Received Uninvoiced page can be divided into 3 sections as follows.
- Advanced Search – Allows you to specify additional criteria to narrow down search results for a specific order.
Note
For more information, refer to How to Search Received Not Invoiced Orders.
- Summary – Displays the summary of all received not invoiced POs currently listed in the table. Values in the summary will update if you run a search.
- You can export the purchase orders as CSV, XLX, or XLXS files and also customize the columns that you wish to export. You can also set the columns you wish to view in the purchase order list.
 For more information, refer to the following sections:
- Purchase Orders List – Displays all the outstanding purchase orders that are not fully invoiced but the goods are delivered. You can view the details of a purchase order when you press anywhere in the row of the order you wish to view.You can use the quick search to find a specific purchase order.

- Advanced Search – Allows you to specify additional criteria to narrow down search results for a specific order.
How to Search Received Not Invoiced Orders
To search for a specific received purchase order that is not invoiced, follow the steps below.
- On the Accounts Payable > Received Uninvoiced page, enter the characters present in the PO Number or Supplier in the quick search.

You can narrow down the search by using the Advanced Search option by following the steps below.
- On the Accounts Payable > Received Uninvoiced page, enter the criteria in the fields for Advanced Search.
 The available fields to set the criteria for Advanced Search are:
- PO No.
- Supplier
- Company
- Archived
- Date Range
- Delivery Date Range
- Cost Code
- Currency
- Invoice #
- Term
Department
- PO No.
- Press Search. The purchase orders with the data matching the criteria in the Advanced Search fields are displayed and the summary of the purchase orders will be updated depending on the filter result.

Orders Not Invoiced
The Orders Not Invoiced section displays all the fully approved purchase orders that are not fully invoiced but the goods may or may not be delivered.
- On the left navigation panel, press Reports & Searches > Orders Not Invoiced. The Accounts Payable > Orders Not Invoiced page is displayed.

- The Accounts Payable > Orders Not Invoiced page can be divided into 3 sections as follows.
- Advanced Search – Allows you to specify additional criteria to narrow down search results to easily access a specific purchase order that is not invoiced fully.For more information, refer to How to Search Orders Not Invoiced.

- Summary – Displays the total of all purchase orders listed in the table below. It also displays the total of fully invoiced purchase orders and total of non-invoiced purchase orders.
You can export the purchase orders as CSV, XLX, or XLXS files and also customize the columns to export. You can also show the columns you wish to view in the purchase order list and hide them if not needed. For more information, refer to the following sections:
- Purchase Orders List – Displays all the purchase orders that are fully approved but are not fully invoiced. You can view the details of an individual purchase order here. You can use the quick search to find a specific purchase order.
 For more information, refer to the following sections:
- Advanced Search – Allows you to specify additional criteria to narrow down search results to easily access a specific purchase order that is not invoiced fully.For more information, refer to How to Search Orders Not Invoiced.
How to Search Orders Not Invoiced
To search for a specific received purchase order that is not invoiced, follow the steps below.
- On the Accounts Payable > Orders Not Invoiced page, enter the characters present in the PO Number or Supplier in the quick search. The POs that match the search criteria are displayed.

You can narrow down the search by using the Advanced Search option by following the steps below.
- On the Accounts Payable > Orders Not Invoiced page, enter the criteria in the fields for Advanced Search.
 The available fields to set the criteria for Advanced Search are PO No., Supplier, Company, Archived, Date Range, Delivery Date Range, Cost Code, Currency, Invoice No., Term, and Department.
 - Press Search. The POs with the data matching the criteria in the Advanced Search fields are displayed and the summary of the purchase orders will be updated depending on the filter result.

How to View Orders Not Invoiced Details
To view the details of a specific purchase order not invoiced, follow the steps below.
- On the Accounts Payable > Orders Not Invoiced page, press anywhere in the row of the order you wish to view the details.
 The Invoices page of the Accounts Payable > View Purchase Order is displayed.
 For more information refer to the following sections:
View Details
To view the details of the individual purchase order in the Orders Not Invoiced list, follow the steps below.
- Press the Details tab in the Accounts Payable > View Purchase Order page. The Details page is displayed.
 The Details page displays the details of the purchase order such as Company Details, Supplier Details, Order Details, and Delivery Details. You can perform the following actions on this page.
- You can add a comment. By pressing the Comment icon, a comment dialog is displayed for you to enter your comments.
For more information, refer to How to Add Comment to Invoice Documents. - You can upload a document related to the purchase order by pressing Drag & Drop under Documents. Once the document is uploaded, you can select from the options – No or Yes under Email Document with PDF, to attach the PDF of the document in the email.
- You can cancel the order by pressing the Cancel Order button after entering the reason for cancellation in the Reason for cancelling field.

- You can send the purchase order through email by pressing the Email PO You can update the email of the supplier in the Supplier email field.
- You can edit the purchase order by pressing the Edit button after entering the reason for updating in the Reason for editing. This opens Pending Changes tab where the order can be edited.

- You can repeat the purchase order by pressing the Replicate button.
- You can download the purchase order details as a PDF file for any future reference by pressing the Download PDF
- You can print the purchase order by pressing the Print button and confirming the print by pressing the Print
- You can archive the purchase order by pressing the Archive
- You can add a comment. By pressing the Comment icon, a comment dialog is displayed for you to enter your comments.
View Invoices
To view the invoice summary of a purchase order in the Orders Not Invoiced list, follow the steps below.
- Press the Invoices tab in the Accounts Payable > View Purchase Order page. The Invoices page is displayed.
 The Invoices page displays the summary of the purchase order you are reviewing. You can perform the following actions on this page.
- You can close the invoicing by entering the reason for invoice closure in the Reason for closing field and pressing the Close Invoicing
- You can create a new invoice by pressing the New Invoice button.
For more information, refer to How to Reconcile New PO Invoice Manually.
View Audit Trail
To view the audit trail of a purchase order on the Orders Not Invoiced page, follow the steps below.
- Press the Audit Trail tab in the Accounts Payable > View Purchase Order page. The Audit Trail page is displayed.
 The Audit Trail page displays all events carried on the purchase order. You can perform the following actions on this page.
- You can export the audit trail as an Excel spreadsheet by pressing the Export To Excel
- You can download the audit trail as a PDF file by pressing the Download PDF
- You can check status of all emails relevant for the purchase order by pressing the Status Of Emails button.
Purchase Order Search
The Purchase Order Search section displays all the orders in the system including the requisitions and canceled orders.
- On the left navigation panel, press Reports & Searches > Purchase Order Search.
The Accounts Payable > Purchase Order Search page is displayed. The Accounts Payable > Purchase Order Search page can be divided into 2 sections as follows.
- Advanced Search – Allows you to specify additional criteria to narrow down search results to easily access a specific purchase order from the entire purchase orders in the system. You can also perform batch actions such as receiving all items, and closing invoicing for orders in bulk. For more information, refer to How to Search Purchase Order Search List.

- Purchase Orders List – Displays all the purchase orders in the system including the requisitions and canceled orders. You can view the details of an individual purchase order here. You can also use the quick search to find a specific purchase order, export the order, and customize the table.
 For more information, refer to the following sections:
- Advanced Search – Allows you to specify additional criteria to narrow down search results to easily access a specific purchase order from the entire purchase orders in the system. You can also perform batch actions such as receiving all items, and closing invoicing for orders in bulk. For more information, refer to How to Search Purchase Order Search List.
How to Search Purchase Order Search List
To search for a specific purchase order from all the purchase orders in the system, follow the steps below.
- On the Accounts Payable > Purchase Order Search page, enter the characters present in the PO No., Supplier Name, or Department in the quick search. The purchase orders that match the search criteria are displayed.
 You can narrow down the search by using the Advanced Search option by following the steps below.
- On the Accounts Payable > Purchase Order Search page, enter the criteria in the fields for Advanced Search.
 The available fields to set the criteria for Advanced Search are PO No., PR No., Person, Supplier, Status, Supplier Notes, Company, Recipient, Date Range, Requested Date Range, Delivery Date Range, Value Range, Internal Notes, Department, Delivery Location, Item Name, Item Code, Category, Cost Code, Archived, Document Attached, and Document Name.
 - Press Search. The invoices with the data matching the criteria in the Advanced Search fields are displayed.
 You can perform batch actions from the Advanced Search section. For more information, refer to How to Perform Batch Action.
- On the Accounts Payable > Purchase Order Search page, enter the criteria in the fields for Advanced Search.
How to View Purchase Order
To view the details of a specific purchase order from the entire purchase order list, follow the steps below.
- On the Accounts Payable > Purchase Order Search page, press anywhere in the row of the order you wish to view the details.
 The Invoices page of the Accounts Payable > View Purchase Order is displayed.
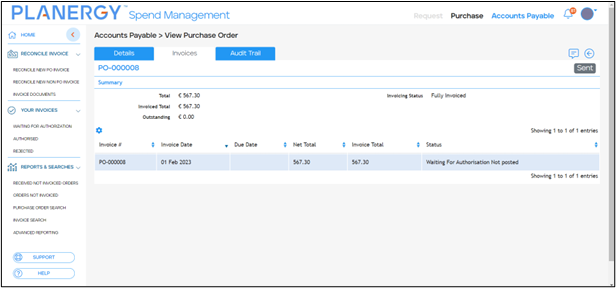
For more information refer to the following sections:
- View Details in Purchase Order Search List
- View Invoices in the Purchase Order Search List
- View Audit Trail in Purchase Order Search List
- View Revision History
View Details in Purchase Order Search List
To view the details of the individual purchase order on the Purchase Order Search list, follow the steps below.
- Press the Details tab in the Accounts Payable > View Purchase Order page. The Details page is displayed.
 The Details page displays the details of the purchase order such as Company Details, Supplier Details, Order Details, Delivery Details, and Product Details. You can perform the following actions on this page.
- You can add a comment. By pressing the Comment icon, a comment dialog is displayed for you to enter your comments. For more information, refer to How to Add Comment to Invoice Documents.
- You can upload a document related to the purchase order by pressing Drag & Drop under Documents. Once the document is uploaded, you can select from the options – No or Yes under Email Document with PDF, to attach the PDF of the document in the email.
- You can send the purchase order through email by pressing the Email PO. You can update the email address of the supplier in the Supplier email field.
- You can edit the purchase order by pressing the Edit button after entering the reason for updating in the Reason for editing. The Pending Changes tab is displayed and the fields are enabled to make the necessary changes.

- You can repeat the purchase order by pressing the Replicate. The Purchase > New Order page is displayed so that you can enter the required details to create a new order.
- You can download the purchase order details as a PDF file for any future reference by pressing the Download PDF
- You can print the purchase order by pressing the Print button and confirming the print by pressing the Print
- You can archive the purchase order by pressing the Archive
View Invoices in the Purchase Order Search List
To view the invoice of the purchase order in the Purchase Order Search list, follow the steps below.
- Press the Invoices tab in the Accounts Payable > View Purchase Order page. The Invoices page is displayed.
 The Invoices page displays the summary of the purchase order you are reviewing along with the status of the invoice. On pressing anywhere in the row of the invoice, the Accounts Payable > View Invoice page is displayed.
View Audit Trail in Purchase Order Search List
To view the audit trail of a purchase order in the Purchase Order Search list, follow the steps below.
- Press the Audit Trail tab in the Accounts Payable > View Purchase Order page. The Audit Trail page is displayed.
 The Audit Trail page displays all events carried on the purchase order. You can perform the following actions on this page.
- You can export the audit trail as an Excel spreadsheet by pressing the Export To Excel
- You can download the audit trail as a PDF file by pressing the Download PDF
- You can check status of all emails relevant for the purchase order by pressing the Status Of Emails button.
View Revision History
To view the revision history of a purchase order in the Purchase Order Search list, follow the steps below.
Revision History tab is only available on purchase orders that have been edited.
- Press the Revision History tab in the Accounts Payable > View Purchase Order page. The Revision History page is displayed.
 You can view the details of individual versions of the history by pressing View in the row of the revision history.
Create New Invoice for a Purchase Order
To create a new invoice for a purchase order listed in the Reports & Search table, follow the steps below.
In the following example, we are showing you how to create a new invoice for a purchase order in the Purchase Order Search table.
- Press the Invoices tab in the Accounts Payable > View Purchase Order page of a purchase order. The Invoices page is displayed.

- Click New Invoice. The Accounts Payable > New Invoice page is displayed.
 The steps to create a new invoice are similar to the steps to reconcile a new PO invoice manually. For more information, refer to How to Reconcile New PO Invoice Manually.
Note
Request Authorization for Purchase Order Invoice
To request authorization for a purchase order, follow the steps below.
- On the Accounts Payable > View Invoice page, scroll down the page.
 The Authorise Invoice section is displayed.
- Select the user to authorize the invoice from the Forward For Authorization dropdown list.
- Press Forward. The invoice successfully forwarded notification is displayed.

How to View Credit Note Purchase Orders
You can view the credit note purchase order automatically generated in the background and included in the budget when a credit note is created.
- Navigate to Accounts Payable > REPORTS & SEARCHES > PURCHASE ORDER SEARCH.

The Accounts Payable > Order Search page is displayed.
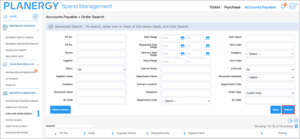
- Press Advanced Search.

The Advanced Search filter fields are displayed.
- Select the Credit Note option from the Order Type dropdown list.
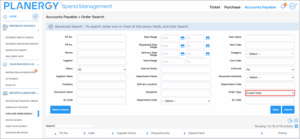
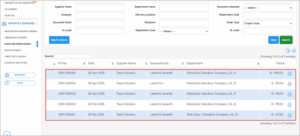
- Press Search.
All the autogenerated credit note purchase orders are displayed.
Invoice Search
The Invoice Search section displays all invoices in the system that you have permission to view.
- On the left navigation panel, press Reports & Searches > Invoice Search. The Accounts Payable > Invoice Search page is displayed.
 The Accounts Payable > Invoice Search page can be divided into 2 sections as follows.
- Advanced Search – Allows you to specify additional criteria to narrow down search results so that you can easily access a specific purchase order from all the purchase orders in the system. You can also manually mark an invoice as posted, export the invoice to the integrated account system, and view the integration export history.

- Invoice List – Displays all the invoices in the system. From here, you can view the detailed information of any invoice listed such as details of the invoice, comments, audit trail, and purchase order details against which the items are invoiced. You can also use the quick search to find a specific invoice, export invoices, and customize the table.

- Advanced Search – Allows you to specify additional criteria to narrow down search results so that you can easily access a specific purchase order from all the purchase orders in the system. You can also manually mark an invoice as posted, export the invoice to the integrated account system, and view the integration export history.
For more information, refer to the following sections:
How to Search Invoice Search List
To search for a specific invoice in the system, follow the steps below.
- On the Accounts Payable > Invoice Search page, enter the characters present in the Invoice # or Supplier Name in the quick search. The invoices that match the search criteria are displayed.

You can narrow down the search by using the Advanced Search option by following the steps below.
- On the Accounts Payable > Invoice Search page, enter the criteria in the fields for Advanced Search.
 The available fields to set the criteria for Advanced Search are Invoice No., PO No., Date Range, Company, Status, EPD Date, Supplier, Posted Status, Document Attached, Invoice Type, Document Name, GL Code, Archived, Notes, Tax Code, Department and many more that you can adjust based off the criteria needed.
 - Press Search. The invoices with the data matching the criteria in the Advanced Search fields are displayed.
 You can mark the invoices as posted, export to Xero, and export the integration history from here.
How to View a Specific Invoice in Invoice Search List
To view a specific purchase order or invoice in the Invoice Search List, follow the steps below.
- On the Accounts Payable > Invoice Search page, press anywhere in the row of the order you wish to view the details.
 The Account Payable > View Invoice page is displayed.
- You can authorize/reject the invoice if you have the users permission to do so or forward the invoice to the selected user to authorize.
- You can edit or delete the invoice. To edit the invoice, press Edit, and to delete the invoice, press Delete and confirm the deletion.
How to Export Invoices
You can export the invoices in the Invoice Search list to Excel or to the integrated accounting system. To export the Invoice Search data, follow the steps below.
- On the Accounts Payable > Invoice Search page, press the Export icon in the Summary section.
For more information, refer to the following.
Export Invoices to the Integrated Accounting System
To export the invoices into the integrated accounting system, follow the steps below.
- On the Accounts Payable > Invoice Search page, press Expand Me on Advanced Search.
 The Advanced Search section is displayed. In the following example, we have integrated the Xero accounting system into our account to export the data into Xero.
- Press Export to Xero. All invoices with status Authorized, Not Posted will be exported to Xero.
Note
Mark as Posted
If you do not wish to export invoices into your accounting system or when you manually update the invoice to your accounting system, there is no need to export the invoice to the integrated accounting system.
In such cases, to manually update the invoice status as Posted, follow the steps below.
- On the Accounts Payable > Invoice Search page, press Expand Me on Advanced Search.

- Use the advanced search fields to search for the invoices you wish to mark as posted.
 The invoices matching the search criteria are displayed.
- Press Mark As Posted.
 The Mark As Posted dialog is displayed.
- Press Ok. All the authorized invoices listed in search results are marked as posted.

Advanced Reporting
The Advanced Reporting section allows you to view different graphs, create custom reports, and schedule reports. You can add the frequently used reports to Favorites Reports for quick access.
On the left navigation panel, press Reports & Searches > Advanced Reporting. The Accounts Payable > Reports page is displayed and the data on it is organized into the following.
-
- Favorite – By default, the Favorite section is displayed with various widgets on it. This section allows you to access all the frequently used reports added to it by you. You can customize the widgets on the Favorite dashboard as needed. For more information, refer to Favorite Dashboard Widgets.
-
- Accounts Payable – This section allows you to access the list of all reports generated in the system. You can filter and run the reports, replicate the reports, and add them to the Favorite list. From this section, you can also create new reports.

- Accounts Payable – This section allows you to access the list of all reports generated in the system. You can filter and run the reports, replicate the reports, and add them to the Favorite list. From this section, you can also create new reports.
For more information, refer to the following sections
Favorite Dashboard Widgets
The Favorite section of the Reports page displays various widgets for quick access to the required information.
Most of the widgets on the dashboard have a graphical representation of data for easy understanding.
The available widgets on the Favorite Dashboard are as follows:
- Expenditure And Invoiced Bar Chart
- Top 5 Not Invoiced Expenditure By Supplier
- Top 5 Not Invoiced Expenditure By Department
- Favorite Reports
- Invoiced Total Chart
- Top 5 Invoiced Suppliers
- Top 5 Invoiced GL Codes
- Top 10 Suppliers By AVG Overinvoiced PO
- Top 10 Overinvoiced PO
The widgets can be resized or moved around the dashboard as required. You can also filter the data on each widget based on the associated report fields.
For more information, refer to How to Customize the Home page.
Expenditure And Invoiced Bar Chart
The Expenditure And Invoiced Bar Chart widget displays the data of the standard report that is by default displayed on the Favorite dashboard.

The bar graph gives a graphical representation of the report on the invoiced status of orders by the month for 12 months that are classified based on the total expenditure, total invoiced, and total non-invoiced data.
On mouse over, the statistical data per month is displayed.

If any of the legends is pressed, the data related to that legend is hidden. In the following example, we have pressed the Expenditure legend.

You can view the complete report by pressing Go to Report. For more information, refer to the Standard report – Expenditure and Invoiced Bar Chart.
Top 5 Not Invoiced Expenditure By Supplier
The Top 5 Not Invoiced Expenditure By Supplier widget displays a donut chart with the data of the top 5 expenditures that are not invoiced by the supplier. By default, this chart is displayed on the Favorite dashboard.

On mouse over, the statistical data of the non-invoiced expenditure per supplier is displayed.

If any of the legends is pressed, the data related to that legend is hidden.

Top 5 Not Invoiced Expenditure By Department
The Top 5 Not Invoiced Expenditure By Department widget displays a donut chart with the data of the top 5 expenditures that are not invoiced by departments. By default, this chart is displayed on the Favorite dashboard.

On mouse over, the statistical data of the non-invoiced expenditure per department is displayed.

If any of the legends is pressed, the data related to that legend is hidden.

Favorite Reports
The Favorite Reports widget displays all the reports that you have added to the Favorites for easy access.
You can narrow down your search for reports using the quick search, run, replicate, or filter, and run the report as needed from here. You can also remove the report from the Favorite list if needed.

Invoiced Total Chart
The Invoiced Total Chart widget displays a line graph representing the invoiced total data for 12 months.

On pressing the dot on the graph, the statistical data for the specific month is displayed.

Top 5 Invoiced Suppliers
The Top 5 Invoiced Suppliers widget displays a donut chart with the data of the top 5 suppliers who have invoiced data.

On mouse over, the statistical data of the specific supplier with the invoiced amount is displayed.

If any of the legends is pressed, the data related to that legend is hidden.

Top 5 Invoiced GL Codes
The Top 5 Invoiced GL Codes widget displays a donut chart with the data of the top 5 GL Codes that have invoiced data.

On mouse over, the statistical data of the specific GL Code with the invoiced amount is displayed.

If any of the legends is pressed, the data related to that legend is hidden.

Top 10 Suppliers By AVG Overinvoiced PO
The Top 10 Suppliers By AVG Overinvoiced PO widget displays the data of the top 10 suppliers by the average overinvoiced percentage. This report is a standard report.

Top 10 Overinvoiced PO
The Top 10 Overinvoiced PO widget displays the data of the top 10 purchase orders that have been overinvoiced. This report is a standard report.

How to Create New Reports
The standard reports are automatically generated by the system. To create new custom reports, follow the steps below.
- On Accounts Payable > Reports, press the Accounts Payable tab. The Accounts Payable section is displayed.

- Press New Report. The new report form is displayed.

Note
All the fields marked with an asterisk (*) in the form are mandatory. - Under the Accounts Payable Report Type, select the type of report you wish to create from the Report Type dropdown list. For more information on the types of custom reports available, refer to Custom Reports. In the following example, we are creating a report of the type Invoice with Audit Trail. You can follow similar steps to create other custom reports.
- Under Report Header,
- Enter the name of the report in the Name*
- Select the default format for exporting the report from the Default Export Format* dropdown list.
- Enter any information or description regarding the form in the Description
- Enable the Include Export Name button if you wish to include the name of the export.
- Enable the Include Timestamp button if you wish to include the time.
- Enable the Include Header button if you wish to include the headers.
- Under the Report Columns:
- Select the column you wish to add from the Available columns
- Press the Move Right icon to move the columns into the Selected columns You can press the Move Left icon to move the columns from the Selected columns list back to the Available columns list.
- Select the column names that you wish to reorder in the Selected Columns list and press the Move Down icon to move them down the order list. You can press the Move Up icon to move the selected columns up the order list.
Note
Depending on the report type you choose to create, the associated columns of the report type are displayed in the Available Columns option. The chosen columns are added to the Selected Columns list in the order you wish to display them.
- You can set filters if needed to narrow down the report based on a specific invoice, supplier, document attachment status, a specific date range, posted status, archived status, department, GL code, PO number, date period, company, and many more. Enter the data in the required fields under Report Filter.
- Under Access By, select from the options available whom you wish to grant permission to access the report.
- Press Save. The Report successfully saved notification is displayed.

You can now run the report. For more information, refer to How to Run Report.
Types of Reports
The reports are of two types
- Standard Reports – Predefined by PLANERGY
- Custom Reports – Customized by you
Standard Reports
These reports are predefined by PLANERGY but you can filter the required data and download the reports. The various standard reports that are available in the system
- Expenditure and Invoiced Bar Chart Report – The Expenditure and Invoice Bar Chart Report gives a detailed report on the invoiced status of orders by the month. You can view the total expenditure value, value already invoiced, and remaining non-invoiced values for the past 12 months based on company, department, cost code, supplier, item, user, and location.
- On Accounts Payable > Reports, press the Accounts Payable tab. The Accounts Payable section is displayed.

- Press Expenditure and Invoiced Bar Chart. The Expenditure and Invoiced Bar Chart report is displayed.

The Expenditure and Invoiced Bar Chart report page can be classified into the following for better understanding.
- A – Graph – Displays a graphical representation of the report. You can use the filters to narrow down the result based on Company, Category, various category types, and months. For more information on the graph, refer to the Expenditure and Invoiced Bar Chart.
- B – Export – Allows you to export the report for any offline or documentation purposes. You can change the format of the report if needed before exporting the report.
- C- Table – Displays a list of all the relevant POs. You can use the quick search feature to narrow down the list to the required POs. You can view any of the POs directly from the report to take a closer look at the details.
- On Accounts Payable > Reports, press the Accounts Payable tab. The Accounts Payable section is displayed.
- Over Invoiced Purchase Orders Report – The Over Invoiced Purchase Orders Report gives a detailed report on the purchase orders that are over-invoiced. You can view the purchase order details such as the purchase order number, department name, total amount, invoiced amount, over-invoiced amount, and over-invoiced percentage. You can view the purchase orders for the past 12 months based on a selected date range or supplier.
- On Accounts Payable > Reports, press the Accounts Payable tab. The Accounts Payable section is displayed.

- Press Over Invoiced Purchase Orders. The Over Invoiced Purchase Orders report is displayed.
 You can filter the report by setting the date range in the Date Range field or by selecting the supplier from the Supplier dropdown list. You can also narrow down the table list by using the quick search feature.
- On Accounts Payable > Reports, press the Accounts Payable tab. The Accounts Payable section is displayed.
- Suppliers By AVG Overinvoiced POs – The Suppliers By AVG Overinvoiced POs report gives a detailed report of the suppliers based on their average over-invoiced purchase order value and percentage.
- On Accounts Payable > Reports, press the Accounts Payable tab. The Accounts Payable section is displayed.

- Press Suppliers By Avg Over Invoiced POs.The Suppliers By Avg Over Invoiced POs report is displayed.
 You can filter the report based on the date range by selecting the date range in the Date Range field. You can also narrow down the table list by using the quick search feature.
- On Accounts Payable > Reports, press the Accounts Payable tab. The Accounts Payable section is displayed.
Custom Reports
These are the reports that you can customize based on your requirements for your business.
For more information regarding the creation of the custom report, refer to How to Create New Report.

Note
The various Custom Reports available in the system are as follows.
- Invoice Report – The Invoice report can be created for a detailed overview of all invoices in the system. You can use the filter options to display a particular range of invoices.

- Invoice Audit Trail Report – The Invoice Audit Trail report can be generated for a sequential record of the history and events related to the invoices in the system.

- Invoice with Items Report – The Invoice with Items report can be generated for understanding the related information of the items invoiced in the system and the purchase pattern of items supplied by various suppliers.

- PO Invoice Status – The PO Invoice Status report can be customized and generated depending on the purchase order and invoice status.

- Received Not Invoiced – The Received Not Invoiced report can be generated to understand the data related to those orders that are received but are not invoiced.

- Received Not Invoiced With Items – The Received Not Invoiced With Items report can be generated to understand the data related to orders that are received but are not invoiced with the item details.

How to Run Report
To download a report, follow the steps below.
- On Accounts Payable > Reports, press the Accounts Payable tab. The Accounts Payable section is displayed.

- Press Run in the row of the report you wish to download. The report is generated and downloaded on your system.

- Press the report downloaded. The report is displayed. The following example displays a report generated with a filter applied for a specific invoice number.
 The following example displays a report generated with no filter applied to it.
Note
- You can duplicate a report to save time when a new report contains similar fields by pressing Replicate on the row of the report you wish to copy.
- You can apply the required filters before running the report by pressing Filter And Run on the row of the report you wish to download.
How to Schedule Custom Reports
You can schedule custom reports if you have the user permission to do so by following the steps below.
- On Accounts Payable > Reports, press the Accounts Payable tab. The Accounts Payable section is displayed.

- Press Schedule in the row of the report you wish to generate at the fixed time. The Scheduled Reports page is displayed.

- Check the box Enabled to enable the report.

- Select the hour(s) you wish to schedule the report in the Hour section.
- Checking the box Every Hour will generate the report on an hourly basis.
- Checking the box Specific Hour will enable you to select the particular time of the day to generate the report. You can choose an individual hour or multiple hours during the day to generate reports.

- Select the day(s) you wish to schedule the report in the Day section.
- Checking the box Every Day will generate the report on a daily basis.
- Checking the box Specific day of the week will enable you to select the particular day(s) of the week to generate the report. You can choose one day or multiple days of a week to generate the report.
- Checking the box Specific day of month will enable you to select the particular day(s) in a month to generate the report. You can choose individual day or multiple days of a month to generate the report.

- Select the month(s) you wish to schedule the report in the Month section.
- Checking the box Every Month will generate the report on a monthly basis.
- Checking the box Specific month will enable you to select the particular month(s) to generate the report. You can choose an individual month or multiple months of a year to generate the report.

- Under the Message section,
- Select the report recipient Email address from the To
- Enter the topic of the email in the Subject
- Enter the message you wish to send to the recipient in the Message

- Click Save. The report is scheduled to be generated in a fixed time/time interval.
How to Filter Credit Notes based on Purchase Order Number
You can filter credit notes based on a specific purchase order number by following the steps below.
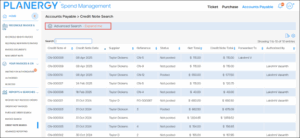
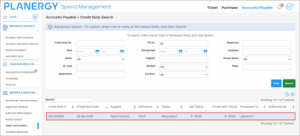
- Navigate to Accounts Payable > REPORTS & SEARCHES > CREDIT NOTE SEARCH.
The Accounts Payable > Credit Note Search page is displayed.- Press Advanced Search.
The Advanced Search criteria fields are displayed.
- Enter the required purchase order number in the PO No. search field.
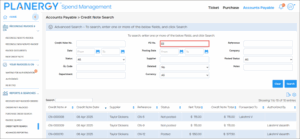
- Press Search.
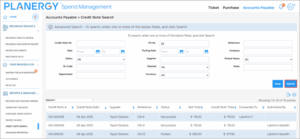
All the credit notes matching the search criteria are displayed.
How to add a Credit note
Credit Notes work in similar way as Non PO Invoices. They use the same permissions:
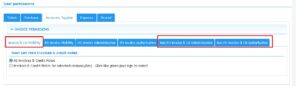
There’s a new menu option on Accounts Payable module:
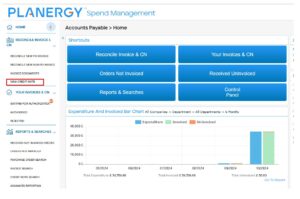
The form is similar to Non Po Invoice:
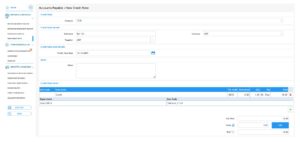
Credit Note has to be approved same as Non Po Invoice. When Approved the value of the
credit note is updated in the department’s expenditure.