You can manually reconcile an invoice with a purchase order or without a purchase order and perform many more actions on the invoice documents such as:
- View invoices that are sent through email
- Upload invoices manually
- Search invoices
- Match invoices using AP Automation
- Block/unblock a sender email domain
- Add comments to Invoice Documents
- Archive/unarchive Invoice Document
On the Accounts Payable > Home page, press Reconcile Invoice widget or Reconcile Invoice in the left navigation panel. The Accounts Payable > Reconcile Invoice subsections are displayed.
Permissions Required
If you do not see the Reconcile New Non PO Invoice and Invoice Documents subsections then you do not have the required permissions.
For more information, refer to the following sections:
How to Reconcile New PO Invoice Manually
To reconcile invoices with purchase orders manually and import the items from the associated purchase order, follow the steps below.
Note
- On the left navigation panel, press Reconcile Invoice > Reconcile New PO Invoice.
 The Accounts Payable > New Invoice page is displayed.
 This is the standard PO Invoice form available to all users with user permissions for PO invoice administration.You can switch to the Non PO Invoice form directly from the New Invoice page using the Switch To Non PO Invoice button.
 - In the Invoice Details, the fields marked with an asterisk (*) are mandatory.
- Enter the invoice number in the Invoice #Note: The Currency, Supplier, and Terms are auto-populated when the Process button is pressed.

- Enter the invoice number in the Invoice #Note: The Currency, Supplier, and Terms are auto-populated when the Process button is pressed.
- In the Invoice Date Details:
- Select the Invoice Date from the respective calendar icon. This is a mandatory field.
- Select the invoice Receipt Date from the respective calendar icon.
- Select the invoice Due Date from the respective calendar icon. Note that the Due Date will be auto-populated on pressing the Process button if it is mentioned in the credit terms of the purchase order.

- Enter invoice notes if any in the Notes textbox.

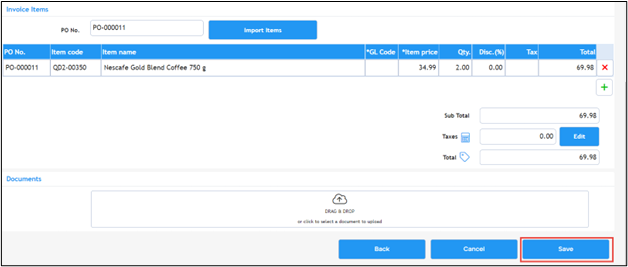
- In Invoice Items, press Import Items.
- A dropdown list with all not fully invoiced POs is displayed.

- Select the PO number associated with the invoice from the dropdown list. You can also use the quick search at the top of the dropdown list to search for a specific PO.
- Check the box(es) against the item you wish to add from the imported invoice and press Process.

Note
You can check all the item boxes at once by checking the top box in the item table header row. The invoice items are added.
Note
Once the items are processed, you can set the GL code and Tax for the item if needed.
You can also edit the quantity, item price, and discount percentage at this stage.
- A dropdown list with all not fully invoiced POs is displayed.
- You can add any document associated with the invoice by dragging and dropping it into Documents.
- Press Save. The invoice will be matched against the original purchase order when you try to save.
 The status on the invoice will be Waiting for Authentication, Not posted.
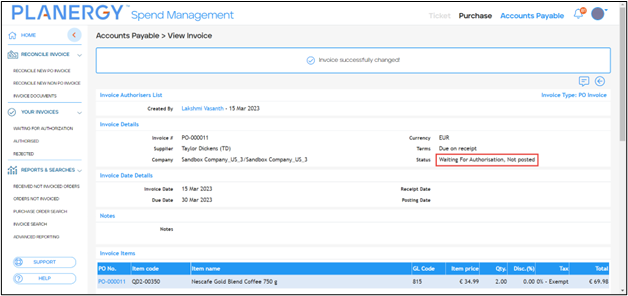
Note
On the Accounts Payable > View Invoice page, you can authorize/reject the invoice for payment, if you have the user permission to do so or forward the invoice to the selected user to authorize.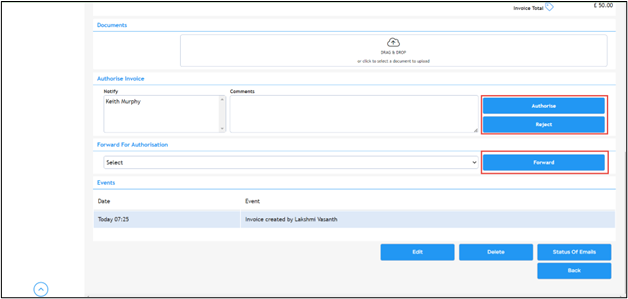
- To edit the invoice, press Edit, and make the necessary changes.
- To delete the invoice, press Delete on the Accounts Payable > View Invoice page and confirm the deletion of the invoice.
How to Reconcile a New Non PO Invoice Manually
To manually reconcile invoices that have no purchase orders associated, follow the steps below.
- On the left navigation panel, press Reconcile Invoice > Reconcile New Non PO Invoice.
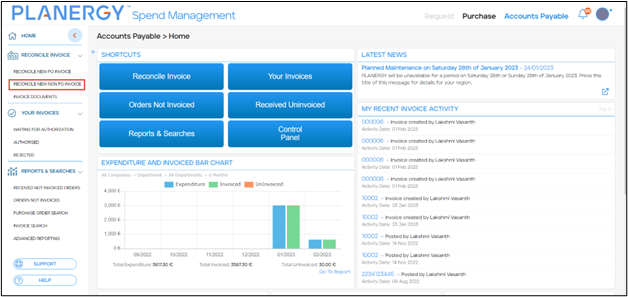 The Accounts Payable > New Invoice page is displayed.
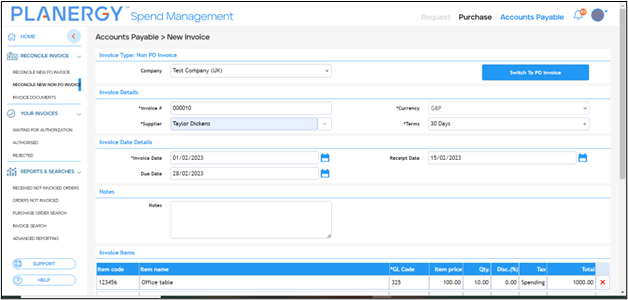
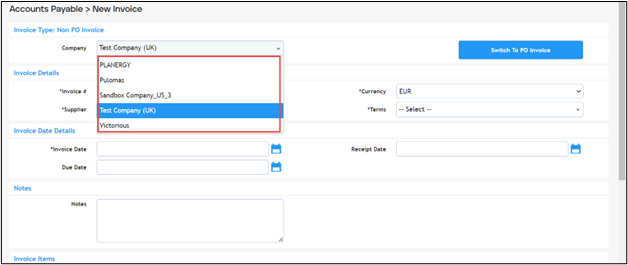
- Select the company from the Company dropdown list.
- In the Invoice Details, Invoice Date Details, and Notes, all the fields with an asterisk (*) are mandatory. Enter the fields with the required data.For more information on the fields, refer to the How to Reconcile New PO Invoice Manually.

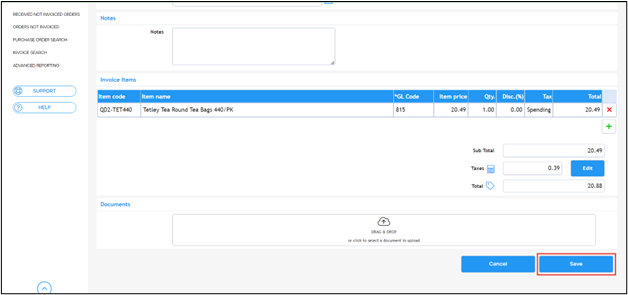
- Enter the details required in the Invoice Items table such as Item code, Item name, GL Code (general ledger code), Item price, Qty (quantity), Disc (%) (percentage of discount), and Tax.

- Press Save.
 The Invoice successfully saved notification is displayed.
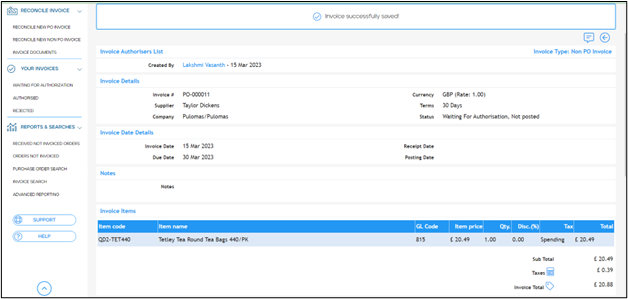
Note
On the Accounts Payable > View Invoice page, you can authorize/reject the invoice if you have the user permission to do so, else you can send it to be authorized by pressing Forward.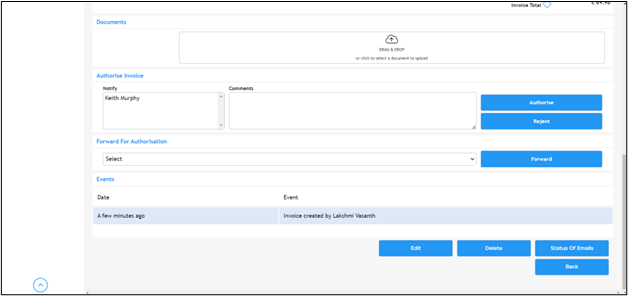
- To edit the invoice, press the Edit button and make the necessary changes.
- To delete the invoice, press Delete and confirm the deletion.
Invoice Documents
The Invoice Documents section is the repository of all the invoice documents that are scanned by AP Automation.
It allows you to manually upload invoice documents, view the invoices that are sent through email, search invoices, block/unblock a sender email domain, add comments, archive/unarchive invoices, and many more.
On the left navigation panel, press Reconcile Invoice > Invoice Document.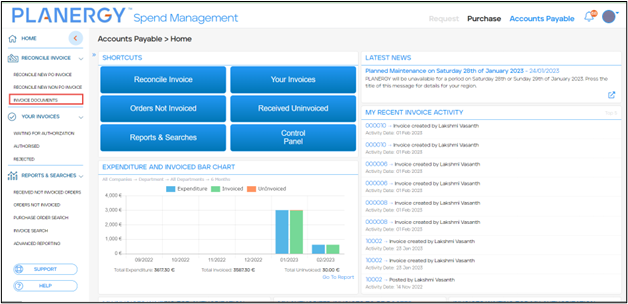 The Accounts Payable > Invoice Documents page is displayed.
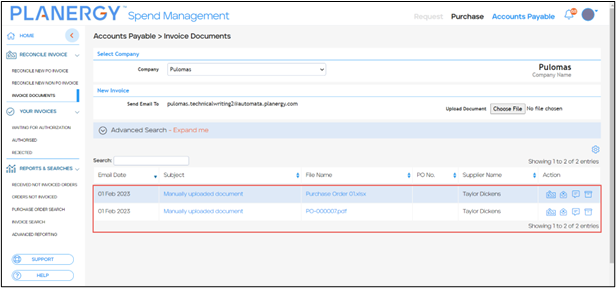 The list displays all the invoices that are received through the designated email address and those that are uploaded manually.
For more information, refer to the following sections:
- How to Upload Invoice Document Manually
- How to Search Invoices
- How to Reconcile Invoices in Invoice Documents
- How to Block a Sender Email Domain
- How to Unblock a Sender Email Domain
- How to Add Comments to Invoice Documents
- How to Archive Invoice Document
- How to Unarchive Invoice Document
How to Upload Invoice Document Manually
To upload invoice manually in Invoice Documents, follow the steps below.
- On the Accounts Payable > Invoice Documents page, select the company you wish to add the invoice to from the Company dropdown list.

- In New Invoice, press Choose File. The Open dialog is displayed.
- Select the invoice document you wish to upload from your system and press Open.
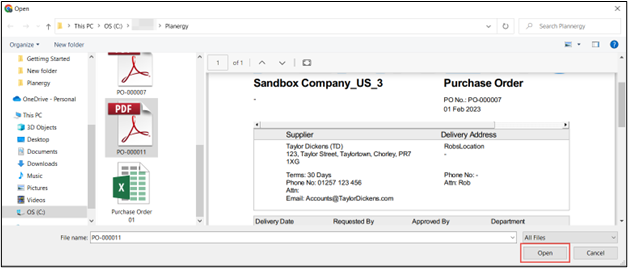 The file is successfully uploaded notification is displayed.
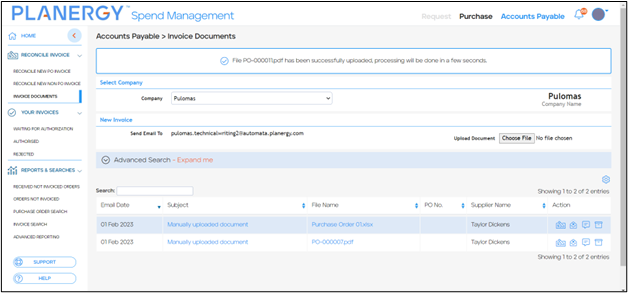 The file is displayed in the table once it is processed.
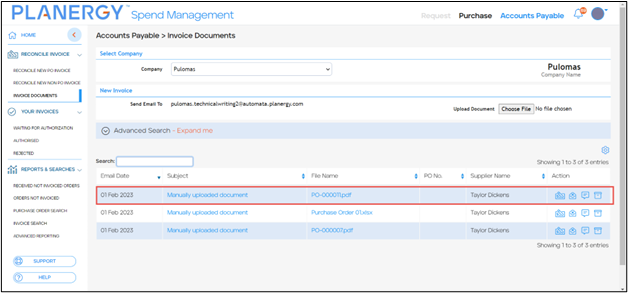
How to Search Invoices
To search for invoice documents using the quick search, follow the steps below.
- On the Accounts Payable > Invoice Documents page, enter the characters present in the invoice File Name, PO No., or Supplier Name in the quick search. The invoices that match the search criteria are displayed.
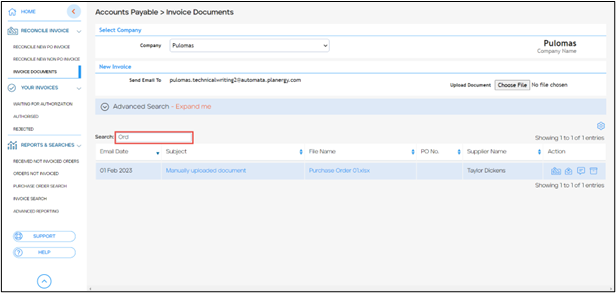
You can narrow down the search by using the Advanced Search option by following the steps below.
- On the Accounts Payable > Invoice Documents page, press Expand Me on Advanced Search.
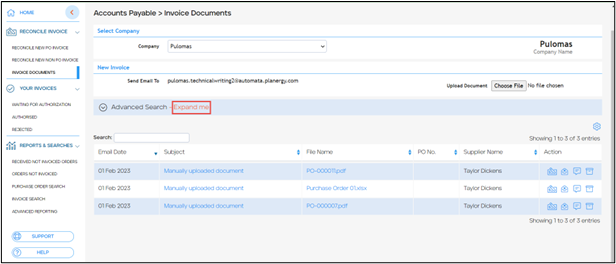 The fields for entering the criteria for the Advanced Search are displayed.
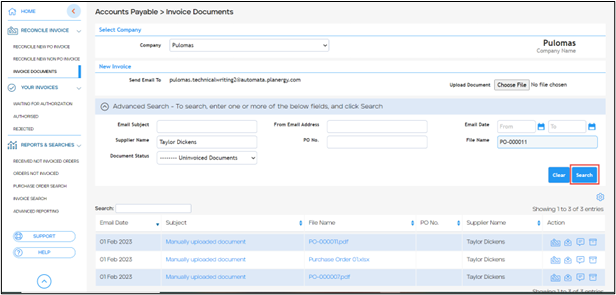
- Enter the criteria in the respective field based on which you wish to search the invoices. The available fields are Email Subject, From Email Address, Email Date range, Supplier Name, PO No., File Name, and Document Status.
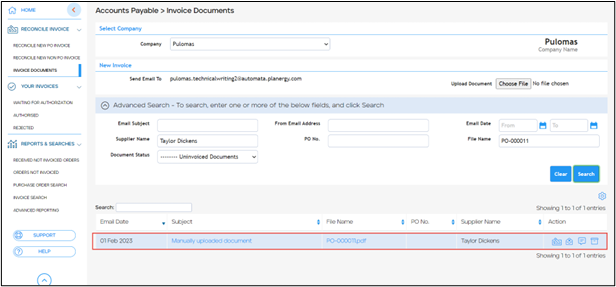
- Press Search. The invoices with the data matching the criteria in the Advanced Search fields are displayed.
How to Reconcile Invoices in Invoice Documents
To reconcile the invoices in the Invoice Document section, follow the steps below.
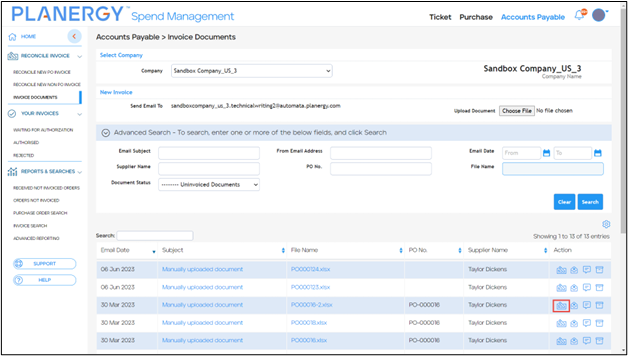
- On the Accounts Payable > Invoice Documents page, press the Reconcile Invoice icon in the row of the invoice you wish to reconcile.
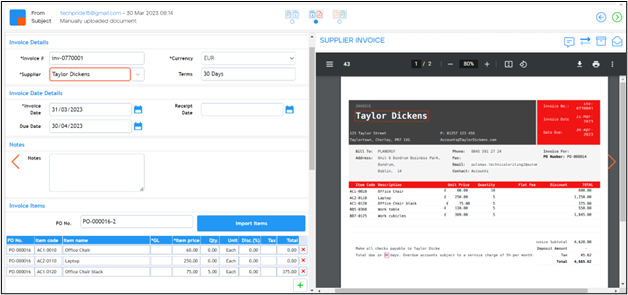
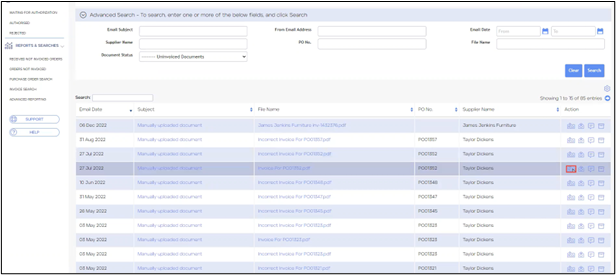 The Reconcile Invoice page is displayed.
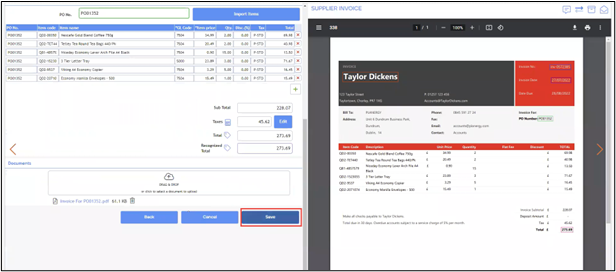 The Reconcile Invoice page provides you with a side-by-side view of the invoice document and the purchase order.
 - Review the items to be processed on the invoice.
- Press Save. The invoice is reconciled and ready to be authorized for payment.
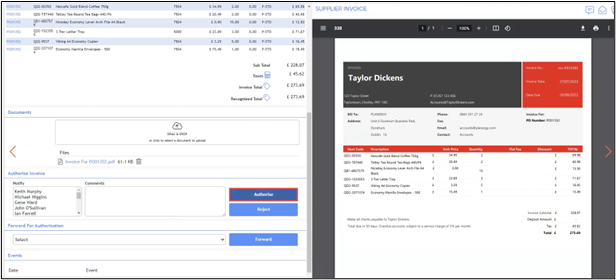
- If you have the user permission to authorize/reject the reconciled invoice for payment, press Authorize/Reject else you can send it to be authorized by pressing Forward.The invoice is reconciled and saved.For more information, refer to the following sections:
Note
You can change the document view to review the reconciliation of the invoice document/invoice with the purchase order.
Change View of Documents
You can switch the document view when an invoice is scanned.
You can also compare the invoice document with the invoice or PO by switching between invoice and invoice document view, PO and invoice view, or invoice document and PO view by following the steps below.
- On the Reconcile Invoice page, press Switch to PO Invoice.
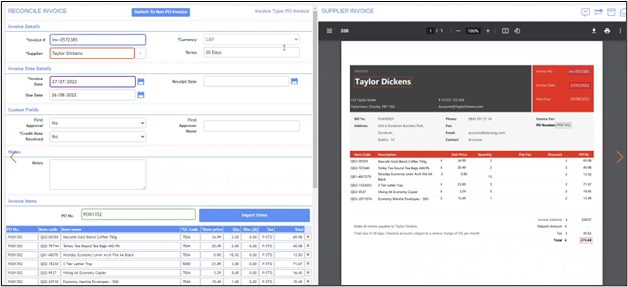 The invoice document with PO Invoice can be further viewed in 3 modes as follows:
- Compare Invoice with Document – This is the default view that allows you to compare the invoice on the left-hand side with the invoice document on the right-hand side of the page.
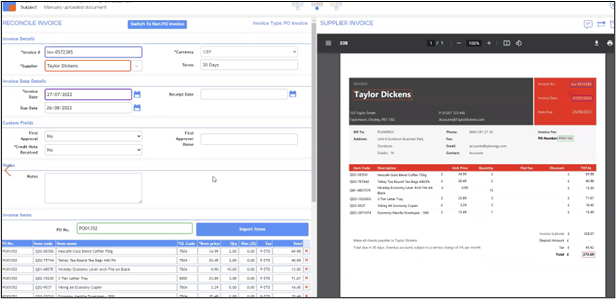
- Compare PO with Invoice – This view allows you to compare the purchase order on the left-hand side with the invoice on the right-hand side of the page.
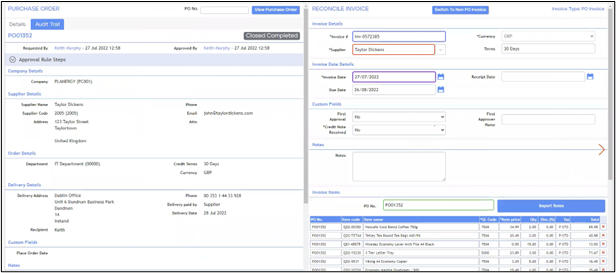
- Compare Document with Purchase Order – This view allows you to compare the invoice document on the left-hand side with the purchase order on the right-hand side.
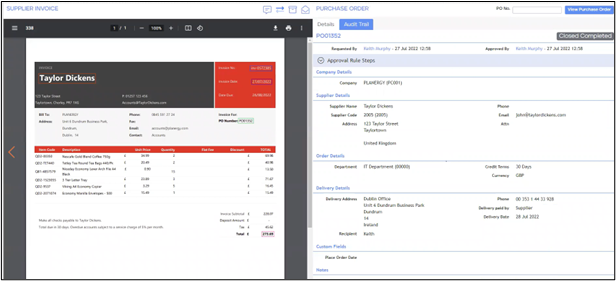
- Compare Invoice with Document – This is the default view that allows you to compare the invoice on the left-hand side with the invoice document on the right-hand side of the page.
Invoice Matched Using AP Automation
From the start of the Invoice Document section, the invoice document is matched to the purchase order by the AP automatically and also during the process of being reconciled.
The fields that are matched will be auto-populated and highlighted.
Note
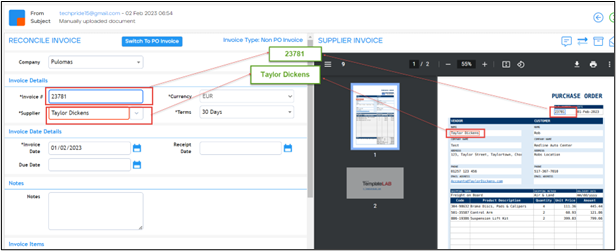
In the following example, a Non PO invoice is reconciled.
The Invoice number and the Supplier name on the invoice were detected by the AP automation that is highlighted.
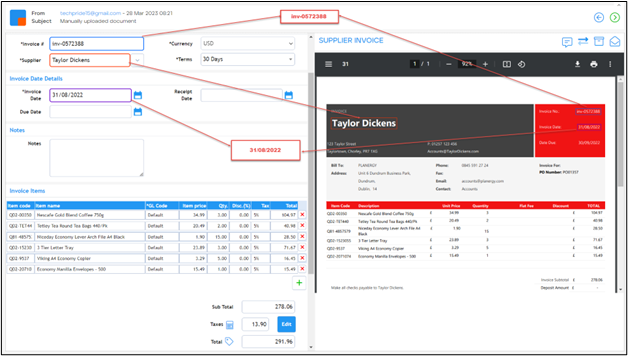
Similarly, when an invoice with PO is reconciled, the invoice number, the name of the supplier, and invoice date are matched.
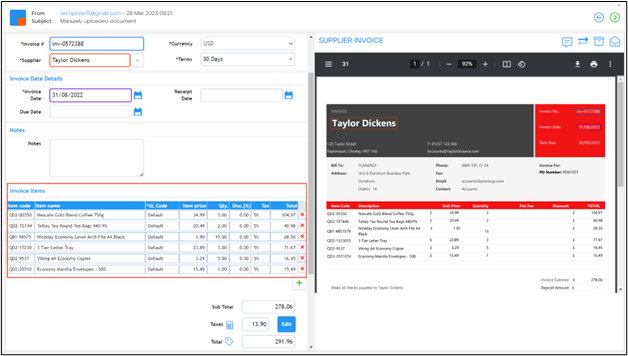
The PO items are auto populated on the invoice.
Note

If there is any mismatch in the item price or quantity, it is highlighted with ! icon.
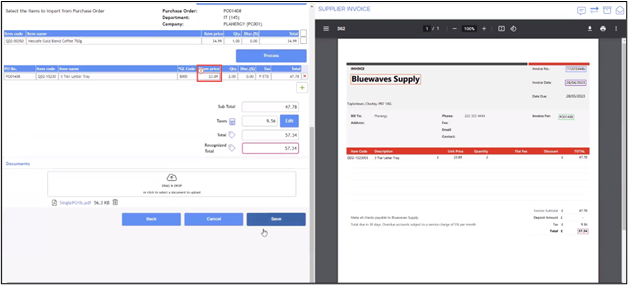
On mouse over the ! icon, you will see the reason for mismatch in the tooltip text format.

Note that the document view can be switched from the PDF view to invoice document or PO view when needed for comparison by toggling between the following buttons.

For more information, refer to Change View of Documents.
Add a Comment While Reconciling
To add any information or comment while reconciling the invoices in the invoice documents, follow the steps below.
- On the Reconcile Invoice page, press the Comment icon.
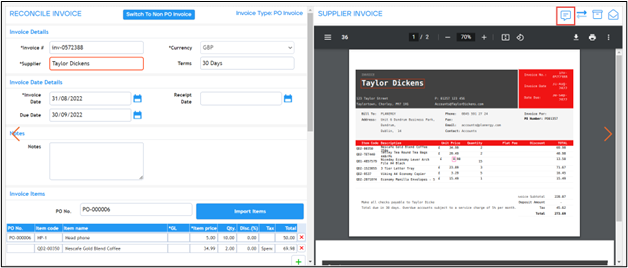 The Comments dialog is displayed.
- Press Click to send a comment up to 300 characters long. The Send comment to and Text fields are displayed.
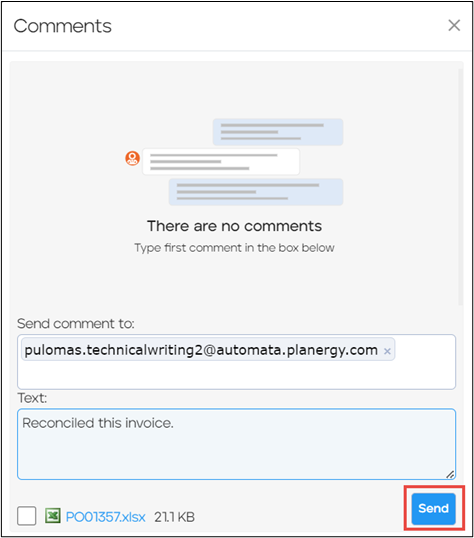
- Enter the email address that you wish to send the comment to in the Send comment to field.
- Enter the required information or comment in the Text field.
- Click Send. The comment is added and displayed under the Comments section.
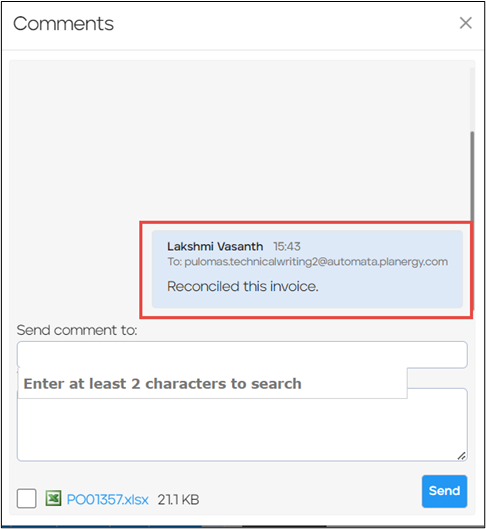 You can add multiple comments as needed in the similar manner.
How To Match an Invoice to Multiple POs
You can match multiple purchase orders to an invoice to process the items.
In the following example, we are showing you how to match the invoice that we have already added to multiple purchase orders created in the system.
For more information, refer to How to Upload Invoice Document Manually.
- On the Accounts Payable > Invoice Documents page, press the Reconcile Invoice icon in the row of the invoice you wish to reconcile.
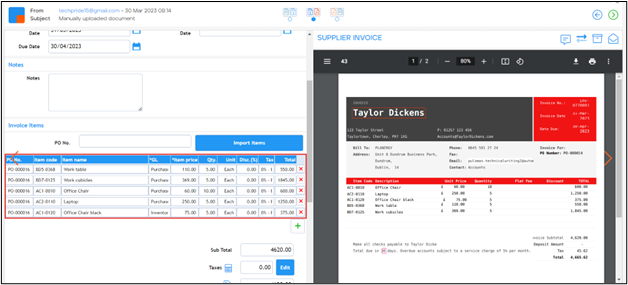
 The Reconcile Invoice page is displayed and the matching items are auto populated on the invoice.
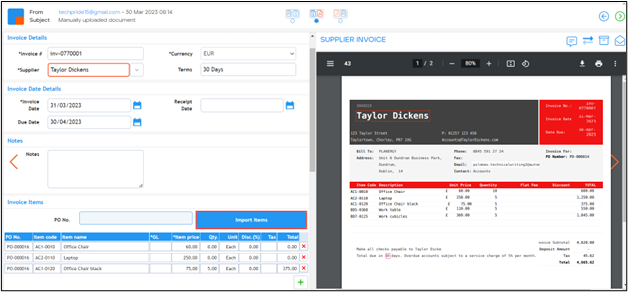
- Delete the PO number in the PO No. field and press Import Items.
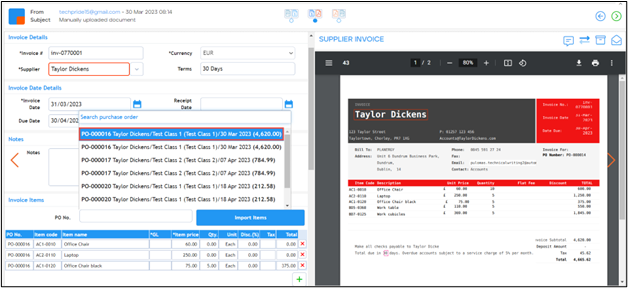
- The list of purchase orders is displayed in the Import Items dropdown list. Select another purchase order you wish to match the invoice items from the Import Items dropdown list.
- The items of the selected purchase order are imported. Check the box in the row of the items you wish to match and press Process.
 The items from both the purchase orders are matched with the invoice.
- Press Save.
 The invoice document is reconciled. You can view the reconciled invoice and the PO by pressing the icon

How To Match a PO to Multiple Invoices Using AP Automation
Matching a purchase order to multiple invoices is actually a standard behavior as long as the line items and quantities are automatically identified.
If not, the user can select only relevant items to process from the PO. They can also reduce the item quantity of line items they are processing an invoice against.
In the following example, we are showing you how to match the invoice documents that we have already added to a single PO.
For more information, refer to How to Upload Invoice Document Manually.
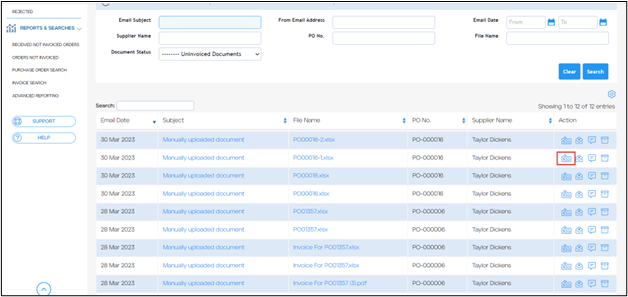
- On the Accounts Payable > Invoice Documents page, press the Reconcile Invoice icon in the row of the invoice you wish to reconcile.
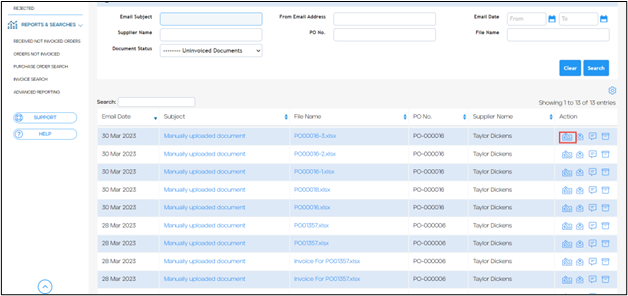 The Reconcile Invoice page is displayed.
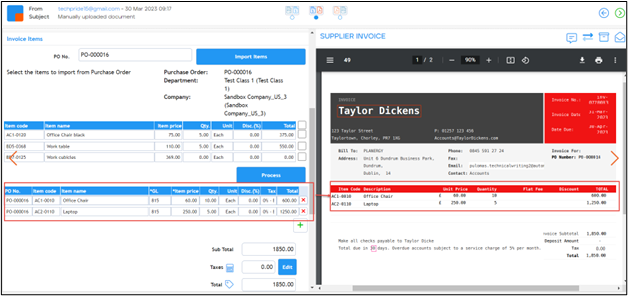
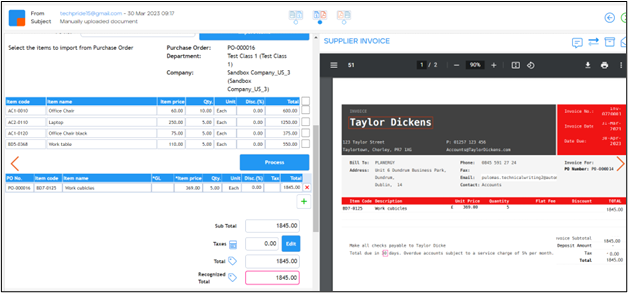 In this example, we can see that only 1 item in the PO is matched with that in the invoice.
 Note that the quantity of the item is matched. If it is different, the quantity is highlighted. By moving the mouse over, you can see the reason for the highlighted text.
 - Scroll down and press Save.
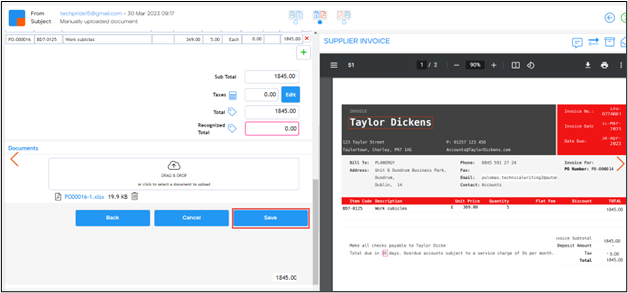 The first invoice is reconciled.
 - Now, add the next invoice document required and select it to reconcile the same.
 Again, we can see that items in the PO are matched with those in the invoice.
- Press Save.
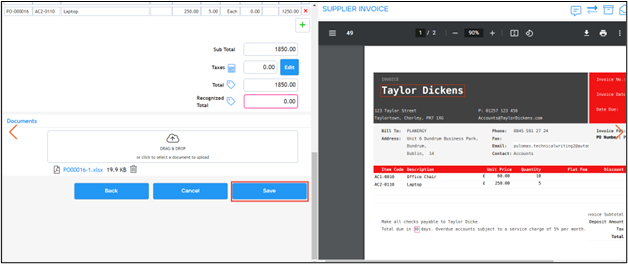 The invoice is reconciled. You can match more invoice documents to a single purchase order. You can view the reconciled invoice and the PO by pressing the icon

How To Manually Copy Data on Invoice Documents to Invoice
To copy the text from the invoice document when the data is not automatically populated on the invoice, follow the steps below.
- On the Accounts Payable > Invoice Documents page, press the Reconcile icon in the row of the invoice you wish to reconcile.
 The Reconcile Invoice page is displayed.
 - Press the Copy icon.

- Press the left mouse button down and drag the mouse to form a rectangle around the text you wish to copy from the invoice document.

- Left-click on the field in the invoice you wish to enter the selected copied text. The text is copied into the field.
 Similarly, you can copy any other data you need to the invoice from the invoice document.
How to Block a Sender Email Domain
You can block spam emails in your Invoice Documents by blocking the sender’s email domain. To block an email domain of a sender, follow the steps below.
- On the Accounts Payable > Invoice Documents page, press the Mail icon in the row of the invoice you wish to block the sender’s email domain.
 The Block sender’s email domain dialog is displayed.
- Press Confirm. All the emails received from the selected email domain will be removed from your invoice list.
How to Unblock a Sender Email Domain
To unblock an email domain of a sender you have blocked, follow the steps below.
- On the Accounts Payable > Invoice Documents page, press Expand Me on Advanced Search.
 The fields for entering the criteria for the Advanced Search are displayed.
- Press Document Status. The Document Status dropdown list is displayed.

- Press Spam.
- Press Search. The list of all invoices with blocked email domains is displayed.
- Press the Mail icon in the row of the invoice you wish to unblock the sender’s email domain.
 The Unblock sender’s email domain dialog is displayed.
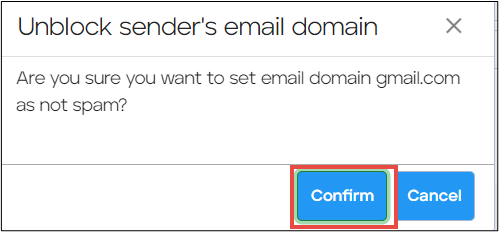
- Press Confirm. The selected sender’s email domain is unblocked.
How to Add Comments to Invoice Documents
To provide more information on an invoice, you can add comments to the invoice document by following the steps below.
- On the Accounts Payable > Invoice Documents page, press the Comment icon in the row of the invoice document you wish to comment.
 The Comments dialog is displayed.
 You can view all the comments on the document.
 - Press Click to send a comment up to 300 characters long. The Comments dialog to add the comment is displayed.
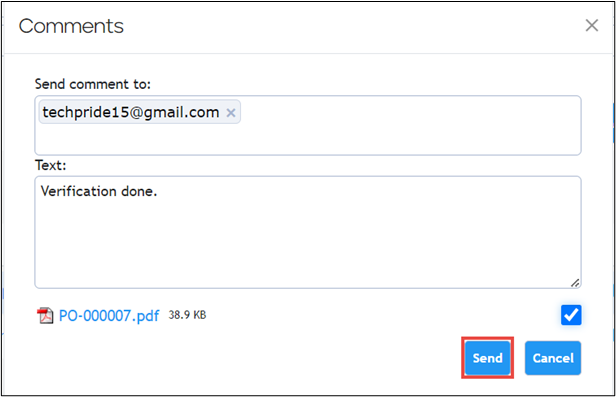
- Select the email address to send the comment to by searching/entering an email address in the Send comment to field.
- Enter the comment in the Text textbox.
- Check the box against the purchase order if it has to be attached in the email.
- Press Send. The comment is added to the invoice document.
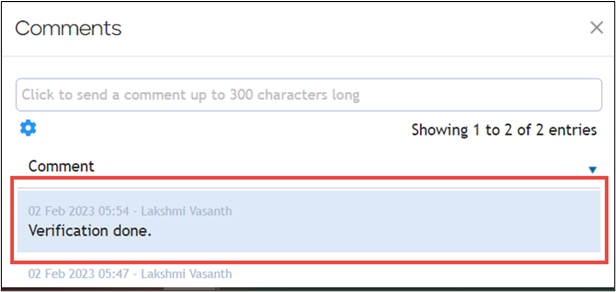
How to Archive Invoice Document
To archive an invoice document, follow the steps below.
- On the Accounts Payable > Invoice Documents page, press the Archive icon in the row of the invoice you wish to archive.
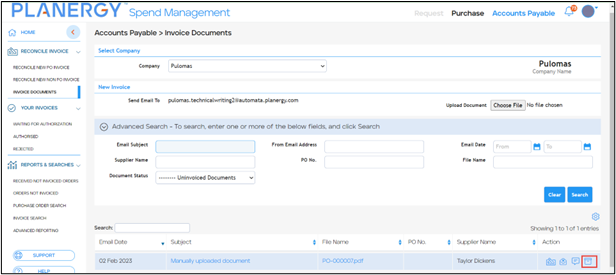 The Archive document dialog is displayed.
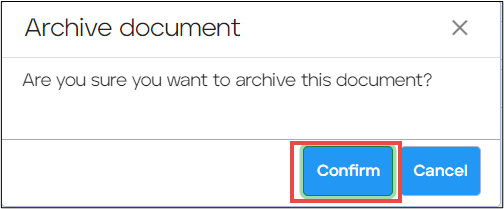
- Press Confirm. The invoice document selected is archived and removed from the Invoice Document list.
How to Unarchive Invoice Document
To unarchive an invoice document that you have archived, follow the steps below.
- On the Accounts Payable > Invoice Documents page, press Expand Me on Advanced Search.
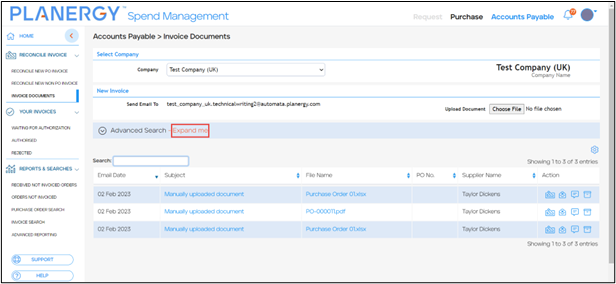 The fields for entering the criteria for the Advanced Search are displayed.
- Press Document Status. The Document Status dropdown list is displayed.
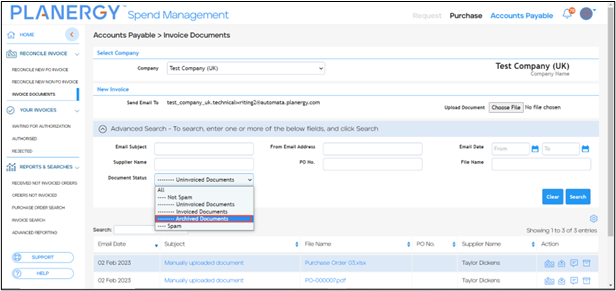
- Press Archived Documents in the dropdown list.
- Press Search. The list of archived invoice documents is displayed.

- Press the Archive icon in the row of the invoice document you wish to unarchive.
 The Unarchive document dialog is displayed.
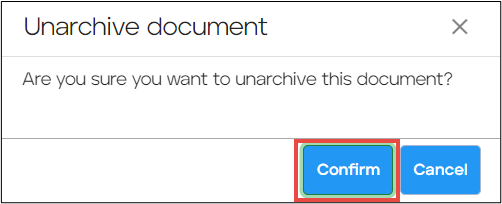
- Press Confirm. The invoice document is unarchived.
Reconcile Invoices FAQ
Incorrect Supplier assigned to the Invoice
You can correct this if you click on ‘Reconcile Invoice’, under ‘Action’ column and select the correct Supplier from the Supplier dropdown menu, remove the PO number from the PO No. field and click Import Items button to import items from the relevant PO.
This may happen from time to time, especially at the beginning as the system, learns your Supplier’s invoices. This can also happen if the Supplier details in Control Panel don’t match the Supplier details on the invoice: for example – Supplier name is different, there is no PO Number anywhere on the invoice, or the email the invoice was sent from, or phone and email addresses don’t match.
In these cases, we would recommend keeping the Supplier records in Control up to date, as follows:
- Always try to use the same name as the supplier in Control Panel > Suppliers as it is on the invoice (supplier name as text, not the logo).
- Make sure Supplier Email and Supplier Contact Email addresses are up to date for the suppliers.
- If phone number is included on invoices, also include it in supplier details.
Wrong ‘Recognized total’ on the invoice
Recognized Total on the invoice is just a value that the system has detected on the scanned document, as a total of the invoice. In some cases, it may be detected incorrectly. However, if the invoice is saved there the ‘Total’ on the left panel matches to the Total on the document on the right panel, it should ‘train’ the system where the correct total value on the document is, so that on the next invoice from that Supplier, the Recognized total should be detected correctly.
Wrong PO detected in AP automation
Q: We have a wrong PO detected, and assigned in AP automation, how can we re-assign it to correct one?
A: You can import the items from the correct PO on these invoices, by following the next steps:
- Click ‘Reconcile invoice’ icon;
- Under ‘Invoice items’ section, remove the wrong PO number in the PO No. field, and click ‘Import Items’, button;
- This will open a list where you can select the correct PO;
- Mark the checkboxes on the right, and click ‘Process’ button;
- The rest of the process is the same as usual.
How to return received line items
Q: I want to return the received line items, but I’m unable to locate the order in the search of the Reconcile delivery section?
A: Usually, this can happen due to the change in the status of the order. To locate the needed order for which you wish to return the line items, please go to Receiving section -> Advanced search. Once there, please input the order number in the needed field, and set ‘Status’ filter to the needed status of the order (Closed completed, or something else from the offered options), and click on ‘Search’ button.
Once you get the needed results in the section below, please click on the order, and afterwards click on ‘Reopen order’ button, to reopen the order.
From there, you can either input the needed number of the line items for each line that you want to return, and then click on ‘Return items’ button, which will return the mentioned numbers of the selected items, or just click on ‘Return All items’ button which will return all of the received items, and that should give you the needed result.
