Users – 02 – Adding a New User
To create a new user you can click the Add New User button on the main Users page. This will bring you to the Add User page. Here you can add all the access and permissions settings for the user.
You can only add a new user if you have free licenses available in the system. The number of licenses and the number of licenses used are displayed together on the main Users page. If you need additional licenses contact our team at [email protected]
The basic user profile settings will be at the top of the page followed by a number of separate sub-sections – Order Permissions, Invoice Permissions and Additional Permissions.
User Profile Settings
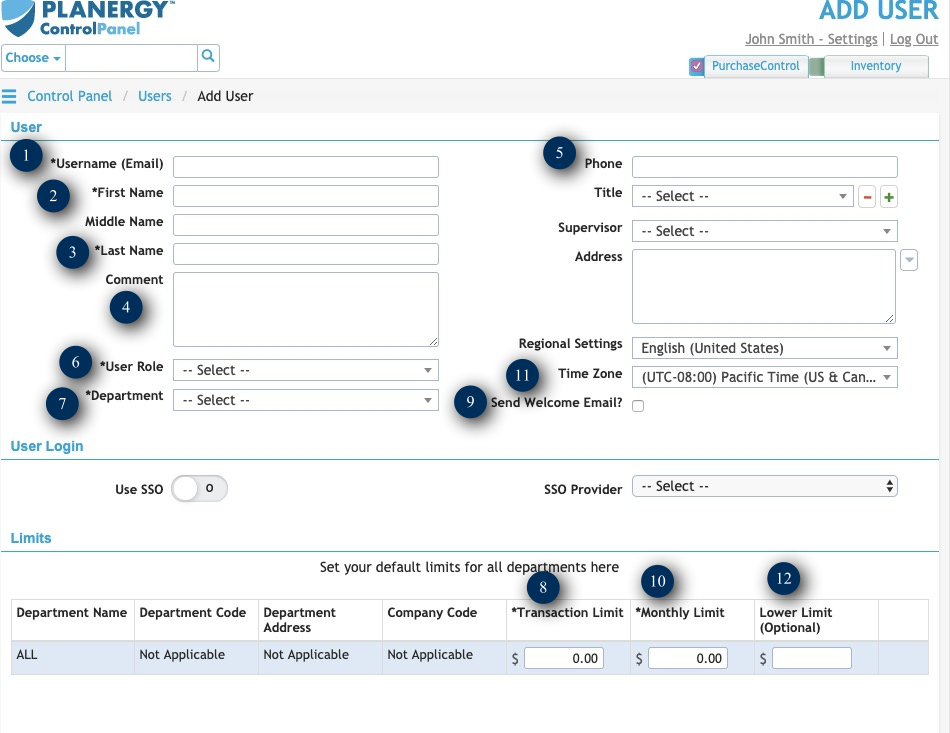
Figure 3: Add User page – Basic User Settings
- Username
The email address of the user. All system emails related to this user will be sent to this email address. This will also be the username used for logging into the system. No two users in the system can have the same username/email address. - First Name
The first name of the user. - Last Name
The last name of the user. - Comment
Any additional comments related to this user you want to add in the system. - Phone
The contact phone number of the user. - Role
The role assigned to the user. The role is a template of permissions and access levels. When assigned to a user they will inherit the permissions from the role. Any additional changes to the permissions and access of the user will take precedence over those assigned by the role. - Department
The home department of the user. When assigning permissions for the user this department will be assigned when ‘Own Department’ is selected. - Transaction Limit
The value of an order the user can approve. Orders below this limit they will be able to approve. Orders above this limit they will not be able to approve. The transaction limit assigned here will apply for the departments set for the user in the ‘Order on Behalf’ permission in the Order Permissions section for other user’s orders and for their own if ‘User can authorize own POs’ is set to yes. - Send Welcome Email
If this is checked login details will be sent to the user’s email address immediately after their settings have been saved. If this is not checked, you will need to use the Send Welcome Email button at the bottom right of the edit users page to send the user login details. - Monthly Limit
The total value of orders the user can approve in a given month. If they approve orders up to this value in a given month they cannot approve any more until the next month. - Time Zone
The time zone the user will usually be working in. - Lower Limit
If set this will exclude the user from the approval list for orders below the value set here. This can be useful for ensuring upper management are not being sent smaller orders that should be approved by a line manager. - Language
Sets the display language for the user. Currently only English (US) and English (UK) are available. - Active
Switch to set if the user is active or not. An inactive user cannot access PLANERGY.Username, First Name, Last Name, Role, Department, Transaction Limit and Monthly Limit are all required fields and need to be set for every user added into the system. The required fields are marked by an asterisk next to their name.