Companies – 02 – Adding a New Company
To create a new company you can click the New Company button on the main Companies page. This will bring you to the Add Company page. Here you can add all the details for the company. Required fields are marked with an asterisk.
Company Details
Company

Figure 3: Add Company Page – Company section
-
-
- Name
The name of the company. This will appear in the header area of all purchase orders created for this company. - Address
The address of the company. This will appear in the header area of all purchase orders created for this company. - Email
The contact email address for the company. - Time Zone
The time zone where the company is predominantly based. - Tax Number
The tax number for the company. If set this will appear in the header area of all purchase orders created for this company. - Code
The code to identify the company. This should match the code used in your financial package. - Phone
The contact phone number for the company. - URL
The address of the company’s web site. - Tax Label
The tax label related to the tax number of the company. This is an optional field to describe the tax number. Depending on your location there may be a different term for the tax number. You can set the label used. For example, VAT Number. This will appear in the header area of all purchase orders created for this company. - Active
Switch to select if the company is active or inactive. All departments assigned to an inactive company cannot be selected when creating an order if the company is inactive.
Logo
A logo can be assigned to the company. This will appear in the header area of all purchase orders created for this company. To add a logo click the green Upload Logo button and navigate to the image file of the company logo you want to use and click Open.

Figure 4: Add Company Page – Logo section
Financial
When you set up your first company the system will set it as your Main Company. There are some additional settings for the Main Company that are required to start using the system. Some of the settings are only available for the main company and will be applied to all companies in the system.

Figure 5: Add Company Page (Main Company) – Financial section
- Start Of The Financial Year
This sets when the financial year should begin for the company. This can be set differently for each company in the system. By default this will be set as January 1, but your financial calendar may start at a different date. If that is the case you should edit this setting. The date set here is also when any annual budgets set for departments related to the company will renew.Invoice ToleranceThis sets the allowed difference between an invoice and the value on the original PO as a monetary figure. This setting will be applied to all companies in the system. Depending on what is set in this field the system will allow invoices to be a higher value than the original PO. This will allow over invoicing of the PO so should only be set if you regularly have acceptable reasons to allow an over invoicing against a PO. By default the settings in the system will not allow any over invoicing.Orders Invoicable FromThis sets the date from which invoices should be created from. This setting will be applied to all companies in the system. Any orders before the date set here are not considered to require to have an invoice set against them. The Accounts Payable Reports – Orders Not Invoiced and Received Uninvoiced – will only display orders from after this date.Invoice Tolerance PercentThis sets the allowed difference between an invoice and the value on the original PO as a percentage value of the original order. This setting will be applied to all companies in the system. Depending on what is set in this field the system will allow invoices to be a higher value than the original PO. This will allow over invoicing of the PO so should only be set if you regularly have acceptable reasons to allow an over invoicing against a PO. By default the settings in the system will not allow any over invoicing.
If you are integrating with the finance package Twinfield there will be an additional setting in the Financial section of the company to set the Twinfield Financial Period. This is only visible if the integration is enabled. If you need to enable this integration contact the support team at [email protected] or use the support button in the application.
Currency
The currency set for main company will be the base currency for the system and cannot be changed. The base currency will apply for all companies in the system and will be the currency used when reporting and setting budgets within the system. All other currencies will be set with exchange rates related to this currency.

Figure 6: Add Company Page (Main Company) – Currency
Purchase Order Footer
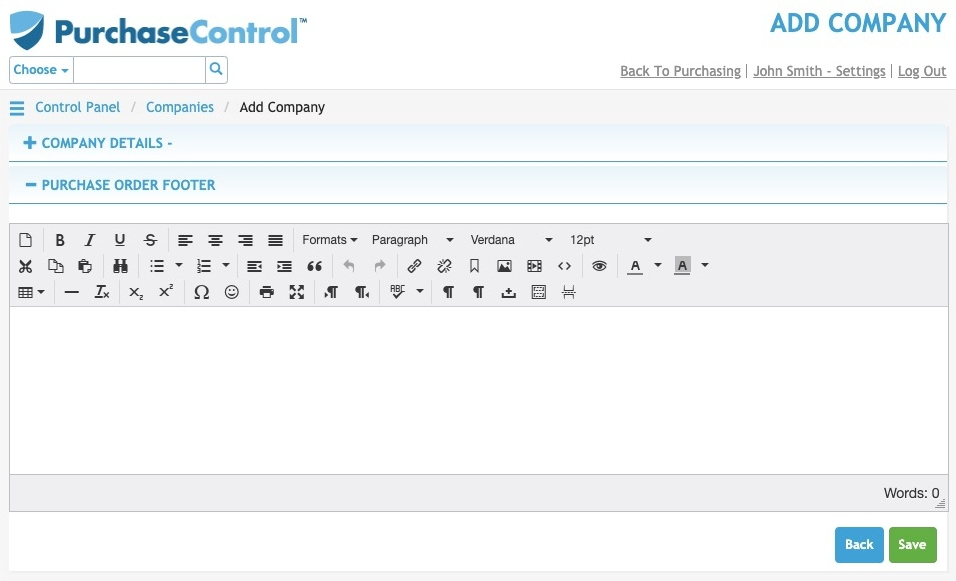
The purchase order footer is a text editor that can be used to set the text that will appear at the end of all purchase orders created for this company. This section is usually used to add the company’s terms and conditions but you can set any text you would like to be included with all the purchase orders you send out for this company.

Figure 7: Add Company Page – Purchase Order Footer
- Name
-

