Buy Something – 01 – Creating, reviewing and editing a requisition
Here we look at creating a requisition using the new order form.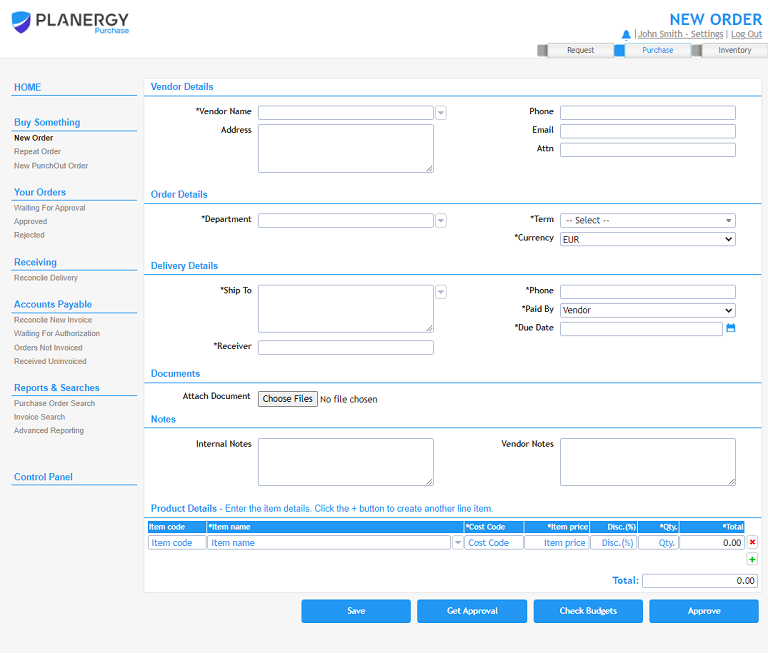
Completing the New Order form
Fields with an asterisk beside their name indicate that the field is mandatory and you must fill the field. For example Vendor Name in the Vendor Details section is required for every order.
If you have been given authority to add information using free-text you may be able to add details into the order directly by typing it. Usually this is restricted to the adding of line items but this will depend on your user setup. If you do not have this ability you will need to select from the list of options already in the system. Anywhere you see the small button  , indicates that you can select from a pre-existing list of options. If you click on the button, a popup window should appear providing you with a list to select from and a search field to narrow the results in the list. Selecting one of the options in the list closes the popup window and populates the new order form with the details of your selection.
- Complete the Order Details section
- Select the appropriate department for the order from the popup list – you may only have permission to buy for your own department or a specific list of departments. If that is the case you will not see all the departments in the list, only the departments you have authority to order on behalf of will appear.
- Select the credit terms, if applicable. Credit terms may be linked to the vendor and locked.
- Select the currency, if applicable. Currency may be linked to the vendor and locked.
- Complete the Delivery Details section
- Select the appropriate Delivery location for the order.
- Type the name of the recipient.
- Select the appropriate ‘Paid by’ option
- Select the due date for the goods or when you expect the service to be delivered by.
- Attach relevant documents
- If you have any documents related to the order you can attach them here. By default they will be set to be attached for internal reference and not to be sent with the purchase order. You can edit this per document when the order is saved by updating the ‘Email Document with PO?’ setting for the document to yes. This will include the document with the emailed PO when it is sent to the vendor.
- Add notes related to the order
- Internal Notes Add any notes or instructions related to the order for people within your own company. Any user with authority to see the order in the system will be able to see these notes but they will not be sent to the vendor.
- Vendor Notes Add any notes or instructions related to the order for the vendor to be aware of. These will appear on the purchase order in a notes section and can be used for adding specific requests such as delivery instructions.
- Complete the Product Details section
- For each line item, select or enter the product details (item code, name/description, quantity, price, and discount if applicable). Select a Charge to Account – this will depend on the setup of the system but may be a job code, project code, GL code or something similar. It will assign the expenditure to this Charge To Account for expenditure tracking. At this point the order should look like the screenshot.
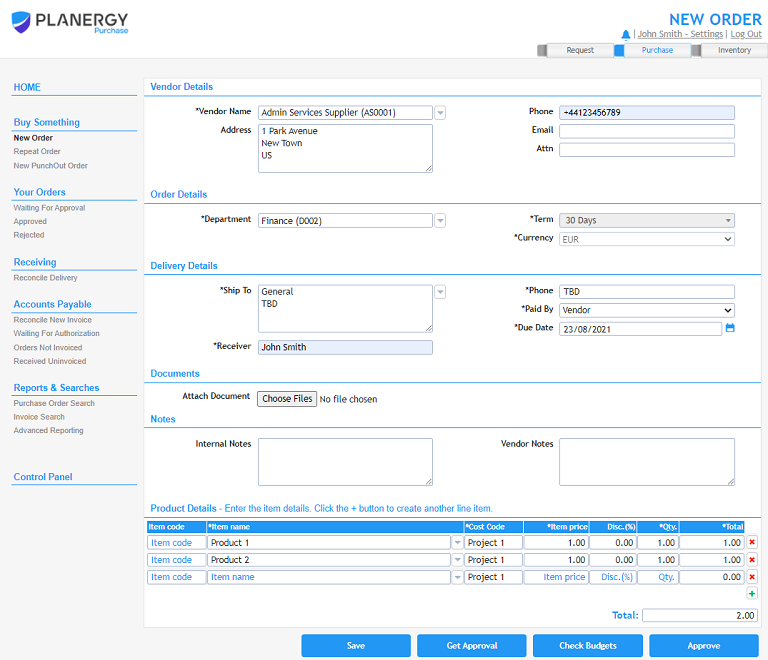
- For each line item, select or enter the product details (item code, name/description, quantity, price, and discount if applicable). Select a Charge to Account – this will depend on the setup of the system but may be a job code, project code, GL code or something similar. It will assign the expenditure to this Charge To Account for expenditure tracking. At this point the order should look like the screenshot.
- Save the requisition or enter the approval process
- After completing the details of the requisition in the new order form depending on your user settings you may see 3 options at the bottom right of the page. If any of the required fields have not been filled the system will highlight these with error messages and they will need to be updated before proceeding.
- Save You can save the requisition to come back to later. If you have not fully completed the order and do not want it to enter the approval process you can save it and finalize the details later.
- Get Approval You can send a request to another user to approve the order. Who can approve the order will depend on the value of the order and the department it was ordered for. PLANERGY will dynamically create a list of people who have the correct authority to approve the order. You can select from the list and forward an email requesting they approve the order.
- Approve If you have authority to approve your own orders you may see the Approve button.
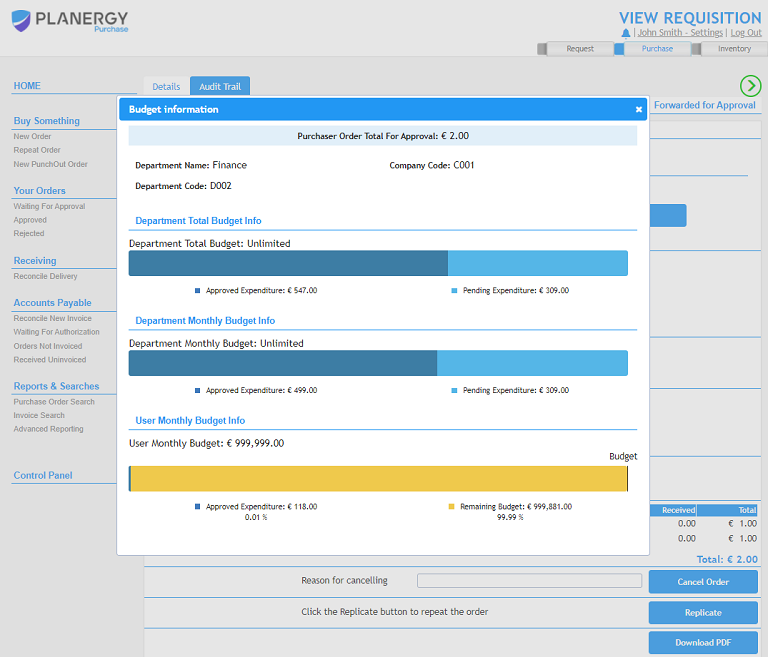
To those who have the right to approve the order, budget expenditure is displayed, for user and department.
After creating and saving an order, or accessing an order that we have right to approve the PO Approver list will be shown like on the image below.

So when we click the [Check Budgets] button, it will show us a popup that displays mentioned expenditure information, like seen in the image below.